11.6. Institutions
Administration menu → Institutions
Vous pouvez utiliser Mahara en tant qu’instance multi-locataires. Cela signifie que plusieurs institutions différentes peuvent partager une installation de Mahara. Tous les titulaires de comptes de ces différentes institutions peuvent le faire :
share portfolios with each other
give feedback on each other’s evidence and pages
travailler collaborativement dans des groupes, à travers plusieurs institutions
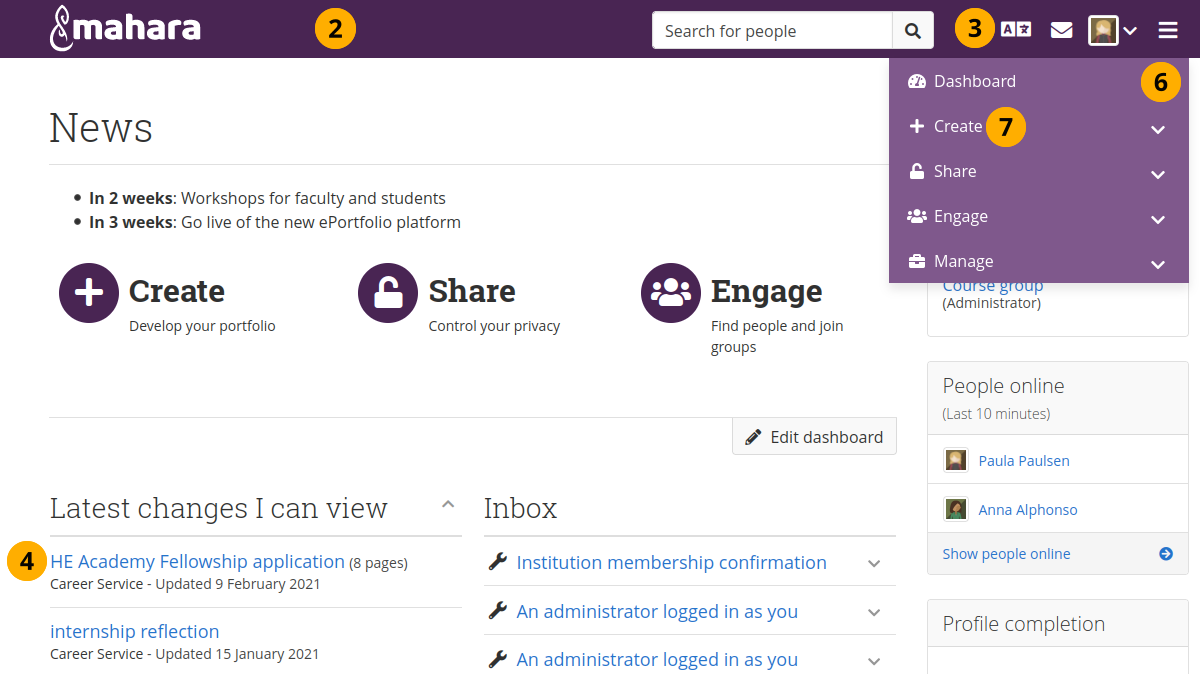
In Administration menu → Institutions → Settings you can set up as many institutions as you wish. Institution administrators can only administer their members and their institutions but not make any changes to site settings.
Institutions don’t need to be separate organisations. You can set up Mahara institutions for different parts of your organisation to use different themes, have different default settings, or authentication methods.
Note
Even if you use Mahara with one organisation only and do not want to distinguish different departments within your organisation, we recommend you set up at least one institution and not use “No institution”. By setting up that institution, you will have two more roles available: institution staff and institution administrator.
You can create institution administrator accounts, which are less powerful than site administrator accounts. By having institution administrators, you can allow them to take care of account and group creation etc. without giving them full powers over the site preventing that too many people can make site changes.
11.6.1. Aperçu
Menu Administration → Institutions → Paramètres
As site administrator, you see an overview of all institutions that exist on your Mahara instance. Institution administrators only see the institution(s) for which they are an administrator.
Note
Les administrateurs d’institution qui ne gèrent qu’une seule institution ne voient pas cette page et sont immédiatement conduits vers la page de configuration pour leur institution.
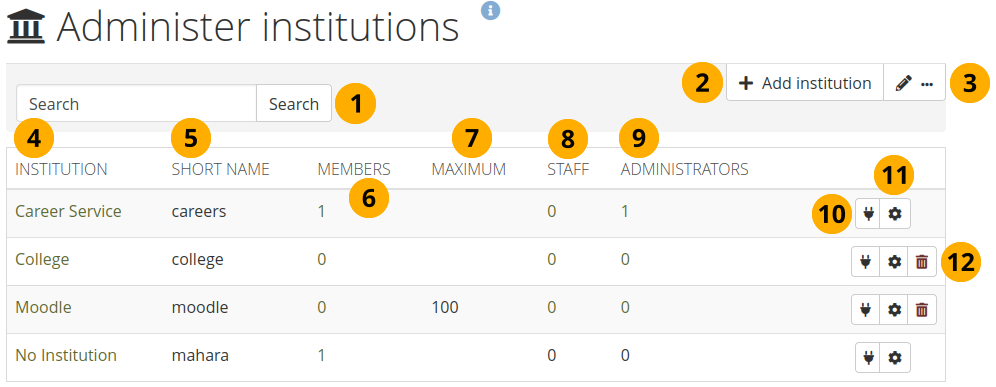
Page d’accès global pour les institutions
Rechercher : Rechercher une institution particulière parmi celles qui existent en donnant son nom et en cliquant sur le bouton Rechercher.
Cliquez sur le bouton Ajouter institution pour créer une nouvelle institution. Ce bouton n’est visible qu’aux administrateurs du site.
Click the Edit with three dots button to edit institution members, staff, and administrators.
Institution : Les institutions sont listées de manière alphabétique. Si vous cliquez sur le nom d’une institution, vous êtes envoyé sur la page des contacts.
Short name: The institution’s short name. If you set up an institution manually, it converts that name into a lower case shortname. If you create institutions automatically, e.g. via web services or SAML, it is generated based on parameters set out by the automatic process.
Membres : Le nombre des membres enregistrés dans cette institution.
Maximum: Maximum allowed members in this institution. If an institution has a maximum set, and it is reached, any potential new members will be rejected. The site and institution administrator receive a notification to take further steps.
Staff: Number of institution members with staff rights in this institution.
Administrateurs : Le nombre de membres de l’institution possédant les droits d’administrer l’institution.
Click the Manage connections button to change web services connections for this institution.
Note
You only see this button if at least one institution has web services connections configured via the “Connection manager”.
Click the Manage button to change institution settings.
Cliquez sur le bouton Supprimer pour supprimer une institution. Vous ne pouvez supprimer une institution que lorsqu’elle ne contient plus de membres.
Note
L’institution « Aucune institution » est l’institution par défaut. Il ne peut pas être supprimé car il s’agit du site standard de Mahara.
11.6.2. Ajouter une nouvelle institution
Note
Seuls les administrateurs du site peuvent ajouter des institutions. Toutefois, une fois que l’institution existe, les administrateurs de celle-ci peuvent modifier bon nombre de paramètres.
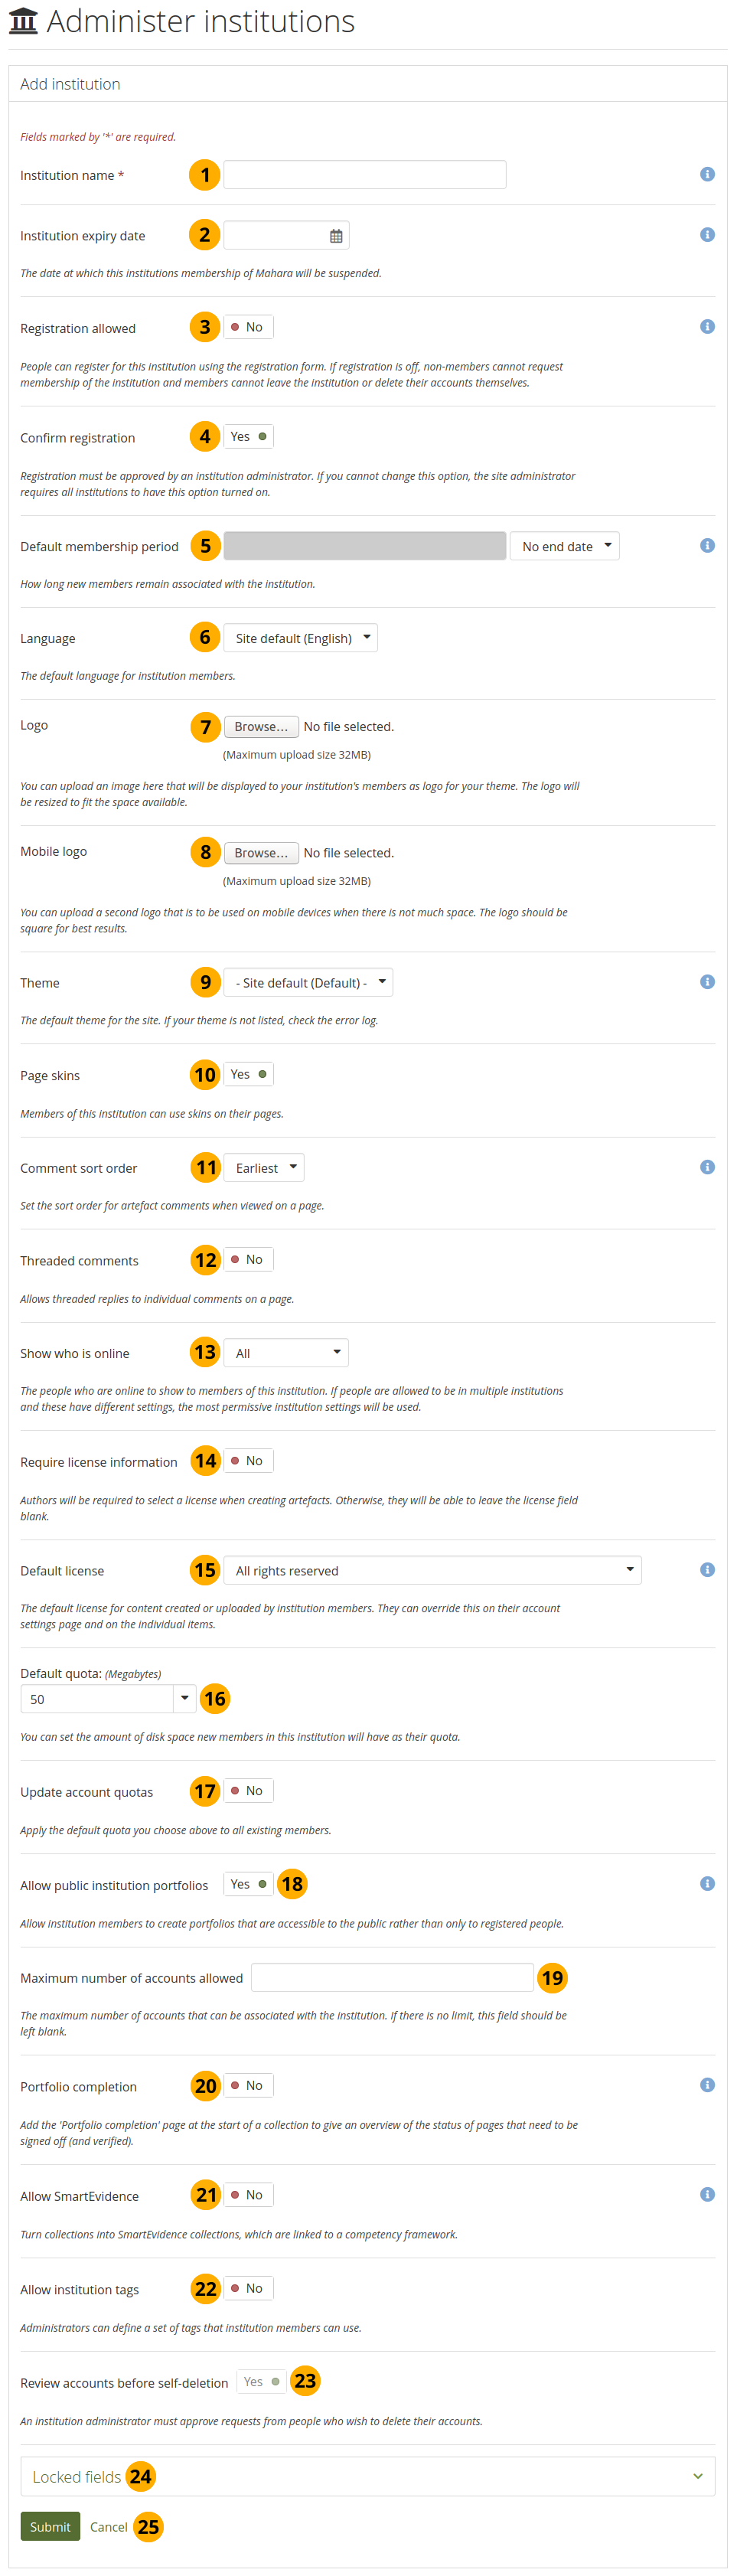
Lorsque vous souhaitez ajouter une institution en cliquant sur le bouton Ajouter une institution dans Menu Administration → Institutions → Paramètres, vous devez fournir quelques informations de base pour la nouvelle institution. Vous pourrez modifier tous les paramètres par la suite.
Ajouter une nouvelle institution
Nom de l’institution : Ce champ est obligatoire. Il s’agit du nom que tout le monde voit sur le site pour identifier cette institution.
Note
Un identifiant interne est généré automatiquement pour chaque institution. Il est affiché sur la page de paramétrage de l’institution, une fois que celle-ci a été sauvegardée la première fois.
This short name can contain letters and numbers and must be at minimum one character long. This is helpful when institutions are created automatically based on an IdP setup.

Date d’expiration de l’institution : Cliquez dans le champ pour sélectionner une date. Si vous laissez le champ vide, l’institution n’a pas de date d’expiration.
Si vous fixez une date d’échéance pour cette institution, lorsque le délai avant expiration est atteint, un message rappelant cette échéance est envoyé aux administrateurs du site et de l’institution.
Si l’option suspension automatique des institutions expirées est activée, une fois la date d’expiration atteinte, cette institution sera suspendue automatiquement, et les membres de cette institution ne pourront plus se connecter.
Le délai d’avertissement pour l’expiration de l’institution et les options de suspension automatique des institutions expirées se trouvent dans les paramètres de l’institution sous Menu Administration → Configurer le site → Options du site.
Enregistrement autorisé : Mettre le sélecteur sur « Oui » si vous souhaitez autoriser l’auto-inscription des personnes. En tant qu’administrateurs de l’institution, il vous sera demandé de confirmer que ces personnes peuvent rejoindre votre institution. Si vous refusez, leur nouveau compte sera associé à « Aucune institution », à moins que vous n’ayez activé l’option Confirmer l’inscription. Lorsque vous n’autorisez pas l’enregistrement, personne ne peut créer un nouveau compte, demander à rejoindre votre institution ou la quitter sans votre autorisation.
Confirmer l’enregistrement : Mettez le sélecteur sur « Oui » si vous voulez contrôler qu’aucun nouveau compte ne soit créé à moins que l’administrateur n’approuve l’enregistrement. Vous recevez une notification sur les inscriptions en attente lorsqu’une nouvelle personne veut s’inscrire. Si l’administrateur du site exige que toutes les institutions confirment l’enregistrement, vous ne pouvez pas changer ce paramètre en mettant le sélecteur sur « Non »
Note
L’activation de ce paramètre est recommandée pour la plupart des sites qui autorisent l’auto-inscription, afin d’empêcher les spammeurs de créer des comptes et d’utiliser le site à mauvais escient.
Lorsque l’inscription doit être confirmée, les personnes qui tentent de s’inscrire auprès d’une institution doivent fournir une raison.
Période d’adhésion par défaut : Vous pouvez définir la durée pendant laquelle les membres resteront associés à cette institution par défaut. Choisissez une option dans le menu déroulant, puis indiquez le nombre de jours, de semaines, de mois ou d’années. Après cette durée, les membres seront retirés de l’institution. Avant cette période, les personnes recevront une notification leur rappelant qu’elles seront bientôt supprimées. Toutefois, cela ne signifie pas qu’ils perdront leur compte. Ils l’auront toujours et seront associés à « Aucune institution ».
Langue : Choisissez la langue dans le menu déroulant que vous souhaitez que les membres de votre institution utilisent par défaut.
Note
Il s’agit d’un paramètre par défaut. Les membres de votre institution peuvent choisir leur propre langue dans leur paramètre de compte.
Logo : Vous pouvez téléverser une image qui sera affichée aux membres de votre institution à la place du logo standard.
Logo mobile : Téléversez une version carrée de votre logo qui s’affiche sur les petits appareils.
Note
Vous pouvez également télécharger un logo mobile dans votre thème si vous préférez l’ajouter là plutôt que de le télécharger dans les paramètres de l’institution. Le thème « Raw » possède un logo mobile qui est également utilisé dans les autres thèmes, à moins que vous ne téléchargiez le vôtre. Assurez-vous qu’il s’agit d’un logo carré pour obtenir de meilleurs résultats.
Theme: Use the drop-down menu to choose the theme that you wish to use for this institution. All pages in that institution will receive that theme. When members from other institutions view portfolio pages that were created in this institution, they will see this institution’s theme on these pages. If Site default is selected, when a site administrator changes the site default theme, the theme for the members of this institution will change, too. You can install more themes in the theme folder on the server. Check out the community-contributed themes. If authors are allowed to have page themes, these pages are not affected by theme changes. Mahara also has a configurable theme which allows you to create a theme on the fly.
Page skins: Switch to “Yes” if you want your institution members to use page skins.
Note
Cette option n’est disponible que si l’administrateur du serveur a activé permettre les habillages pour le site.
Ordre de tri des commentaires : Choisissez l’ordre d’affichage des commentaires sur les productions lorsqu’ils sont affichés sur la page. Vous pouvez choisir entre :
Plus anciens : Trie les commentaires dans l’ordre chronologique et mettant les commentaires les plus anciens en tête et les plus récents en fin de liste.
Plus récents : Trie les commentaires dans l’ordre chronologique inverse et mettant les commentaires les plus récents en tête et les plus anciens en fin de liste.
Threaded comments: Display comments on a page in a threaded manner so you can see, which comment is a reply to which previous comment.
Show who is online: If the site administrator allowed the “Show who is online” side block, you can decide which group of people you want to have displayed for this institution:
Aucun : Le bloc n’est pas affiché aux membres de l’institution.
L’institution seulement : Seuls les membres de l’institution sont affichés dans le bloc.
All: Everyone on the site are displayed in the side block. This option is only available if “Isolated institutions” is not turned on.
Require license information: Switch to “Yes” if your institution members need to choose a license for each artefact they upload or create. They can set a default license in their account settings. You only see this option if the site administrator turned on License metadata in the site settings.
Default license: You can choose a default license for your institution members” content. They can overwrite this default license in their account settings. You only see this option if the site administrator turned on License metadata in the site settings. If the site administrator allowed custom licenses, you can enter one using the drop-down menu option “Other license (enter URL)”. This license can then also be used by your institution members.
Note
Si vous ne savez pas quelle licence utiliser, veuillez consulter l’avocat ou le juriste de votre organisation.
Default quota: You can set the amount of file quota new members registering with this institution shall have.
Update account quotas: Switch to “Yes” if you want to apply the default quota you choose above to all existing institution members.
Allow public institution portfolios: Switch to “Yes” if you want to allow members belonging to this institution to create portfolio pages and collections that are accessible to the public rather than only to registered people. If you allow public pages, members can also create secret URLs for their pages. Otherwise they cannot.
Maximum number of accounts allowed: Specify the maximum number of accounts that can be created in this institution. If you leave this field blank, there is no limit to the number of accounts.
Note
When the maximum number of accounts has been reached and another person tries to register for the institution, the site administrator as well as the institution administrator for that institution receive a notification. That allows them to take further steps.
 Portfolio completion: Allow portfolio authors to add the “Portfolio completion” progress page to the start of their collection.
Allow SmartEvidence: Activate SmartEvidence if you want your institution members to work with it.
Allow institution tags: If set to “Yes”, you can set up tags for the members of your institution to use in their portfolios.
Note
Lorsqu’il est activé, le nouvel élément de menu Mots-clés apparaît dans le sous-menu de l’institution.
Review accounts before self-deletion: If set to “Yes”, an institution administrator needs to approve or deny the deletion of an account when the deletion is initiated by the account holder.
Note
Cette option permet aux institutions proposant de la formation formelle d’éviter que les comptes d’utilisateurs soient supprimés avant que ceux-ci devaient être évalués.
If the field is set to “Yes” and greyed out, the site administrator requires the confirmation for all institutions on the site.
Locked fields: Switch any value to “Yes” if you don’t want to allow changes to it by members. Disabled switches are for profile fields which are locked in the institution settings for “No institution”. These profile fields are locked at the site level and cannot be unlocked for individual institutions.
Note
Locking profile fields such as first name, last name and display name can be beneficial for institutions that wish to always identify their members by their real names and not allow them to choose nicknames.
Cliquez sur le bouton Envoyer pour enregistrer vos modifications et créer cette institution, ou cliquez sur le bouton Annuler pour annuler la création.
11.6.2.1. Modifier le logo de l’institution
Vous pouvez téléverser un logo dans chaque thème pour remplacer le logo standard qui vient avec ceux-ci. Si vous utilisez un logo de grandes dimensions, il sera coupé ou mis à l’échelle pour épouser la taille disponible dans le thème. Pour obtenir de meilleurs résultats, utilisez un logo de 90px de haut afin d’optimiser son affichage sur les écran Retina.
Ajouter un logo
Logo : Téléversez le logo que vous désirez afficher dans le haut des pages de votre institution et cliquez sur bouton Envoyer au bas de la page.
Une fois que vos modifications ont été enregistrées, le logo apparaît à la place du logo standard et il en est de même dans la page des réglages de cette institution.
Note
Si vous êtes un administrateur du site mais pas membre de l’institution pour laquelle vous modifiez le logo, vous devrez vous reconnecter en tant membre de l’institution pour voir les modifications que vous avez faites.
Delete logo: If you want to revert back to the standard logo, switch to “Yes” and click the Submit button at the bottom of the page.
Logo pour mobile : Téléversez un logo carré et cliquez sur le bouton Envoyer en bas de la page. Ce logo est utilisé pour les petits appareils lorsque le logo ordinaire prendrait trop de place sur l’écran.
Note
Le logo doit avoir des dimensions carrées.
Une fois que vos modifications ont été enregistrées, le logo apparaît à la place du logo standard et il en est de même dans la page des réglages de cette institution.
Delete mobile logo: If you want to delete this logo, switch to “Yes” and click the Submit button at the bottom of the page.
Note
Il existe un logo spécial qui peut être repris par Facebook et d’autres sites de médias sociaux afin de ne pas afficher une image aléatoire du site. Ce logo doit être placé dans le dossier du thème. Le thème Raw de Mahara possède le logo Mahara, mais il pourrait être changé pour un autre dans un autre thème. Pour plus d’informations, voir le message sur le tracker.
11.6.2.2. Utiliser le thème configurable
Si vous ne désirez pas utiliser les thèmes standards de Mahara ou l’un des thèmes proposés par des contributeurs externes, vous pouvez soit créer votre propre thème, ou utiliser le thème paramétrable de Mahara en utilisant votre logo.
Si vous ne téléversez pas de logo personnalisé et utilisez plutôt le logo Mahara avec le thème configurable, il change de couleur en fonction de l’arrière-plan du thème afin d’être toujours lisible.
Note
The configurable theme is only a display theme. That means that members of the institution in which it is in use see the theme applied to the site and their pages. However, when members from another institution browse the portfolio pages of members from this institution, they do not see the configurable theme, but their own theme.
You can change the configurable theme on the institution settings page.

Paramétrage des couleurs pour le thème configurable
Pour modifier l’une des couleurs, il faut soit fournir le code de couleur hexadécimal, soit choisir la couleur dans le sélecteur de couleurs qui devient disponible dès que vous cliquez dans l’un des champs de couleur.
Thème : Sélectionnez le thème « Thème configurable » dans le menu déroulant, pour faire apparaître les options de « Personnalisation du thème ».
Fond de l’en-tête : La couleur de fond de l’en-tête.
Text on header background: The colour of text in the header. It is also used as the navigation menu icon colour in the header.
Liens : La couleur des liens sur les pages et dans les barres en marge des pages.
Headings: The heading colour for all headings except in the sidebar. This is currently not used.
Arrière-plan du menu de navigation : La couleur de fond du menu déroulant de navigation.
Texte du menu de navigation : La couleur du texte/des liens dans le menu de navigation.
Reset colours: Switch to “Yes” if you want to go back to the original colours of the configurable theme.
Cliquez sur le bouton Envoyer pour valider les modifications que vous avez effectuées sur cette page.
Note
Si vous ne voyez pas vos modifications se répercuter sur l’affichage de vos pages, vous devez penser à supprimer le contenu de vos différents caches (dans l’ordre : celui de votre navigateur, de votre serveur proxy, de votre serveur web).
Exemple du thème configurable
Les numéros ci-dessous se réfèrent aux options du thème configurable ci-dessus.
11.6.3. Modifier l’institution du site
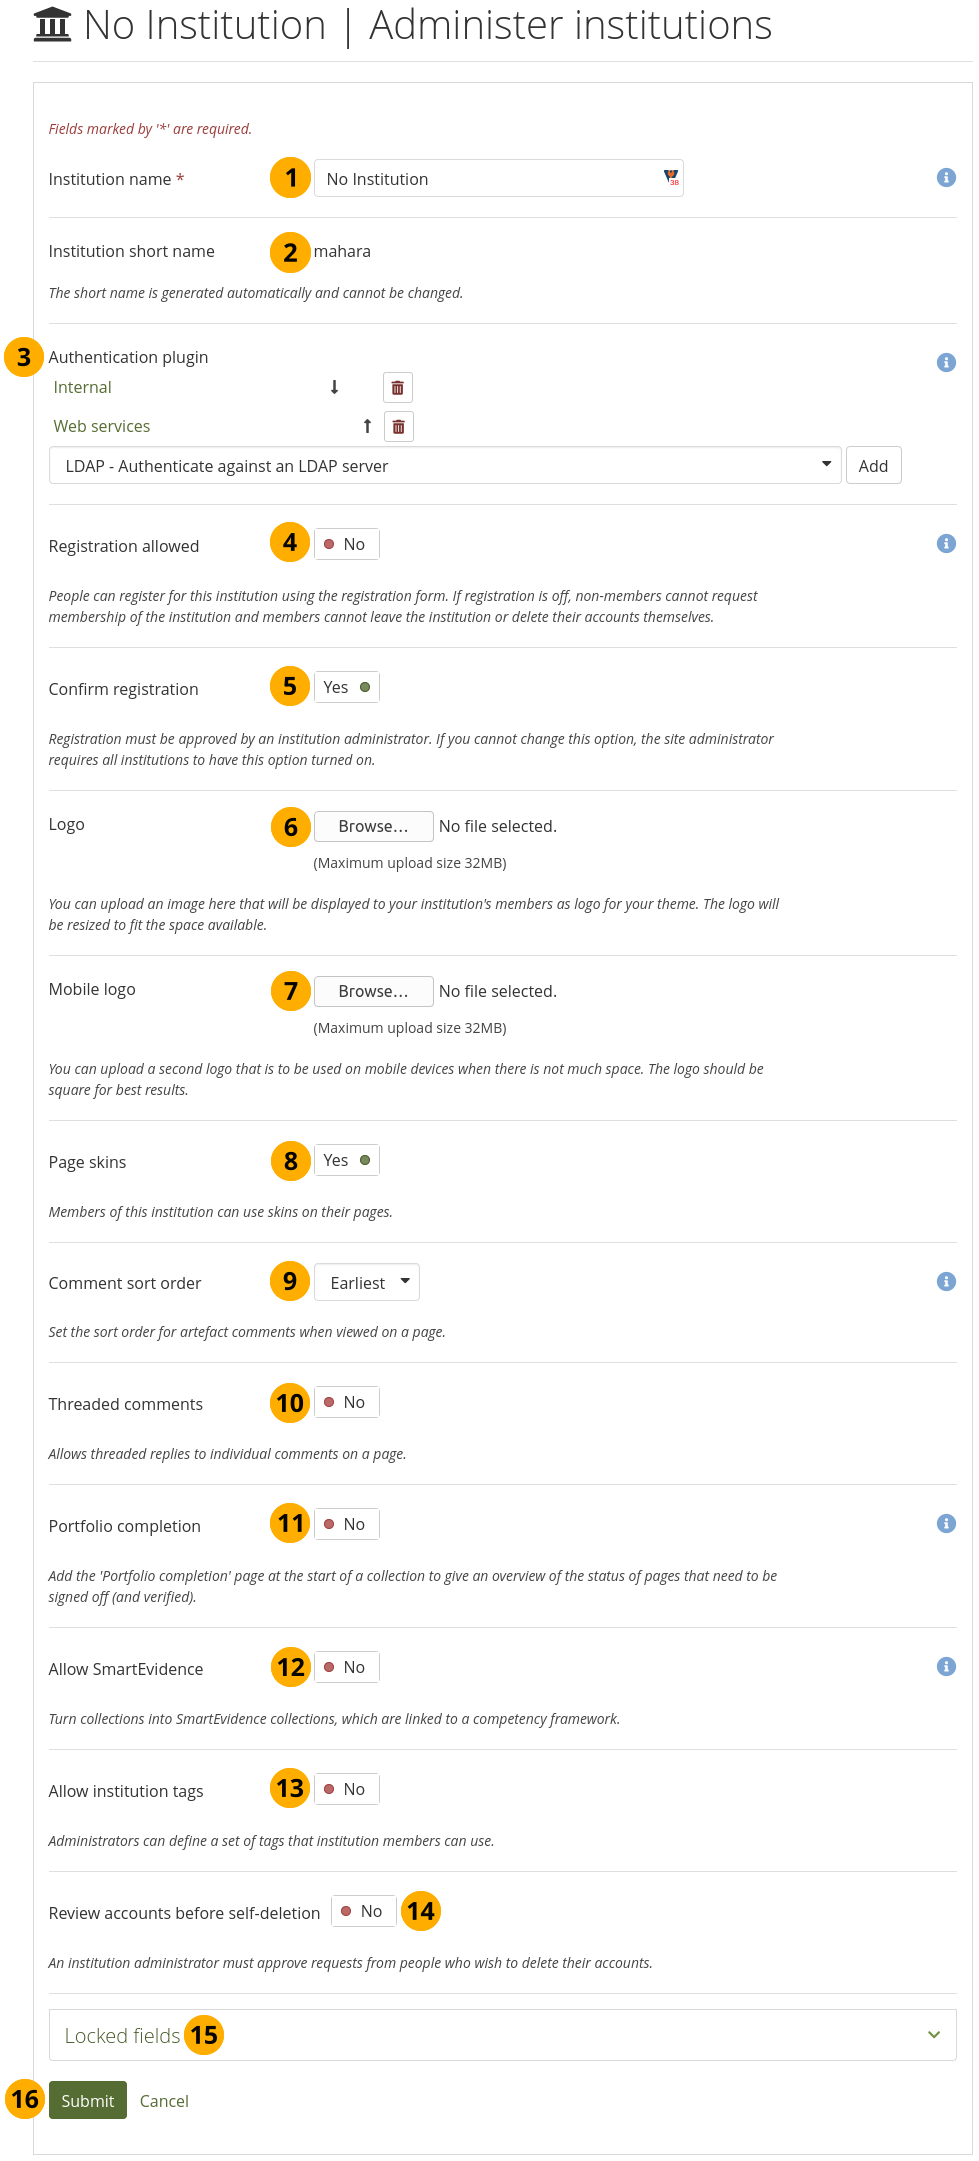
Your Mahara site itself is listed as institution under Administration menu → Institutions → Settings. Per default, it has the name “No institution” and you can change certain settings that are applied to the site.
Note
La plupart des paramètres du site sont définis dans Menu Administration → Configuration du site → Options du site.
Edit the “No institution” site institution
Nom de l’institution : Ce champ est obligatoire. Il s’agit du nom que les personnes voient lorsque l’inscription est autorisée pour le site sans avoir à s’inscrire pour une institution particulière.
Institution short name: This name is generated automatically and set to “mahara”.
Authentication plugin: You can decide which authentication methods you want to allow. See “Edit an institution” for more information.
Registration allowed: Switch this option to “Yes” if you want to allow people to register on your site without registering for a particular institution. If you switch this setting on but not the setting Confirm registration, new accounts do not need approval.
Note
Be careful disabling Confirm registration. Spammers can misuse your site and create accounts without your knowledge.
Confirm registration: Switch this option to “Yes” if you want to control that no new accounts are created unless the site administrator approves the registration. You receive a notification about pending registrations when a new person wants to register.
Note
If the site administrator decides that every manually created account, no matter the institution, needs confirmation, they will switch the “Confirm registration” setting to “Yes” in the “Site settings” in Administration menu → Configure site → Site options → Site settings.
Logo: Replace the standard site logo without having to place it in the theme folder on the server. Upload an image that will be displayed to everyone who is not in an institution and who is not logged into the site.
Logo mobile : Téléversez une version carrée de votre logo qui s’affiche sur les petits appareils.
Page skins: Switch this option to “Yes” if you want people who are not in a particular institution to use page skins.
Note
Cette option n’est disponible que si l’administrateur du serveur a activé permettre les habillages pour le site.
Ordre de tri des commentaires : Choisissez l’ordre de tri pour les commentaires placés pour chaque production. Vous pouvez choisir entre :
Plus anciens : Trie les commentaires dans l’ordre chronologique et mettant les commentaires les plus anciens en tête et les plus récents en fin de liste.
Plus récents : Trie les commentaires dans l’ordre chronologique inverse et mettant les commentaires les plus récents en tête et les plus anciens en fin de liste.
Threaded comments: Display comments on a page in a threaded manner so you can see, which comment is a reply to which previous comment.
- Portfolio completion: Allow portfolio authors to add the “Portfolio completion” progress page to the start of their collection.
Allow SmartEvidence: Activate SmartEvidence if you want your institution members to work with it.
Allow institution tags: If set to “Yes”, you can set up tags for the members of your institution to use in their portfolios.
Note
Lorsqu’il est activé, le nouvel élément de menu Mots-clés apparaît dans le sous-menu de l’institution.
Review accounts before self-deletion: If set to “Yes”, the site administrator needs to approve or deny the deletion of an account that is not in associated with an institution when the deletion is initiated by the account holder.
Locked fields: Switch any value to “Yes” if you don’t want account holders to make changes. Any field that you enable here is locked from editing in institutions.
Note
Locking profile fields such as first name, last name, and display name can be beneficial for institutions that wish to always identify their members by their real names and not allow members to choose nicknames.
Cliquez sur le bouton Envoyer pour valider vos modifications, ou cliquez sur Annuler pour quitter la page sans modifications.
11.6.4. Modifier une institution
Administration menu → Institutions → Settings → Click the Manage button next to an institution
Once you have created your institution, you can edit its settings, suspend, or delete the institution. You will have to choose at least one authentication method for this institution so that accounts can be created.
Note
Seuls les administrateurs du site peuvent ajouter, modifier, ou supprimer une méthode d’authentification pour une institution. Une institution ne peut pas être supprimée si des membres y sont toujours inscrits.
You should set up at least one authentication method. Otherwise, nobody can log in to this institution. You can add multiple authentication methods to your institution to account for different members and how they are allowed to authenticate. That means for example for a university:
les étudiants de la faculté se connectent via leur mot de passe et leur nom d’utilisateur octroyés par celle-ci et peuvent-être gérés dans un système LDAP ou Active Directory (Athentification LDAP), ou par l’intermédiaire d’une autre plateforme SAML (Authentification SAML).
les édudiants pourraient aussi être connectés à Mahara en passant par la plateforme Moodle, comme connexion secondaire possible en plus du LDAP ou du SSO (Authentification XML-RPC / MNet.
les alumni voient ensuite leur connexion MNet / LDAP changée en une authentification interne, dès qu’ils quittent l’université.
les superviseurs ou examinateurs externes, qui n’ont pas de compte dans l’université, accèdent à la plateforme via une authentification interne. Ils reçoivent des informations de connexion, mais l’université n’a pas à fournir des codes qui pourraient leur donner accès à d’autres ressources internes.
All these then still log in to the same Mahara institution. Alternatively, you could also separate the accounts into their own institutions on your Mahara installation if that is more appropriate for your use case. This could mean for the above example:
Faculty and students log in and are automatically placed into the institution “University”. They see the standard university theme.
Alumni are placed into the institution “Alumni” for easier account management as you could have the alumni coordinator manage these. Having them in a separate institution on Mahara would allow you to see who an alumni is. Additionally, they could receive a slightly different university theme that is geared towards alumni, and they can also receive different messages on their dashboard.
External assessors who are placed into the separate institution “Assessors” could be managed by an administrator who is the liaison for them without giving that administrator access to the account management of all other university members. They can receive the standard university theme, but receive different messages on their dashboard.
Avant d’utiliser une méthode d’authentification IMAP, LDAP, SAML ou XML-RPC, vous devez installer les extensions nécessaires sur votre serveur.
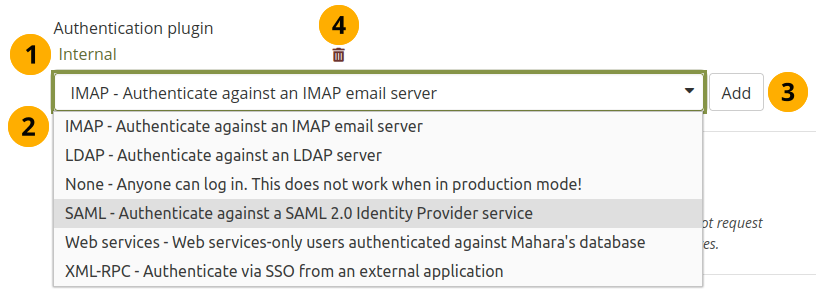
Plug-ins utilisables dans l’institution pour l’authentification
Une fois votre institution créée, les paramètres incluent alors une nouvelle option, Plug-in d’authentification. Vous voyez alors toutes les méthodes d’authentification qui ont déjà été paramétrées pour cette institution.
Note
Every institution receives the authentication method “Internal” automatically. Once another authentication method has been enabled, it can be removed if you do not wish anybody from that institution to have that authentication method.
A l’aide du menu déroulant, vous pouvez ajouter une nouvelle méthode d’authentification pour laquelle le plug-in a été installé préalablement dans Mahara. De manière standard, les plug-ins sont :
IMAP: Accounts are authenticated against an IMAP server. This is rarely used.
Internal: Accounts are created in Mahara. This is the default authentication method for a new institution.
LDAP: Accounts are authenticated against an LDAP server or Active Directory server.
None: Anyone can log in by picking a username and password.
Avertissement
This should only be used for testing but not on a live site as you can’t control who can receive an account.
SAML: A SAML 2.0 Identity Provider Service is needed that has the accounts.
XML-RPC : Cette méthode d’authentification est utilisée conjointement avec les services MNET de Moodle, ou d’un autre serveur Mahara.
Cliquez sur le bouton Ajouter pour accéder aux paramétrages de la méthode d’authentification avant qu’elle soit ajoutée à votre liste.
Click the Delete icon to remove an authentication method from an institution. You can only do so when nobody is associated with that authentication method any more.
11.6.4.1. Authentification par IMAP
You can use this authentication method to receive the login information for your accounts from your IMAP server.
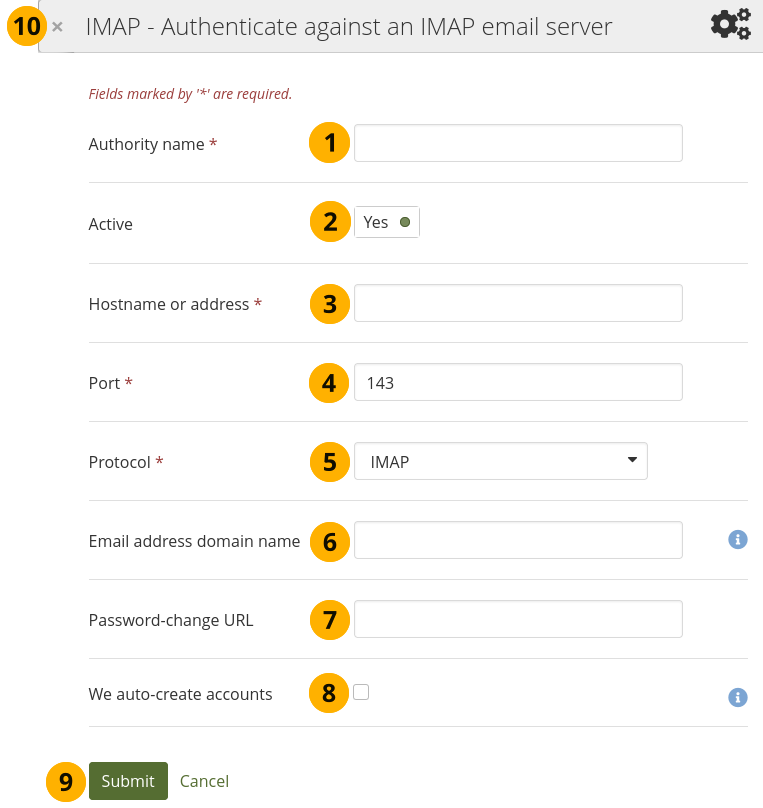
Configurer l’authentification par IMAP
Nom de l’autorité : Entrez un nom clair qui vous aidera à identifier cette méthode d’authentification. Préférez un nom court. Cette rubrique est obligatoire.
Nom d’hôte ou adresse : Indiquez l’adresse URL ou le nom d’hôte. Cette rubrique doit être saisie.
Port number: Specify the port number under which your IMAP server can be reached. The default is 143. This field is required.
Protocol: Select the protocol of your IAMP server by selecting it from the drop-down menu. This setting is required:
IMAP
IMAP / SSL
IMAP / SSL (certificat autosigné)
IMAP / TLS
Email address domain name: Enter an email domain that shall be the only one you accept. This is useful in particular when you use a shared service like Gmail or Outlook.com.
Password-change URL: If your account holders can only change their password in one central space, provide the URL here.
We auto-create accounts: Select this option if people can provide their email address details and receive an account automatically.
Click the Submit button to enable this authentication method, or click Cancel to abort your changes.
Click the Close icon in the top left-hand corner of the modal window to close it without making any changes.
11.6.4.2. Authentification par un serveur LDAP
Utilisez cette méthode d’authentification si vous utilisez un serveur LDAP / Active Directory.
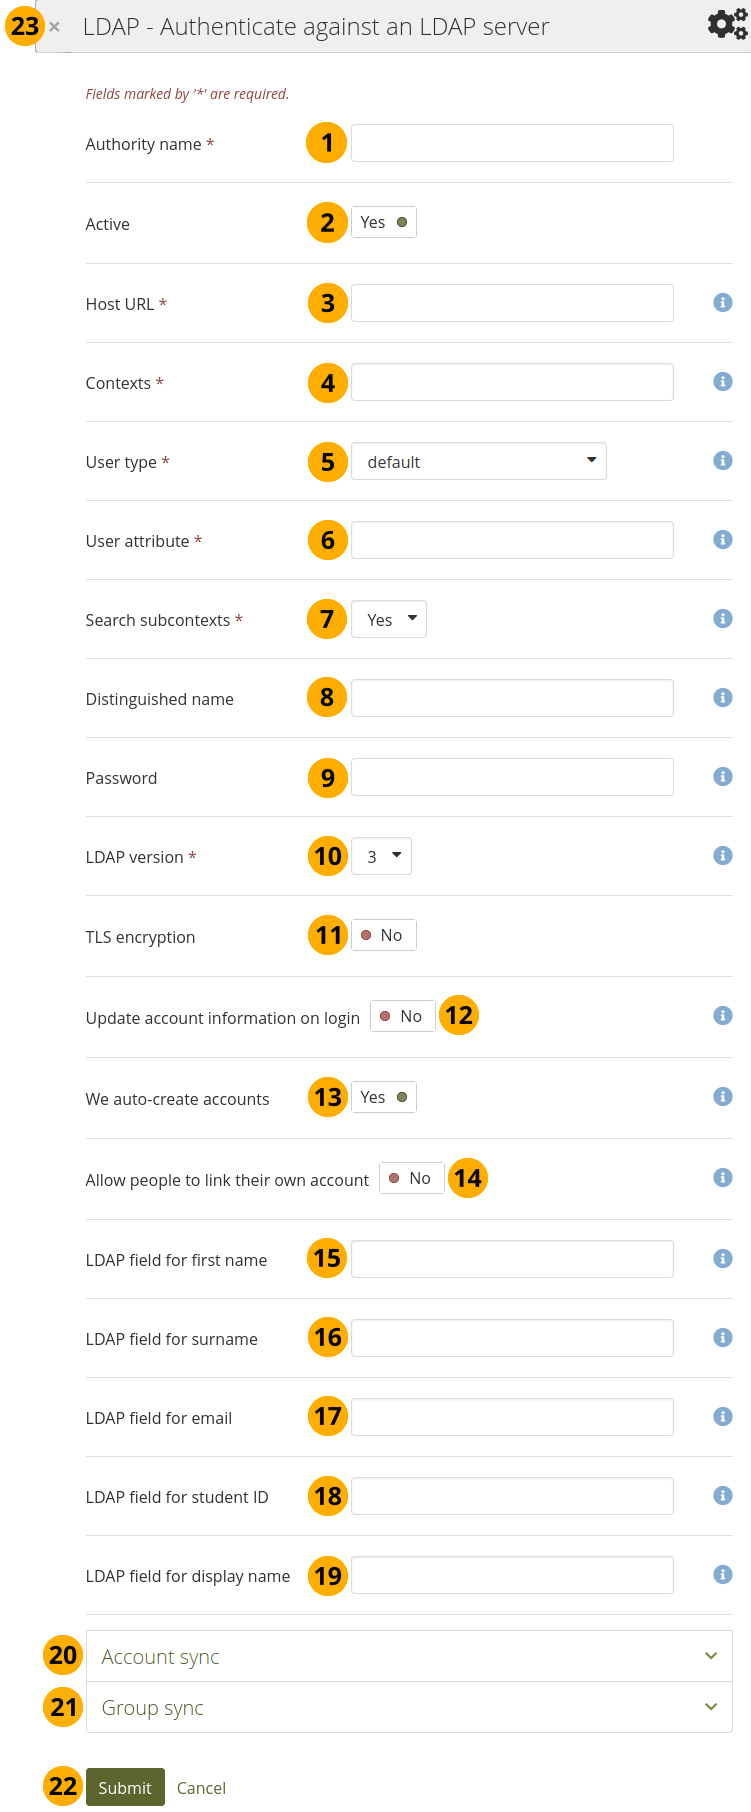
Configurer l’authentification par LDAP
Nom de l’autorité : Entrez un nom clair qui vous aidera à identifier cette méthode d’authentification. Préférez un nom court. Cette rubrique est obligatoire.
Active: Switch to “Yes” if you want to use this authentication method. If you switch to “No”, you can disable it (temporarily) without deleting it.
Host URL: Specify hosts in URL form, e.g.
ldap://ldap.example.com. Separate multiple servers with ; for failover support. This field is required.Contexts: List the contexts where accounts are located. Separate different contexts with ;, e.g.
ou=users,o=org;ou=other,o=org. This field is required.User type: Select from the drop-down menu how accounts are stored in the LDAP directory. This field is required. You can choose between:
Novell Edirectory
posixAccount (rfc2307)
posixAccount (rfc2307bis)
sambaSamAccount (v. 3.0.7)
MS Active Directory
par défaut
User attribute: Enter the attribute used to search for accounts. It is often
cn. This field is required.Search subcontexts: Select “Yes” if you want to search for the accounts also in subcontexts. This setting is required.
Distinguished name: If you want to use bind-user to search accounts, specify it here. It should look something like
cn=ldapuser,ou=public,o=org. Leave this blank for anonymous bind.Password: Enter the password for the “distinguished name”.
Version LDAP : Sélectionnez dans le menu déroulant la version de votre serveur LDAP. Cette information est requise.
TLS encryption: Switch to “Yes” if you use this encryption mechanism.
Update account info on login: Switch to “Yes” if you want to have the first name, last name and email address updated with the corresponding LDAP values at each login. Enabling this option may prevent some MS ActiveDirectory sites / accounts from subsequent Mahara logins.
We auto-create accounts: Switch to “Yes” if you want Mahara to create accounts automatically when a person authenticates successfully but does not yet have an account.
Allow people to link their own account: Switch to “Yes” if you want to allow people who have an account on internal authentication method to link it to their LDAP credentials.
LDAP field for first name: Enter the name of the field in the LDAP record that contains the person’s first name.
LDAP field for surname: Enter the name of the field in the LDAP record that contains the person’s last name.
LDAP field for email: Enter the name of the field in the LDAP record that contains the person’s email address.
LDAP field for student ID: Enter the name of the field in the LDAP record that contains the person’s student ID.
LDAP field for display name: Enter the name of the field in the LDAP record that contains the person’s display name.
Account sync: Decide whether you wish to synchronize your accounts via a cron job and make additional settings.
Synchronisation des groupes : Choisissez si vous désirez voir créés automatiquement les groupes dans Mahara, pour chaque utilisateur, en se basant sur les données contenues dans la base de données LDAP.
Cliquez sur le bouton Envoyer pour activer la méthode d’authentification ou cliquez sur Annuler pour quitter la page sans modification.
Click the Close icon in the top left-hand corner of the modal window to close it without making any changes.
11.6.4.2.1. LDAP account sync
You can set up your LDAP authentication so that account creation can be automated. Account deletion should be considered carefully.
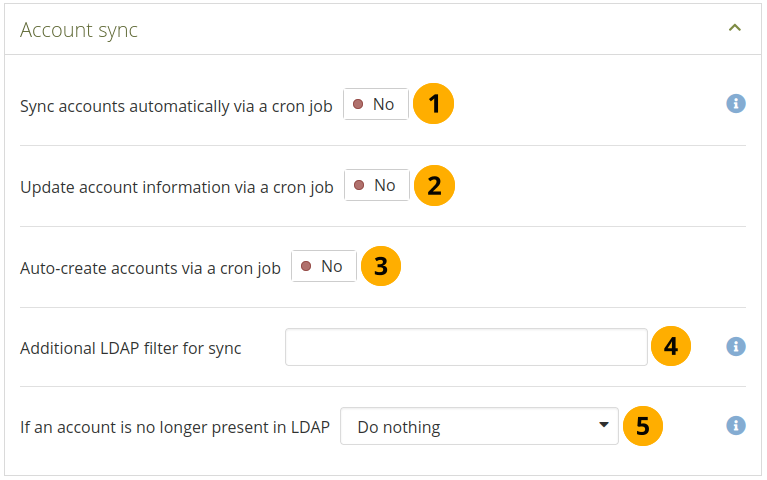
Configure the LDAP account sync
Sync accounts automatically via a cron job: Enable this setting to activate a task in the cron which will automatically create and/or update accounts based on records in the LDAP server.
Note
By default, this cron task runs once a day at midnight (server time). Edit the record in the “auth_cron” table or use the optional command-line script supplied at
htdocs/auth/ldap/cli/sync_users.phpif you want to schedule it to run at other times or with other settings.Ce paramètre n’aura aucun effet si le cron n’est pas en cours d’exécution. Consultez le guide d’installation pour savoir comment le configurer.
Update account information via a cron job: Switch to “Yes” if you to have account information updated via the cron if they changed in the LDAP record.
Auto-create accounts via a cron job: Switch to “Yes” if you want new accounts in your LDAP directory to get an account automatically.
Additional LDAP filter for sync: Provide an LDAP filter here, and the sync will only see accounts in LDAP who match that filter. Example:
Example: uid=user*.Avertissement
Use this setting with caution if you have auto-suspend or auto-delete enabled, as doing so will cause all accounts in your institution which do not match the filter to be suspended or deleted.
If an account is no longer present in LDAP: Choose from the drop-down menu what you want to do if accounts are no longer in your LDAP directory:
Do nothing: People keep their account. This is the recommended setting.
Suspend account: The account will be suspended. The account holder will no longer be able to log in, and their content and pages will not be viewable. However, none of their data will be deleted, and the account can be un-suspended by the cron when their LDAP record reappears, or manually by an administrator. Alternatively, their authentication method could be changed to the Mahara internal.
Delete account and all content: The account will be deleted, along with all their content and pages.
Avertissement
The automatic deletion of accounts is not recommended. The data is fully deleted from the server when an account is deleted. The account can only be restored from a backup. Some information such as friend relationships and group membership cannot be restored.
Click the Submit button to enable this authentication method, or click Cancel to abort your changes.
11.6.4.2.2. Synchronisation des groupes par LDAP
Vous pouvez configurer votre authentification LDAP afin de créer automatiquement les groupes. La suppression automatique des groupes doit toute fois être utilisée avec prudence.
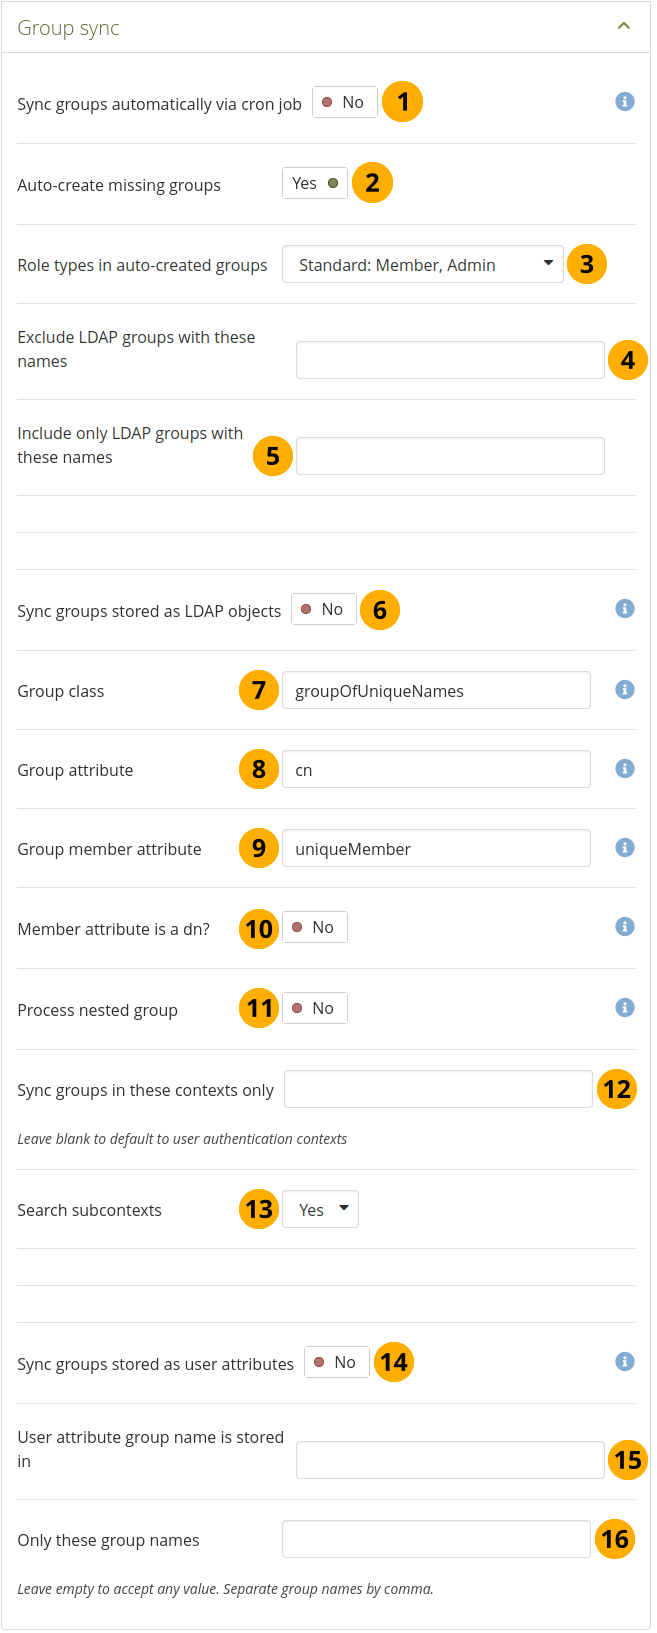
Configurer la synchronisation des groupes par LDAP
Synchroniser les groupes automatiquement par le script cron : Activez cette option pour ajouter une tâche au script cron, que vous avez créé lors de l’installation de Mahara, qui permet de créer et/ou mettre à jour les groupes et l’appartenance des utilisateurs aux différents groupes, en fonction des données présentes sur le serveur LDAP.
Note
By default, this cron task will execute once daily at midnight (server time). Edit the record in the “auth_cron” table or use the optional command-line scripts supplied in
htdocs/auth/ldap/cli/if you wish to schedule it to run at other times or with other settings.Note: You will also need to activate the “Sync groups stored as LDAP objects” and / or “Sync groups stored as user attributes” settings in order for groups to be synced.
Les membres peuvent être ajoutés ou retirés des groupes par cette option. Si un groupe n’est plus présent dans le serveur LDAP, tous ses membres seront retirés de ce groupe.
Ce paramètre n’aura aucun effet si le cron n’est pas en cours d’exécution. Consultez le guide d’installation pour savoir comment le configurer.
Auto-create missing groups: Switch to “Yes” if you want to have new groups in your LDAP directory created automatically in Mahara.
Role types in auto-created groups: Decide which roles members can have in auto-created groups.
Cours : Membres, tuteurs et administrateurs
Standard : Membres et administrateurs
Exclure les groupes LDAP portant ces noms : Si vous désirez que les groupes soient créés automatiquement, mais que cela ne soit pas le cas pour certains groupes, vous pouvez les exclure de la procédure. Entrez simplement le nom de ces groupes ici.
N’inclure que les groupes LDAP ayant ces noms : Si vous voulez restreindre la création/mise à jour à certains groupes, indiquez leur nom ici.
Sync groups stored as LDAP objects: Switch to “Yes” if your groups are stored as standalone records in LDAP. Example:
dn: cn=languagestudents,ou=groups,dc=mahara,dc=orgobjectClass: groupOfUniqueNamescn: languagestudentsuniqueMember: uid=user1,dc=mahara,dc=orguniqueMember: uid=user2,dc=mahara,dc=orguniqueMember: cn=frenchclass,ou=groups,dc=mahara,dc=orgClasse du groupe : Entrez ici la valeur pour la variable objectclass dans laquelle on s’attend à trouver les groupes.
Attribut pour le groupe : Entrez ici l’attribut du serveur LDAP qui contient le nom du groupe. Souvent il s’agit de
cn.Attribut pour les membres du groupe : Entrez ici l’attribut du serveur LDAP qui contient l’identifiant des membres du groupe. Souvent il s’agit de ùniqueMember`.
Member attribute is a dn? Switch to “Yes” if each entry in the “Group member attribute” field is a “distinguished name”. Disable this setting if each entry in “Group member attribute” field is a username only.
Process nested group: Switch to “Yes” if your groups can contain other groups as members. If enabled, the sync process will recursively include the members of these nested groups into the parent group.
Note
Le processus est capable de détecter des problèmes de références circulaires, et si cela arrive il s’arrête de manière sûre.
Synchroniser les groupes de ce contexte seulement : Listez ici les contextes LDAP où les groupes sont définis. Séparez les différents contextes par des points-virgules
;. Par exemple :ou=groups,o=org;ou=other,o=org.Note
If this field is left empty, the group sync cron will fall back to using the same list of contexts as the “Contexts” setting for where accounts are located.
Search subcontexts: Change to “Yes” if subcontexts should be included in the synchronisation.
Sync groups stored as user attributes: Switch to “Yes” if each LDAP account record has an attribute which indicates a group the account should be in. This setting will cause the LDAP sync cron to create a group for each unique value in the specified user attribute (or in those listed in the “Acceptable group names” field), and place each person in the appropriate group (or groups, if they have multiple values for the attribute).
Utiliser l’attribut du nom du groupe stocké dans : Indiquez ici l’attribut du LDAP dans lequel est stocké le nom du groupe.
Only these group names: When creating groups based on user attributes, only create groups with these names. This will not affect groups created via the “Sync groups stored as LDAP objects” setting, if it is active.
Cliquez sur le bouton Envoyer pour activer la méthode d’authentification ou cliquez sur Annuler pour quitter la page sans modification.
11.6.4.3. Authentification SAML
11.6.4.3.1. Setup
Sélectionnez cette méthode d’authentification si votre organisation travaille déjà avec un prestataire de service d’authentification SAML 2.0. Ceci fonctionne si votre prestataire vous permet une connexion sur plusieurs applications.
Le plugin SAML peut également être utilisé pour se connecter à ADFS. Pour ce faire, l’algorithme de signature doit être défini de manière appropriée dans la Configuration du plugin SAML.
In Mahara 20.04 a range of additional fields were made available to automate institution and account setup for organisations that use SAML as their IdP. This includes:
Automatic setup of institutions based on a “parent IdP”.
Role mapping for administrator and staff accounts.
Role mapping for an account that is to be added to all groups either in the institution or on the site.
Voir aussi
If you need to diagnose problems with accounts, you can log the attributes that the IdP passes on.
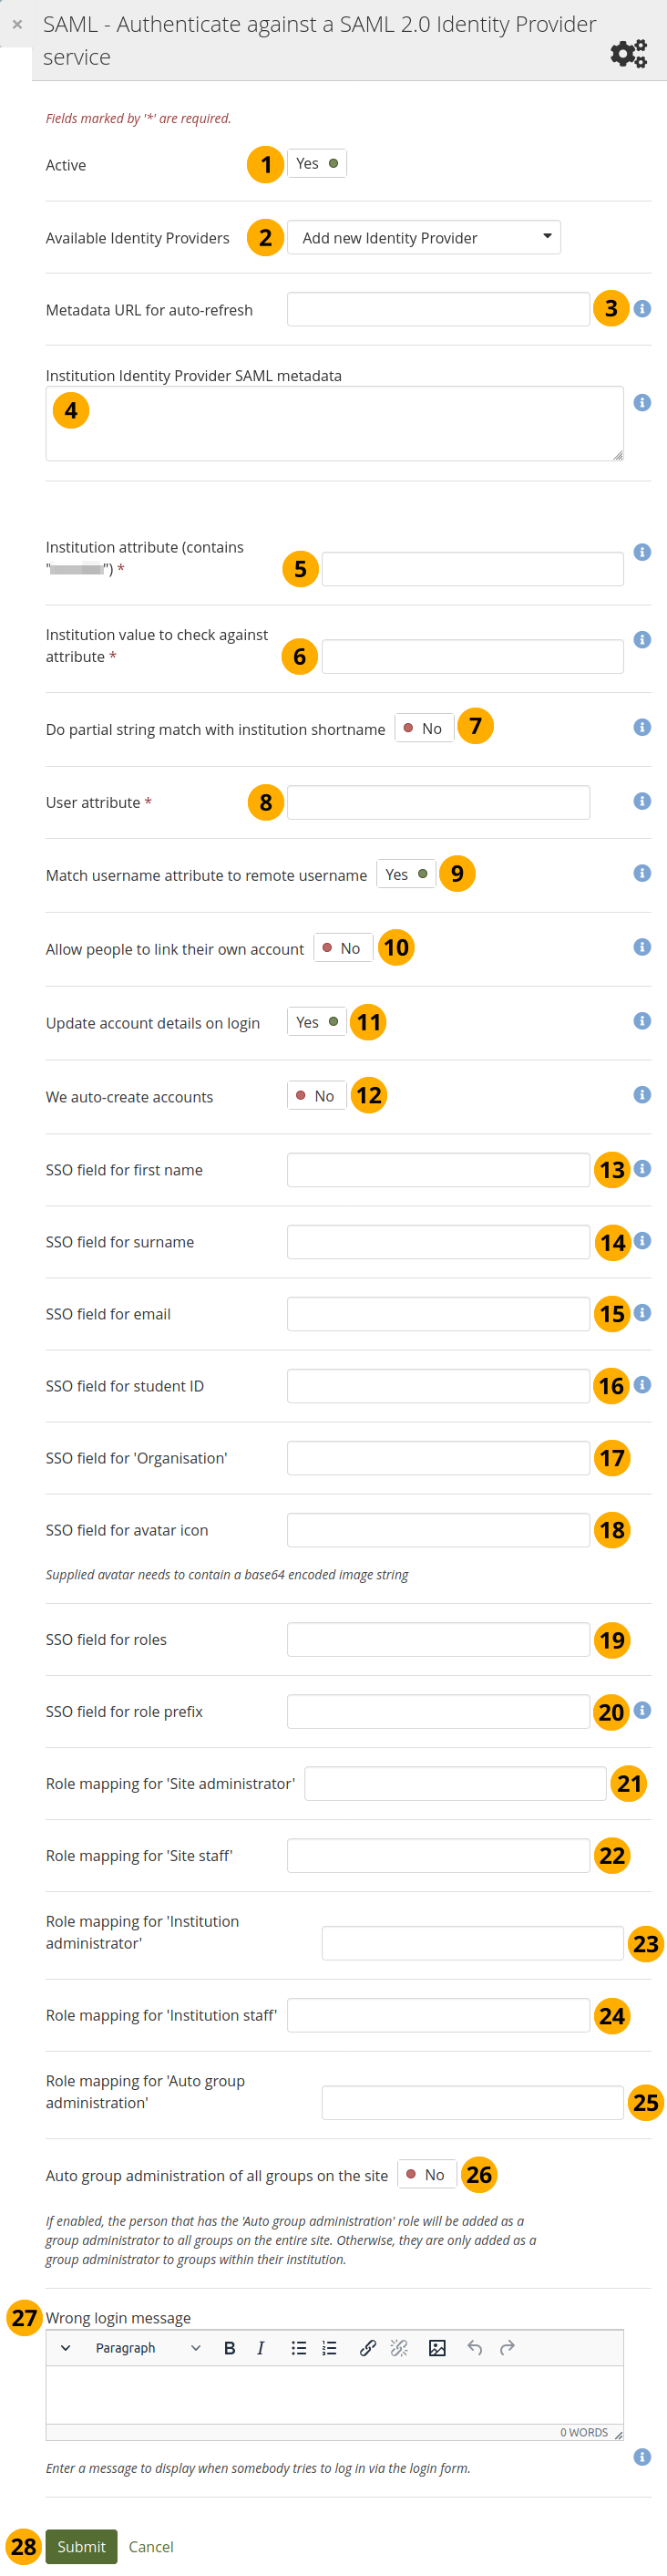
Authentitification avec SAML 2.0
Active: Set the switch to “Yes” if you want to use the IdP.
Note
When you have an inactive IdP, it is not displayed on the page that lists all IdPs.Available Identity Providers: If you add your first SAML IdP, you can only enter the details. Once you have an IdP set up, you see a drop-down menu, and you can choose from them if the metadata for the institution you are setting up uses the same IdP or set up a new IdP.
Note
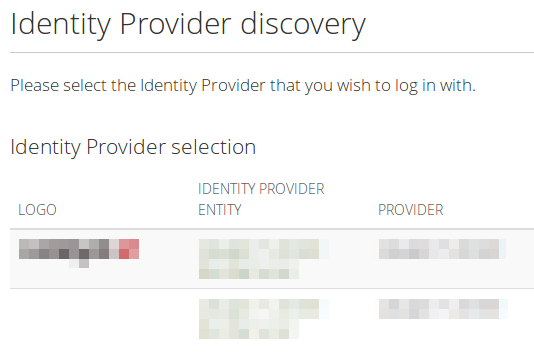
Lorsque vous avez plus d’un serveur IdP SAML défini pour votre site, une personne qui effectuerait une connxion SSO se retrouverait alors devant une page avec la liste des services SSO disponibles.
The available information to display is the logo of the service, its name, and the service provider. If you want to display your logo on the page, add the following just below the
<md:IDPSSODescriptor>line and replace “linktothelogo” with the actual location of the logo:<md:Extensions> <mdui:UIInfo xmlns:mdui="urn:oasis:names:tc:SAML:metadata:ui"> <mdui:Logo width="120" height="30" xml:lang="en">linktothelogo</mdui:Logo> </mdui:UIInfo> </md:Extensions>L’URL des métadonnées pour le rafraîchissement automatique : À la place de d’ajouter directement les métadonnées, vous pouvez fournir l’URL des métadonnées, qui doivent être au format XML, de sorte que les modifications apportées à celles-ci soient tirées automatiquement via cron. Vous n’aurez pas à mettre à jour les métadonnées vous-même lorsqu’elles sont modifiées.
Métadonnées du système d’authentification SAML : Entrez les métadonnées pour votre IdP. Assurez-vous que les informations dans la configuration du plug-in SAML soient correctes et qu’aucune dépendance ne soit manquante.
Note
Cet élément nécessite des métadonnées formatées en XML pour l’IdP auquel vous désirez vous connecter. Si le même IdP a déjà été configuré pour une autre institution, laissez cette rubrique vide.
Si vous avez saisi des métadonnées dans ce champ et que vous avez également fourni un lien vers l’URL des métadonnées, ce dernier a la priorité.
If you provided the metadata URL for auto-refresh previously, you do not need to enter the current metadata into this field when you set up a new instance of that IdP connection. It will be fetched automatically.Institution attribute (contains “…”): Enter the attribute that will be passed from the Identity Provider (IdP) that shows which institution the account belongs to. This usually directly correlates to the LDAP attribute (the signin service of the IdP), e.g. eduPersonOrgDN. This field is required.
Institution value to check against attribute: Enter the value that will be checked against the institution attribute value as passed from the IdP. If the institution regex switch “Do partial string match with institution shortname” is set to “Yes”, this value can be a regular expression that will be used to check against the institution attribute value. This field is required.
Do partial string match with institution shortname: Switch to “Yes” to treat the value in “Institution value to check against attribute” like a regular expression.
Attribut utilisateur : Entrez le nom de l’attribut qui sera envoyé par l’IdP et qui contient le nom d’utilisateur de l’utilisateur. Cette rubrique est obligatoire.
Match username attribute to remote username: This switch is set to “Yes” by default and needs to stay on this setting. It matches the user attribute value to the remote username field assigned to a given account (not the internal Mahara username). Only if you have the experimental feature of “usersuniquebyusername” turned on can you set this switch to “No”. We do not recommend this unless you are very experienced and have control over all applications in question.
Avertissement
By default, SAML authentication instances have the “Match username attribute to remote username” setting enabled. If that setting were disabled, someone with control over any SAML identity provider could gain control over any account on that Mahara site by setting the username attribute accordingly. In other words, administrators of one institution could control members in other institutions. You would only be able to disable this setting if you set the “usersuniquebyusername” variable to “true” in config.php file. However, you should not do that on a Mahara instance to which multiple SAML providers connect and you are not in control of all usernames that are created.
Voir aussi
If you disable “Match username attribute to remote username”, you get an error message which talks about the config setting for “usersuniquebyusername”. Please refer to the experimental feature of the “usersuniquebyusername” variable for more information.
Allow people to link their own account: Switch to “Yes” if you want to allow people to link their own internal Mahara account to the authenticated SAML account. This depends on the “Match username attribute to remote username” option being enabled. If this setting is turned on when people try to log in via SSO and their username as well as the email for example match an internal username, they can link their accounts. That would allow them to log in either via the SSO login or via the regular login box into the same account and avoid account duplication.
Update account details on login: Switch to “Yes” to update the first name, last name, and email address with the corresponding IdP values passed through at each login.
We auto-create accounts: Switch to “Yes” to create accounts on Mahara automatically when a person authenticates successfully but does not yet have an account.
Note
Vous pouvez désormais activer cette option aussi sur des sites qui hébergent plusieurs institutions utilisant SAML SSO pour service d’authentification.
SSO field for first name: Enter the name of the attribute passed by the IdP that contains the person’s first name.
SSO field for surname: Enter the name of the attribute passed by the IdP that contains the person’s last name.
SSO field for email: Enter the name of the attribute passed by the IdP that contains the person’s email address.
Champ SSO pour l’identification de l’étudiant : Entrez le nom de l’attribut transmis par l’IdP qui contient l’identifiant de l’étudiant.
SSO field for “Organisation”: Enter the name of the attribute that denotes an organisation.
SSO field for avatar icon: If the IdP contains base64-encoded images for a profile picture, you can enter it here.
SSO field for roles: Enter the name of the attribute here that passes in role information.
SSO field for role prefix: If the IdP passes in role information for the person logging in, then you can set this “prefix” field so that only those roles starting with the prefix should be handled by Mahara. This way the IdP can have different roles for different Service Providers (SP). If the person does not have any roles relating to this prefix, they will not be allowed to log in.
Role mapping for “Site administrator”: Enter the name of the role that is assigned to people in the IdP who shall have site administrator permissions.
Role mapping for “Site staff”: Enter the name of the role that is assigned to people in the IdP who shall have site staff permissions.
Role mapping for “Institution administrator”: Enter the name of the role that is assigned to people in the IdP who shall have institution administrator permissions.
Role mapping for “institution staff”: Enter the name of the role that is assigned to people in the IdP who shall have institution staff permissions.
Note
At the moment, the institution administrator and institution staff roles are only updated on account creation unless the config variable “usersuniquebyusername” is used. The site administrator and site staff roles are updated on each login. There is a wishlist item to correct that behaviour for institution administrators and staff.
Role mapping for “Auto group administration”: Enter the name of the role that is assigned to people in the IdP who shall be added to every group in this institution per default.
Note
The “auto group administrator” is added to all groups - new and existing - automatically. They are also subscribed to all forums and cannot unsubscribe.
When you set up the “parent” IdP in an institution, you have an additional setting: “Copy roles to all SAML authentication instances”. That allows you to update the role mappings for all institutions based on this IdP in one go.
Auto group administration of all groups on the site: Set this to “Yes” if a role from a “parent” IdP shall be added to all groups on this site. This is useful if the site is very homogeneous for one organisation or for a group of organisations that is administered centrally. If set to “No”, the person is only added to the groups of this particular institution.
Message de connexion erroné : Affiche ce message aux personnes qui tentent de se connecter via le formulaire de connexion standard au lieu du bouton SSO alors qu’elles sont censées l’utiliser. Ce message devrait contenir des instructions sur la manière dont ils peuvent accéder à Mahara via le SSO.
Note
Le message est affiché juste au-dessus du formulaire de connexion dans la barre latérale. Par conséquent, ne le rendez pas trop long.
Cliquez sur le bouton Envoyer pour activer la méthode d’authentification ou cliquez sur Annuler pour quitter la page sans modification.
11.6.4.3.2. Using Keycloak with SAML
Keycloak is an open source identity and access management service that allows you to set up authentication to various applications.
The steps provided here for using Keycloak in Mahara were used by a community member to test the connection. If you have a different experience, please let us know, and we can expand this section.
Download the XML from
/auth/saml/sp/metadata.php.Create a client in Keycloak with the XML.
Create a client scope in Keycloak, add maps for institution, username, email, first name, last name, etc.
Note
Make sure “SAML Attribute Name” matches SSO field names in the Mahara institution SAML configugration.
Set “We auto-create accounts” to “Yes” in Mahara to create accounts on login.
Download the “Mod Auth Mellon files” from the installation tab of the client in Keycloak.
Copy the XML for the IdP to the Mahara “Institution Identity Provider SAML metadata” in the SAML authentication method.
Add the metadata URL, which is
<keycloak server>/auth/realms/<REALM>/protocol/saml/descriptor.
Voir aussi
There is more information on how to set up Keycloak with SAML on the internet. The blog post “Keycloak – Download SAML 2.0 IdP Metadata” was useful.
11.6.4.4. Services web
If you want to use web services with accounts in an institution, add the web services authentication.
You need the web services authentication method if you want to allow people to connect via LTI.
Nous ne pouvez pas faire cette configuration depuis le plug-in d’authentification, mais vous devez aller dans la zone des Services web.
11.6.4.5. Authentification XML-RPC / MNet
Voir aussi
MNet authentication is still provided in Mahara for existing instances. However, if you are setting up a new Mahara site, we recommend you connect it to your learning management system via LTI. The Mahara project team expands the functionality possibilities for LTI.
Use the XML-RPC authentication for connecting a Mahara instance to a Moodle or another Mahara installation for sharing login information. With Moodle 2 that does not only mean that you can log in to Mahara via Moodle, but also that you can transfer certain activities into your Mahara portfolio from Moodle.
Il n’est possible de créer qu’un seul lien entre un Moodle et un Mahara, et cela même si votre Mahara contient plusieurs institutions. Chaque instance d’authentification XML-RPC dans votre Mahara doit avoir une racine www (wwwroot) unique, et doit être associé à une seule institution.
Note
Vous devez avoir activé le service réseau pour pouvoir bénéficier de ce type de méthode d’authentification.
Configurer l’authentification avec MNet
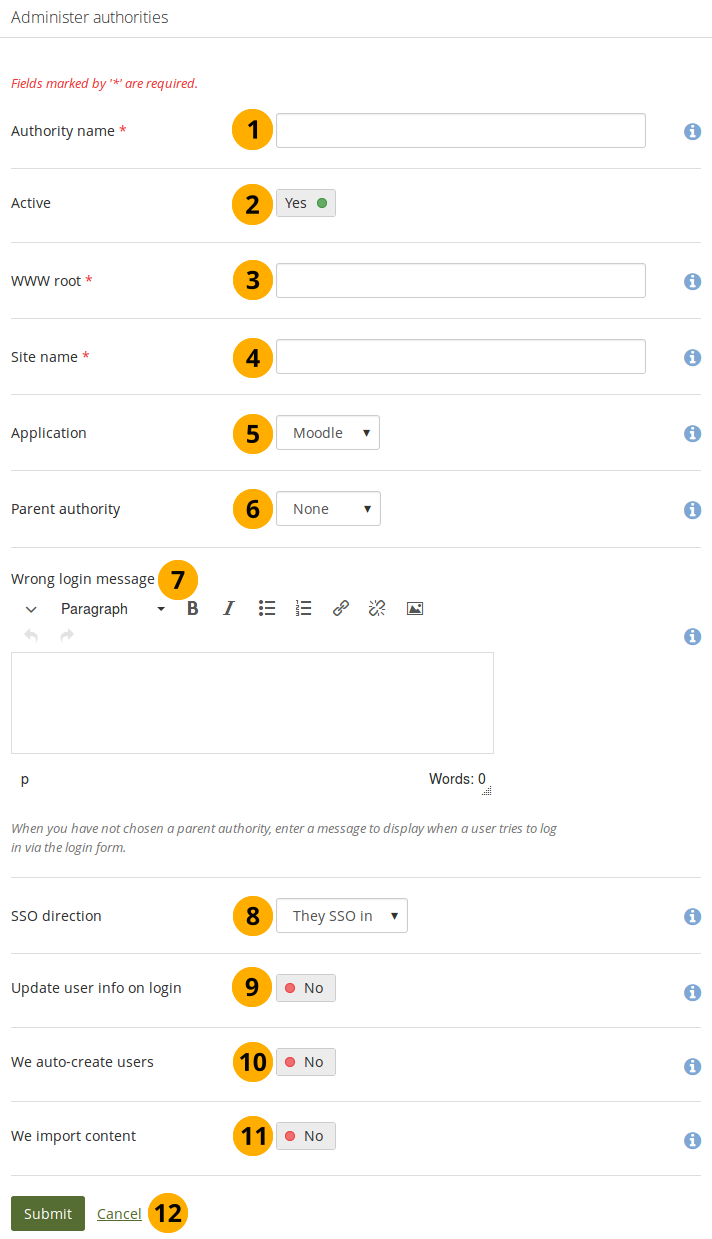
Nom de l’autorité : Saisissez le nom que vous désirez utiliser pour identifier cette autorité. Il est préférable que vous utilisez un nom court et qui soit parlant. Cette rubrique doit être saisie.
Active: Set the switch to “Yes” if you want to use this authentication method for the institution.
WWW racine : Entrez l’adresse web de la racine de l’application distante, par exemple
https://exemple.ch. Ce champ est obligatoire. Si votre racine WWW requiert un port spécifique, entrez le numéro du port que l’application distante utilise. Vous n’aurez probablement pas besoin d’ajouter un port, sauf si vous vous connectez à un servicehttpsou si votre application distante fonctionne sur un port non standard.Site name: Enter the name to present to people to identify the remote site. If you enable SSO, they may click on this name to start a session at the remote site. This field is required.
Application: Choose the application on the remote side. You can choose between “Mahara” and “Moodle”.
Parent authority: If you set a parent authority from the already existing authentication methods, people will be able to log in using that authority as well as MNet. For example, you could set up SAML authentication and have that be the parent of this MNet authority. That means that people will be able to log in by clicking the SSO login button using their SSO credentials as well as via MNet from their Moodle. You do not have to set a parent authority. If you do not, people using MNet will only be able to access Mahara via MNet, i.e. log in to Moodle or the other Mahara first.
Note
If you choose a Parent authority, ensure that all accounts are associated with this authentication method instead of the MNet one. Otherwise, they will not be able to log in via the parent authentication method. If the remote username for MNet and the other authentication method is already the same, you just need to change the authentication method. If they are not yet the same, you need to update the account details together with changing their authentication method.
Wrong login message: Enter a message to display when someone tries to log in via Mahara’s login form but is not allowed to if you have not set up a parent authority.
Direction SSO : Sélectionnez la direction de l’authentification par SSO dans le menu déroulant :
They SSO in: Enable this option to allow account holders from the remote site to roam to your Mahara site without having to enter their username and password. This is the most commonly used setting. The remote application is the source of the login information and where accounts are created initially. This is the default option.
We SSO out: Enable this option to allow your account holders to roam from Mahara to the remote site without having to enter their username and password there. Mahara is the source of the login information and where accounts are created initially. The following fields are replaced by They auto-create accounts if this option is selected.
Update account info on login: Set this switch to “Yes” to bring over personal data from the remote site upon each login and update your Mahara account record with any changes. The following fields, when filled in on Moodle, are filled in Mahara:
Prénom (toujours importé)
Prénom (toujours importé)
Adresse courriel (toujours importée)
Image du profil
Description (Introduction sur Mahara)
Ville
Pays
Langue
préférences sur l’éditeur HTML
We auto-create accounts: Switch to “Yes” to create accounts on Mahara automatically when a person authenticates successfully but does not yet have an account.
We import content: Not all network-enabled applications support this, but if they do, e.g. Moodle, this will allow people of the remote site to import content to Mahara. It depends on the option “They SSO in” from “SSO direction” and it is sensible to also have “We auto-create accounts” set.
Cliquez sur le bouton Envoyer pour activer la méthode d’authentification ou cliquez sur Annuler pour quitter la page sans modification.
Si la connexion au site distant est établie, la clé publique de celui-ci est stockée avec la méthode d’authentification et mise à jour lorsque cela est nécessaire. Si un problème se produit lors de la connexion et que la clé ne peut être récupérée, vous pouvez la rentrer à la main jusqu’à ce que vous ayez trouvé l’origine du problème.
Voir aussi
Référez-vous au guide de paramétrage d’un Mahoodle, soit la mise relation d’un Moodle avec un Mahara, pour plus une marche à suivre pas-à-pas sur la configuration de l’une et de l’autre plateforme pour les faire communiquer. Le guide explique la démarche à la fois pour Moodle 1.9 et pour Moodle 2.x.
11.6.4.6. Ordre d’utilisation des méthodes d’authentification
Si vous avez créé plusieurs méthodes d’authentifications possibles dans une même institution, vous pouvez décider dans quel ordre elles seront utilisées.
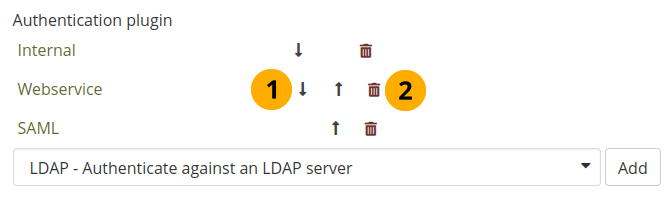
Ordre d’utilisation des méthodes d’authentification
Use the Down arrow button and the Up arrow to move a specific authentication method down or up in the list. Mahara looks for accounts of people in the order of the list.
Supprimez une méthode d’authentification en cliquant sur le bouton Supprimer .
Note
You cannot delete an authentication method when there are still people who require it to log in. Before deleting an authentication method, you have to move the accounts to another authentication method.
11.6.4.7. Suspendre l’institution
Un administrateur du site peut suspendre une institution en tout temps.

Suspension et institution
Click the Suspend institution button to make an institution (temporarily) unavailable to its members.
11.6.5. Pages statiques de l’institution
Menu Administration → Institutions → Pages statiques
Les administrateurs de l’institution peuvent créer des pages qui remplaceront les pages statiques du site. Ces pages sont :
À propos
Accueil (Tableau de bord)
Accueil des non connectés
All pages come with default text that you can change. Every page must contain some text. You can use the visual editor to style your page.
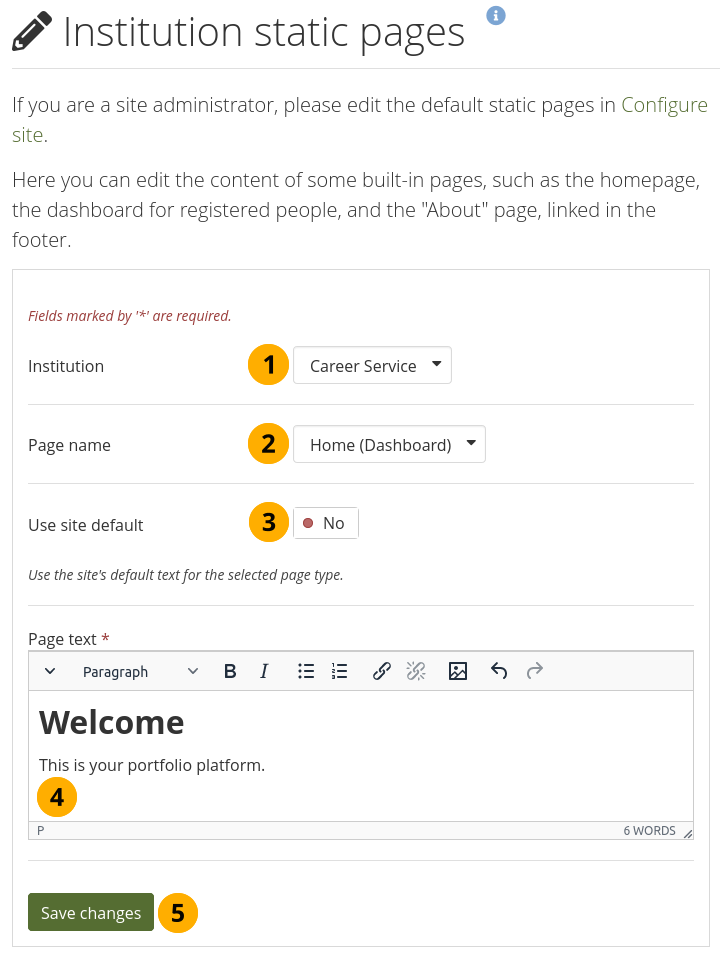
Modifier les pages statiques d’une institution
Institution: If you are a site administrator or an institution administrator of more than one institution, choose the institution for which you want to change the page content. If you administer only one institution, its name is displayed without the drop-down menu.
Nom de la page : Choisissez dans le menu déroulant la page que vous désirez modifier.
Use site default: Switch to “Yes” if you want to use the content that is displayed on the page for the entire site. Switch to “No” if you want to provide your own content.
Page text: Change the text in the editor window if you selected “No” for “Use site default”. You cannot leave this field empty.
Cliquez sur le bouton Enregistrer.
11.6.6. Informations légales
Menu Administration → Institutions → Juridique
Every institution can have its own statement about terms and conditions and privacy in addition to the site’s statements. If the site administrator turned on “Strict privacy” in the institution settings, everyone needs to accept them before being able to use their account.
Avertissement
Les créateurs de Mahara ne peuvent pas donner de conseils juridiques. Si vous avez besoin de conseils juridiques, veuillez consulter votre propre avocat ou juriste afin de vous assurer que vous vous conformez aux lois applicables.
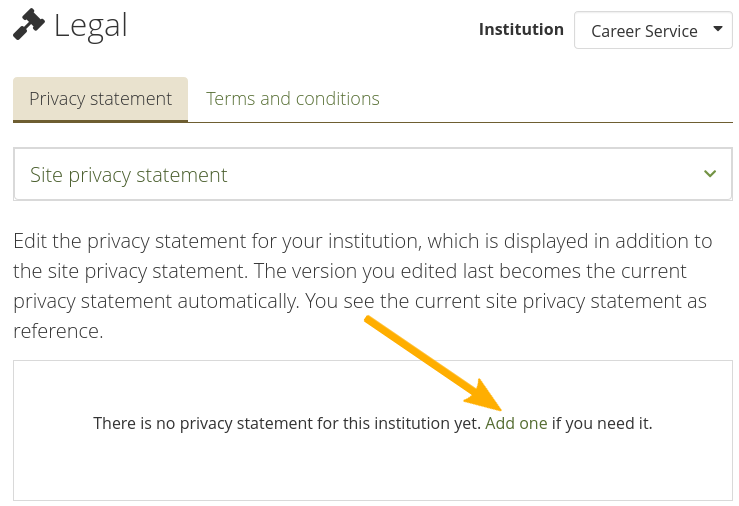
Page de présentation des déclarations légales au niveau de l’institution sans aucune déclaration
When an institution doesn’t have its own privacy statement or terms and conditions set up, the site statement is the default one that is used. Set up your own institution statement by clicking the “Add one” link.
Note
Les institutions ne doivent pas mettre en place leurs propres déclarations légales si la déclaration du site est suffisante.
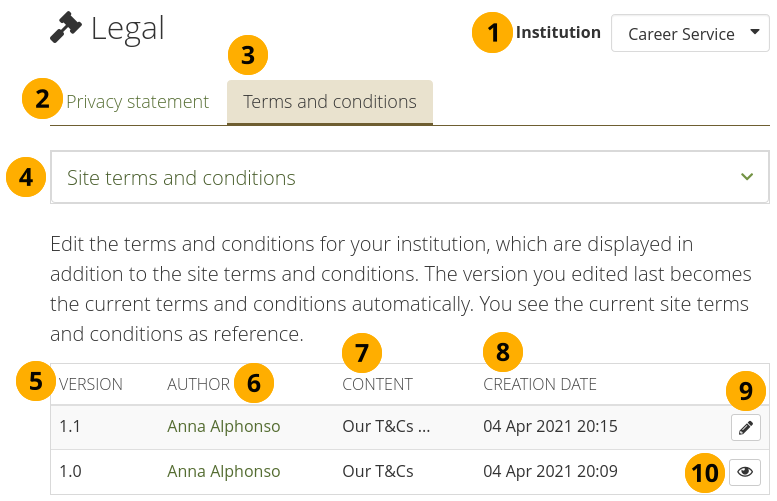
Page de présentation des déclarations légales au niveau de l’institution
Institution : L’institution pour laquelle vous affichez actuellement les règles légales.
Note
Si vous êtes un administrateur d’institution, vous ne voyez que votre propre institution. Si vous êtes un administrateur de site, vous pouvez sélectionner l’institution pour laquelle vous voulez voir le relevé.
Click the “Privacy statement” tab to edit the current privacy statement for the institution and view old versions.
Click the “Terms and conditions” tab to edit the current terms and conditions for the institution and view old versions.
La déclaration de confidentialité ou les conditions générales du site sont fournies à titre de référence afin que vous puissiez décider si votre institution a besoin de ses propres déclarations.
Version : Numéro de version du document
Note
Les versions sont listées dans l’ordre inverse de leur création.
Auteur : Personne qui a modifié cette version.
Contenu : Extrait du début du texte légal.
Date de création : Date et heure de création du document.
Cliquez sur le bouton Modifier lorsque vous désirez effectuer des amendements à la version actuelle. Ceci créera automatiquement une nouvelle version du document.
Cliquez sur le bouton Afficher pour afficher l’ensemble du texte d’une version précédente.
11.6.6.1. Protection des données
Avertissement
Vous ne pouvez pas enregistrer une version provisoire de votre déclaration de confidentialité modifiée. Dès que vous enregistrez le formulaire, toute personne se connectant sera invitée à accepter la nouvelle déclaration de confidentialité.
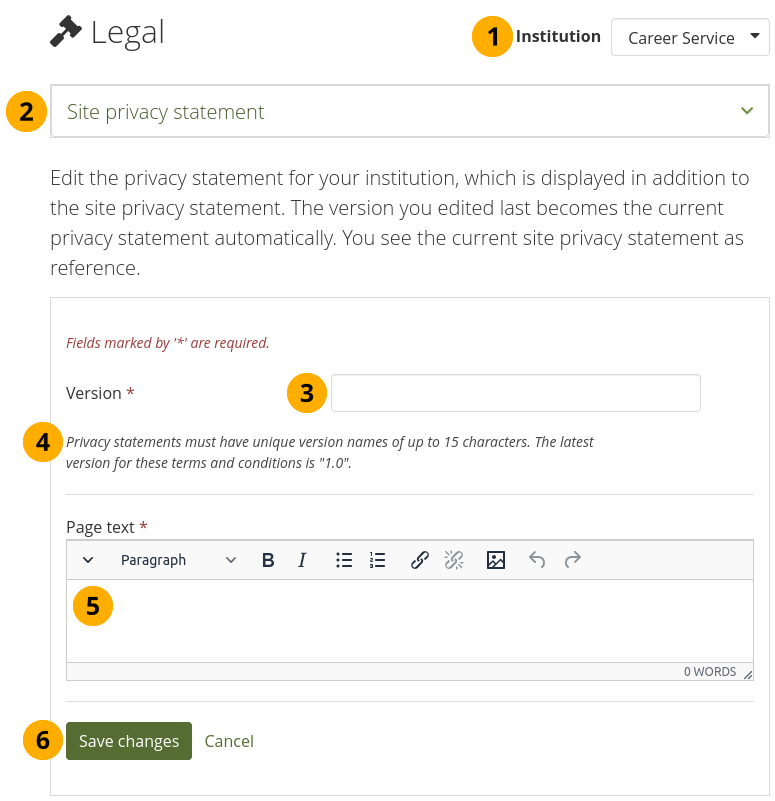
Modifier la déclaration de confidentialité au niveau de l’institution
Institution: The institution for which you are viewing the statements.
Note
Si vous êtes un administrateur d’institution, vous ne voyez que votre propre institution. Si vous êtes un administrateur de site, vous pouvez sélectionner l’institution pour laquelle vous voulez voir le relevé.
Site privacy statement: View the site’s privacy statement so you don’t contradict it in your institution’s statement.
Version : Donnez à votre déclaration un nouveau numéro de version. Il peut comporter jusqu’à 15 caractères et doit être différent de tout numéro précédent.
Le numéro de la version précédente est indiqué pour des raisons de commodité.
Texte de page : Saisissez le texte qui doit être affiché dans la déclaration de confidentialité.
Click the Save changes button to accept your changes, or click Cancel to abort your changes.
11.6.6.2. Conditions d’utilisation
Avertissement
Vous ne pouvez pas sauvegarder une version provisoire de vos conditions modifiées. Dès que vous sauvegardez le formulaire, toute personne se connectant sera invitée à accepter les nouvelles conditions.
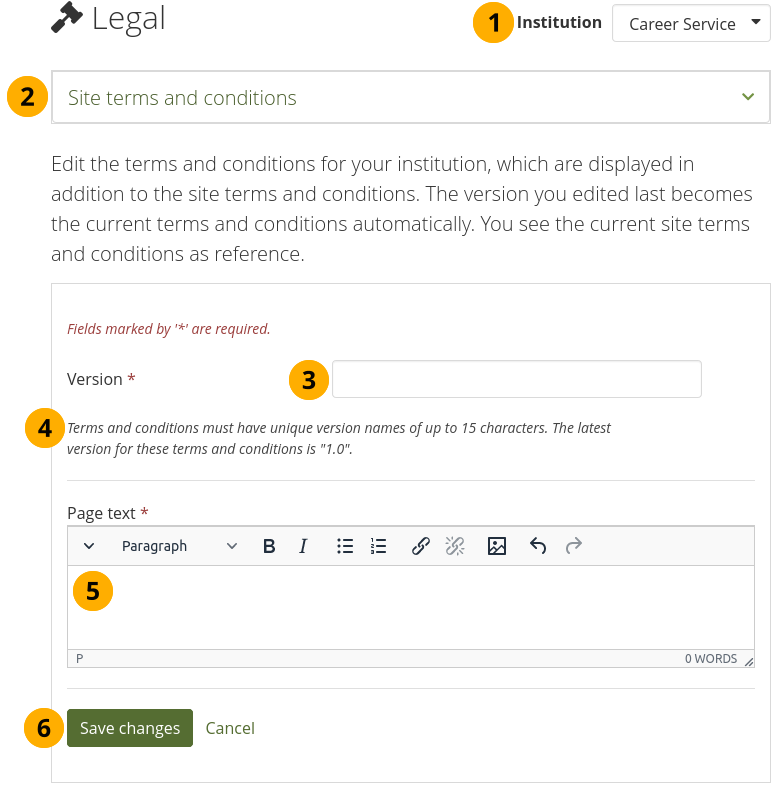
Modifier les termes et conditions au niveau de l’institution
Institution: The institution for which you are viewing the statements.
Note
Si vous êtes un administrateur d’institution, vous ne voyez que votre propre institution. Si vous êtes un administrateur de site, vous pouvez sélectionner l’institution pour laquelle vous voulez voir le relevé.
Site terms and conditions: View the site’s terms and conditions so you don’t contradict it in your institution’s statement.
Version : Donnez à votre déclaration un nouveau numéro de version. Il peut comporter jusqu’à 15 caractères et doit être différent de tout numéro précédent.
Le numéro de la version précédente est indiqué pour des raisons de commodité.
Texte de page : Saisissez le texte qui doit être affiché dans les conditions générales.
Cliquez sur le bouton Enregistrer les modfications pour accepter vos modifications ou cliquez sur Annuler pour annuler vos modifications.
11.6.7. Menbres
Menu Administration → Institutions → Membres
You can add and remove members from one institution in bulk. As site administrator, you can always add members to an institution. As institution administrator, you can only invite people to become members.
You can filter accounts to narrow the result list:
Utilisateurs ayant demandé leur affiliation à l’institution
Utilisateurs n’ayant pas demandé leur affiliation à une institution
Utilisateurs ayant quitté l’institution
Membres actuels de l’institution
Les personnes invitées
Note
Double-click a name and it will be moved to the other side. This goes for all functionalities that are similar to this one here.
11.6.7.1. Utilisateurs ayant demandé leur affiliation à l’institution
If your institution allows self-registration, people who are not already members of your institution can request to join it.
Institution administrators receive notifications about membership requests. Site administrators only receive notifications about people wanting to join “No Institution”.
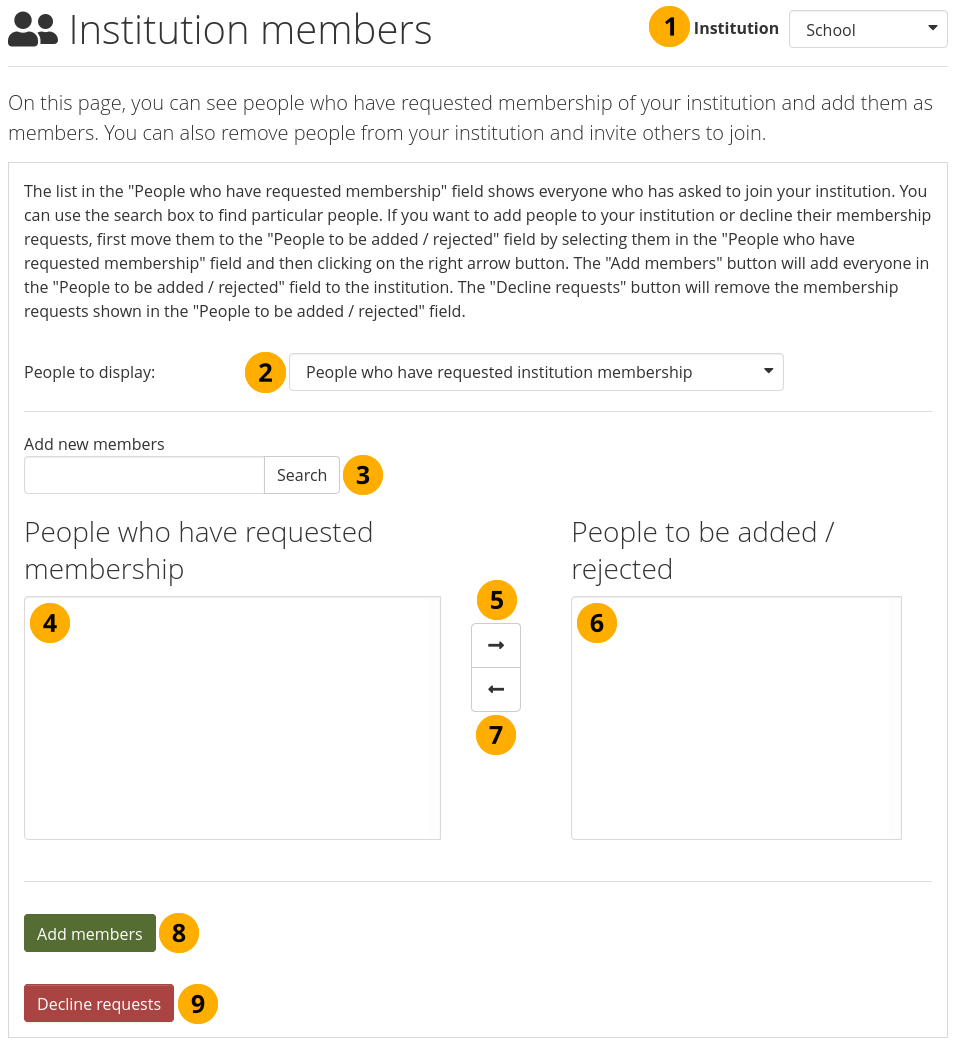
Accepter ou refuser la demande d’adhésion à une institution
Institution: Choose from the drop-down menu to which institution you wish to add people. If there is only one institution that you can administer, its name will be displayed without the drop-down menu.
People to display: Choose People who have requested institution membership.
Add new members: Search for people in the Search box if there are too many names listed.
People who have requested membership: Select the people you wish to add to the institution.
Add the people by clicking the Right-arrow button .
People to be added / rejected: If you put people into the box for “People to be added / rejected” by accident, you can remove them from that list by clicking on them.
Then click the Left-arrow button , and they are removed from the list.
Quand vous avez placé tous les utilisateurs que vous désirez dans la liste des utilisateurs à ajouter/rejeter, cliquez sur le bouton Ajouter membres.
Alternatively, if you wish to decline people’s membership, select them, and then send a general denial by clicking the Decline requests button.
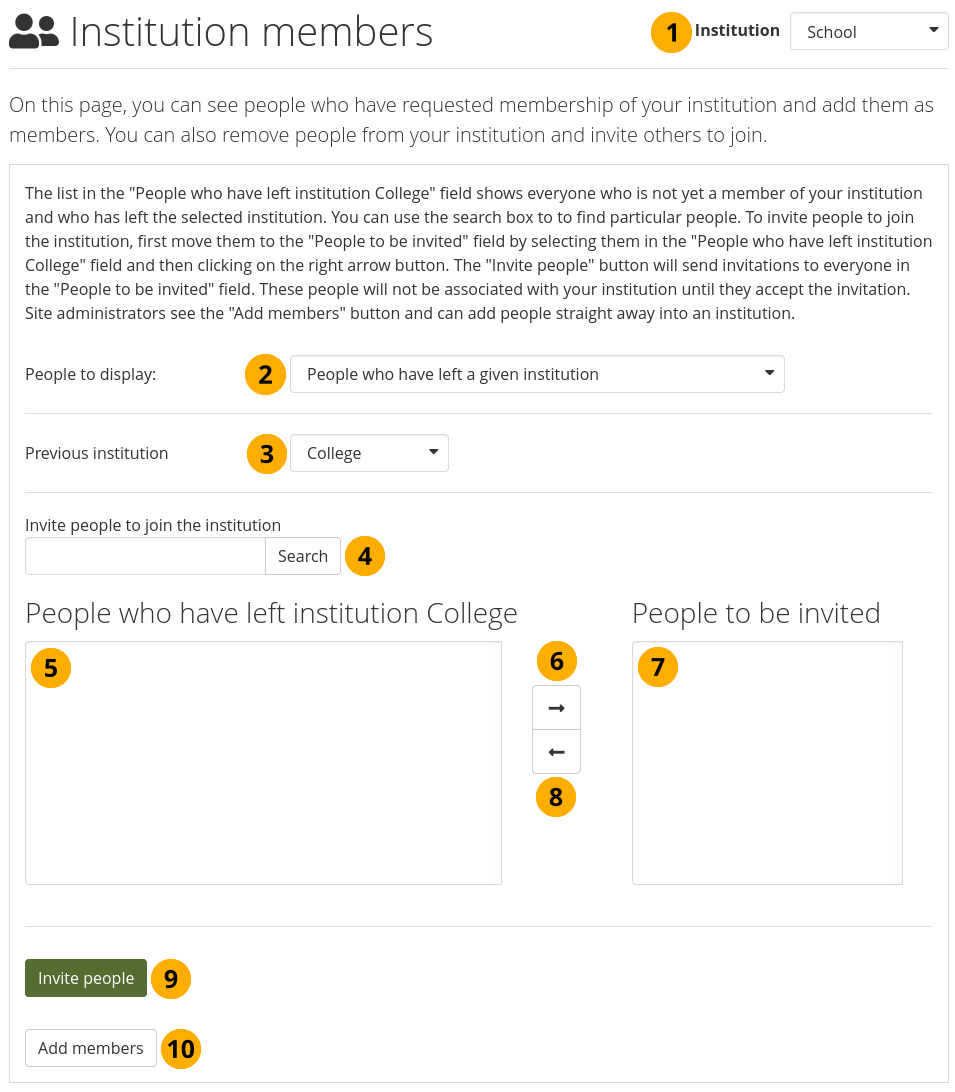
11.6.7.2. Utilisateurs n’ayant pas demandé leur affiliation à l’institution
An admin can also take the initiative and invite or add people to an institution.
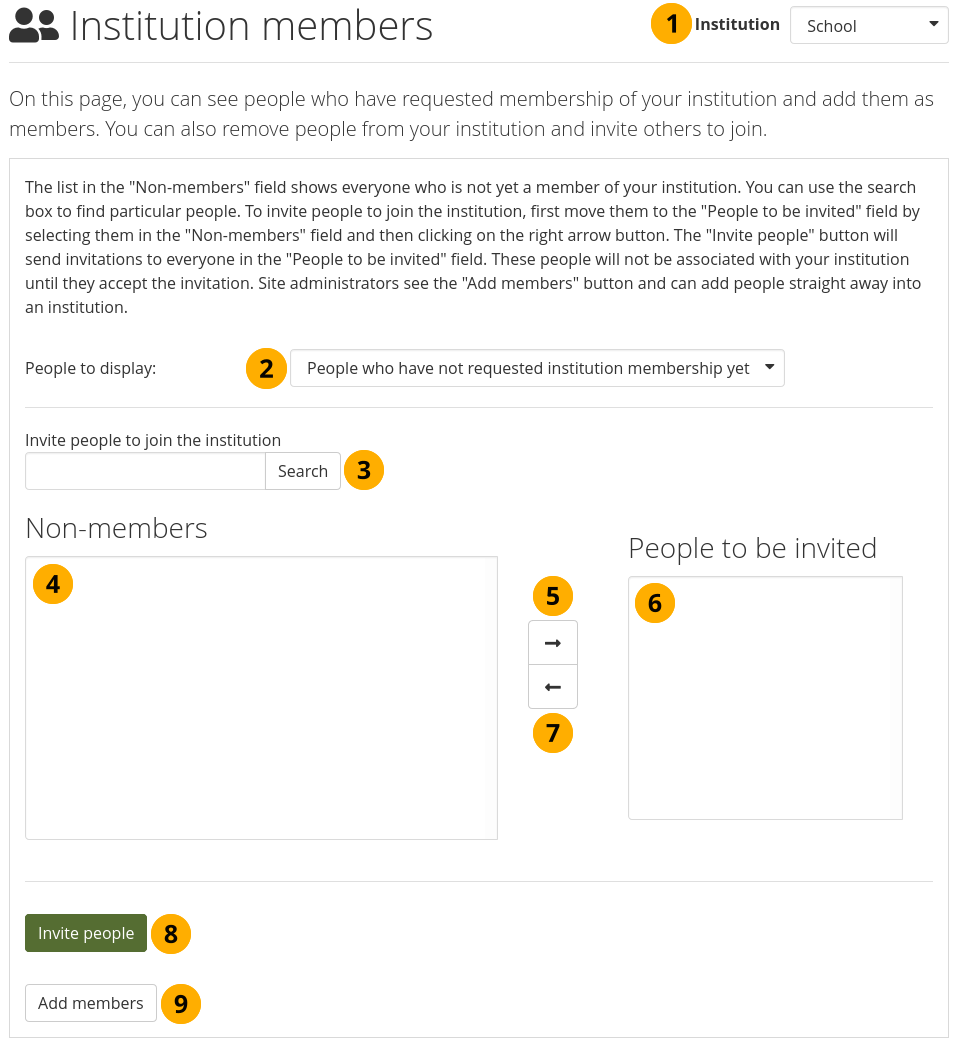
Invite or add people to become institution members
Institution: Choose from the drop-down menu to which institution you wish to invite or add people. If there is only one institution that you can administer, its name will be displayed without the drop-down menu.
People to display: Choose People who have not requested membership yet.
Invite people to join the institution: Search for people in the Search box if there are too many names listed.
Non-members: Select the people you wish to invite to the institution.
Add the people to the list People to be invited by clicking the Right-arrow button .
If you put a person into the box for “People to be invited” by accident, you can remove them from that list by clicking on them.
Then click the Left-arrow button , and they are removed from the list.
When you have all the members you wish to invite to the institution, click the Invite people button. The invitees receive a notification and can accept or decline the institution membership invitation.
Alternatively, if you are a site administrator, you can click the Add members button to add people to the institution without asking them first.
11.6.7.3. Utilisateurs ayant quitté l’institution
An administrator can filter people by the previous institution to which they were attached in order to find them more quickly.
Note
This is only of importance for a multi-tenanted Mahara instance with at least two institutions.
Invite or add people to become institution members when they had left an institution
Institution: Choose from the drop-down menu to which institution you wish to invite or add people. If there is only one institution that you can administer, its name will be displayed without the drop-down menu.
People to display: Choose People who have left a given institution.
Note
“Left” is interpreted loosely, it also means when an administrator removed them from an institution.
Previous institution: Choose the institution from which you want to add people. They must have left it first to be listed here.
Invite people to join the institution: You can search for people in the Search box if there are too many names listed.
People who have left institution [name of the institution]: Select the people you wish to invite or add to the institution listed.
Add the people to the list People to be invited by clicking the Right-arrow button .
If you put a person into the box for “People to be invited” by accident, you can remove them from that list by clicking on them.
Then click the Left-arrow button , and they are removed from the list.
When you have all the people you wish to invite to this institution, click the Invite people button. The invitees receive a notification and can accept or decline the institution membership invitation.
Alternatively, if you are a site administrator, you can click the Add members button add people to the institution without asking them first.
Note
Mahara keeps track of the last institution of a person via an invisible tag.
11.6.7.4. Membres actuels de l’institution
You can remove members from an institution, e.g. if they are no longer students at a school or university, but should still have an account on Mahara or when they are just switching institutions on the same Mahara instance.

Remove members from an institution
Institution: Choose from the drop-down menu which institution’s members you wish to display. If there is only one institution that you can administer, its name will be displayed without the drop-down menu.
People to display: Choose People who are already institution members.
Remove people from the institution: You can search for members in the Search box if there are too many names listed.
Current members: Select the members you wish to remove from the institution.
Add them to the list Members to be removed by clicking the Right-arrow button .
If you put a person into the box for “Members to be removed” by accident, you can remove them from that list by clicking on them.
Then click the Left-arrow button , and they are removed from the list.
When you have all the members you wish to remove from your institution, click the Remove people button.
11.6.7.5. Les personnes invitées
An administrator can uninvite people from an institution.
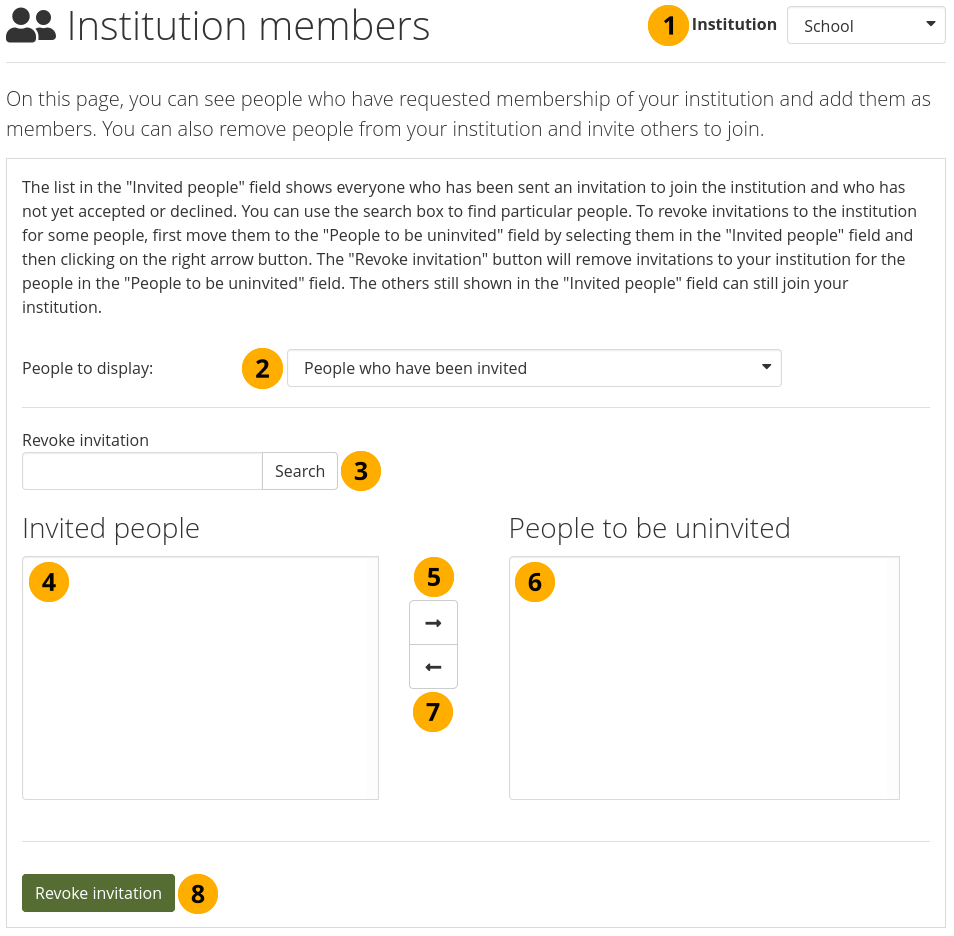
Uninvite people from joining your institution
Institution: Choose from the drop-down menu which institution’s invited people you wish to display. If there is only one institution that you can administer, its name will be displayed without the drop-down menu.
People to display: Choose People who have been invited.
Revoke invitations: You can search for people in the Search box if there are too many names listed.
Invited people: Select the people whose invitation to join your institution you want to revoke.
Add the people to the list People to be uninvited by clicking the Right-arrow button .
If you put a person into the box for “People to be uninvited” by accident, you can remove them from that list by clicking on them.
Then click the Left-arrow button , and they are removed from the list.
When you have all the people you wish to uninvite from the institution, click the Revoke invitations button.
11.6.8. Personnel de l’institution
Administration menu → Institutions → Staff
You can give institution members staff rights in an institution in which they are members. The staff role allows them to create course groups for example. This page allows you to do that in bulk for many members at once.
Voir aussi
You can also give staff rights on the person’s account settings page.
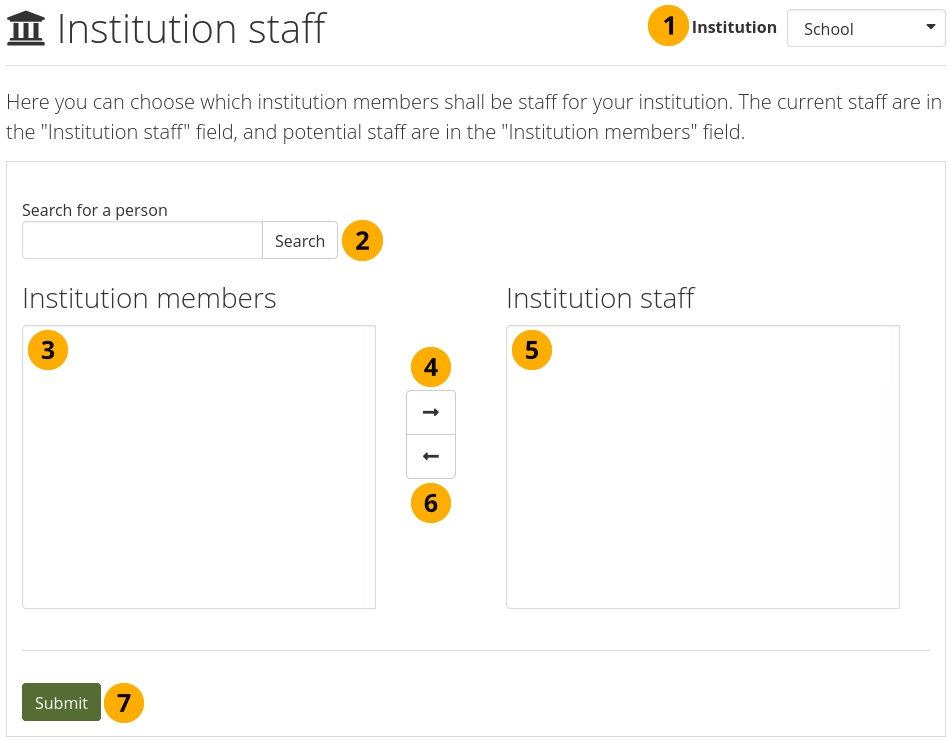
Give members institution staff rights.
Institution: Choose the institution from the drop-down menu for which want to give staff rights to members. If there is only one institution that you can administer, its name will be displayed without the drop-down menu.
Search for a person: You can search for people in the Search box if there are too many names listed.
Membres institution : Sélectionnez la liste les membres que vous voulez promouvoir comme personnel de l’institution.
Add the people to the list Institution staff by clicking the Right-arrow button .
If you put a person into the institution staff list by accident or want to remove existing staff members and return them to normal membership status, select them.
Then click the Left-arrow button , and they are removed from the list.
Lorsque vous avez sélectionné tous les membres dont vous voulez promouvoir le statut comme membre du personnel de l’institution, cliquez sur le bouton Envoyer.
11.6.9. Administrateurs de l’institution
Administration menu → Institutions → Administrators
You can give members administrator rights in an institution in which they are members. The administrator role will allow them to manage others in their own institution. This page allows you to do that in bulk for many people at once.
Voir aussi
You can also give admin rights on the person’s account settings page.
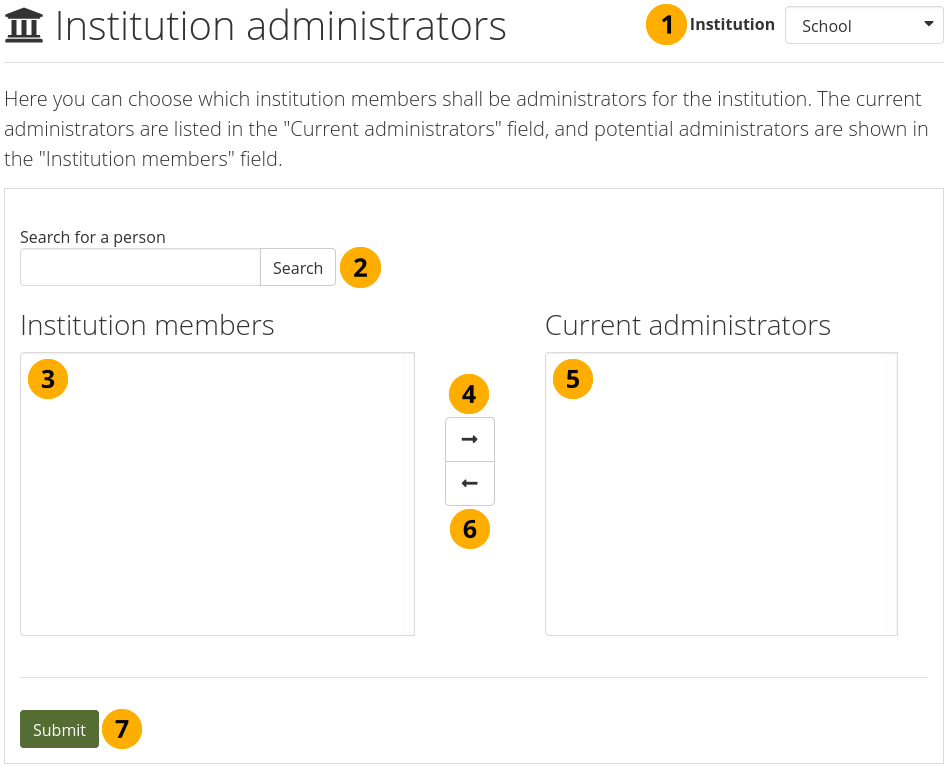
Give members institution admin rights.
Institution: Choose the institution from the drop-down menu for which want to give admin rights to members. If there is only one institution that you can administer, its name will be displayed without the drop-down menu.
Search for a person: You can search for people in the Search box if there are too many names listed.
Membres de l’institution : Sélectionnez les membres auxquels vous désirez attribuer les droits d’administrateur.
Add the member to the list Current administrators by clicking on the Right-arrow button .
If you put a person into the institution administrator list by accident or want to remove existing administration members and return them to normal membership status, select them.
Then click on the Left-arrow button , and they are removed from the list.
Lorsque vous avez sélectionné tous les membres auxquels vous désirez accorder les droits d’administration pour l’institution, cliquez sur le bouton Envoyer.
11.6.10. Notifications administrateurs
Menu Administration → Institutions → Notifications administratives
Avertissement
The administrator notifications are site administrator notifications, yet institution administrators are listed as well even though they do not receive these types of notifications. There is an open wishlist item to deal with this.
The Admin notifications page lists all people with institution and site administrator access on your site. It shows their selected notification preferences for all administrator notifications. There should be at least one administrator receiving each type of message generated.
Note
Institution administrators only see administrator notifications for their own institutions.
Administrator notifications are:
Demandes de contact
Contenu répréhensible
Dépôts répétés de fichiers infectés
Fichiers acceptés après nettoyage antivirus
Contenu répréhensible dans le forum
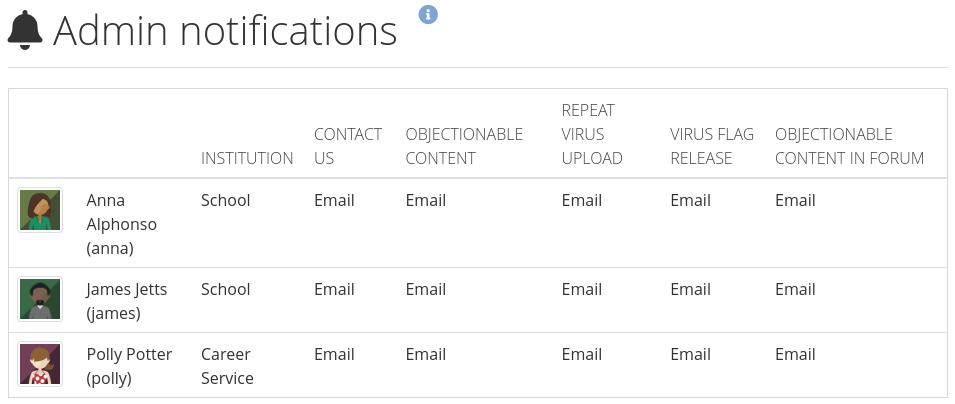
Overview of the administrator notification types
11.6.11. État de la saisie du profil
Menu Administration → Institutions → Achèvement du profil
Profile completion lets you select content that members of an institution need in order to have a “completed” profile. The parameters for a completed profile can differ from one institution to another. In some cases you can also decide how many content items a person needs of a specific artefact type to complete their profile.
Voir aussi
The site administrator needs to enable the profile completion feature in the side block settings for institutions to be able to use it.
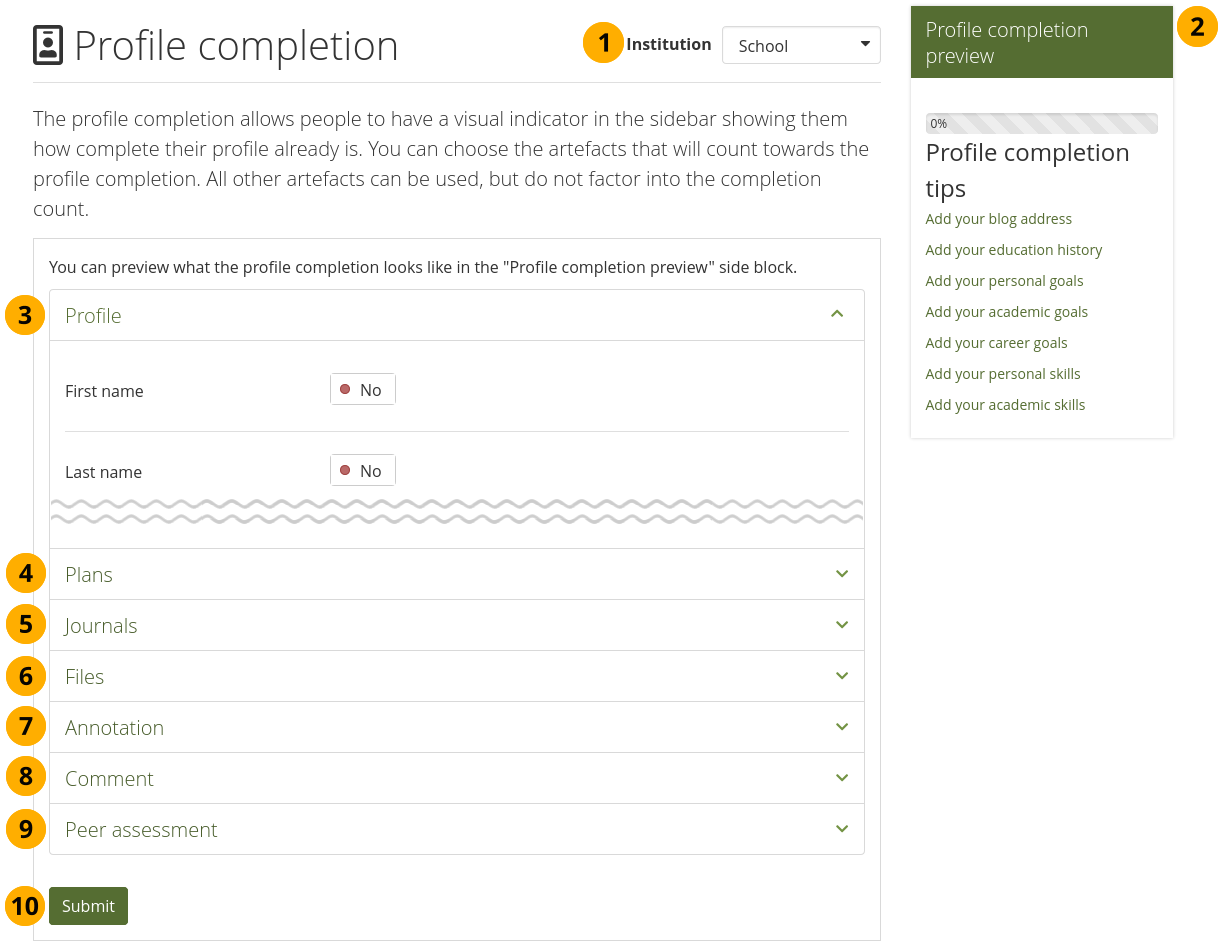
Paramètrer l’état de saisie du profil
Institution : Si vous administrez plus d’une institution, sélectionnez depuis le menu déroulant celle pour laquelle vous désirez modifier l’état de saisie du profil. Si votre serveur ne comprend qu’une seule institution, son nom est affiché à la place du menu déroulant.
Profile completion preview: Once you clicked the Submit button, you will see a preview of the progress bar that is displayed to your institution members in the side block.
Profile: Set the switches to “Yes” for the items that you want your members to fill in from their profile. Select the number of groups a person should join or number of friends a member of your institution should make.
Résumé: Set the switches to “Yes” for the résumé items that a person should fill in to have a completed profile.
Plans: Select the number of plans and tasks a person should have from the drop-down menus.
Journals: Select whether a person needs to have a certain number of journal entries for a complete profile.
Files: In this section you can decide whether a person needs to upload a certain number of files. You can also specify the file type and decide how many items of each file type a person should upload for a complete profile.
Annotation: Select from the drop-down menu the number of comments a person should make on annotations to gain a completed profile.
Comment: Select from the drop-down menu the number of comments a person should make to gain a completed profile.
Cliquez sur le bouton Envoyer pour enregistrer vos modifications.
11.6.12. Pages et collections de l’institution
Menu Administration → Institutions → Pages et collections
You can create pages and collections for your entire institution. Although you could always create portfolios under a regular account that others could copy into their own portfolio, the advantage of institution pages and collections is that new members in the institution can receive a copy upon joining the institution. All administrators for that institution and the site administrator have access to the institution portfolios, and can manage them collaboratively.
La création et l’édition d’un portfolio d’institution est très similaire à la création et l’édition d’un portfolio personnel. Cependant, tous les blocs ne sont pas disponibles lors de l’édition d’une page d’institution en raison du contexte différent. Veuillez vous référer à la vue des blocs pour une liste de tous les blocs que vous pouvez utiliser dans une page d’institution.

Gérer les pages et collections de l’institution
Institution : Si vous administrez plus d’une institution, sélectionnez depuis le menu déroulant celle pour laquelle vous désirez créer ou modifier des pages. Si votre serveur ne comprend qu’une seule institution, son nom est affiché à la place du menu déroulant.
Cliquez sur le bouton Ajouter pour commencer une nouvelle page ou une collection de zéro.
Note
Une fenêtre surgissante apparaît, dans laquelle vous pouvez choisir de créer une page ou une collection.
Cliquez sur le bouton Copier pour sélectionner une page ou une collection comme base à votre création.
Search: If you have many pages and collections on the institution level, type your search term into the search field.
Utilisez la flèche vers le bas pour limiter vos recherches. Les options disponibles sont :
Titre, description, mots-clés : Recherche vos critères dans le titre, la description, et les mots-clés décrivant vos portfolios.
Titre, description : Il s’agit de l’option par défaut. La recherche se fait dans le titre et la description décrivant vos portfolios.
Mots-clés : La recherche s’effectue uniquement dans les mots-clés ajoutés à vos portfolios.
Trié par : Décidez l’ordre de tri pour l’affiche du résultat de la recherche parmi vos portfolios.
Alphabétique : Les portfolios sont affichés dans l’ordre alphabétique croissant sur leur nom.
Date de création : Le tri est fait de manière chronologique inverse, soit le dernier portfolio créé en tête de liste.
Dernière modification : Les portfolios sont triés pour mettre en tête de liste ceux qui viennent d’être modifiés. Il s’agit de l’option utilisée par défaut par Mahara.
Dernier accès : Affiche les portfolios dans l’ordre chronologique inverse de leur dernier accès aux portfolios, soit le dernier accédé en tête de la liste.
Popularité : Affiche les portfolios dans l’ordre des plus visités d’abord.
Commentaires : Affiche la liste des portfolios triée en fonction du nombre des commentaires qui y ont été placés; les plus commentés d’abord.
Note
L’ordre de tri que vous déterminez est conservé lorsque vous quittez la page ou lorsque vous vous déconnectez. Lorsque vous changez à nouveau ce paramètre, il est à son tour conservé jusqu’au prochain changement.
Cliquez sur le bouton Rechercher pour lancer la recherche sur tous les portfolios du site, basée sur les critères que vous avez indiqués.
Modifiez les pages et les collections globales comme à l’accoutumée
Note
Quand un utilisateur place un commentaire sur une page ou une production dans une institution, l’administrateur de l’institution et du site recevront une notification à ce sujet.
11.6.13. Journaux d’institution
Menu Administration → Institutions → Journaux
You create institution journals like regular personal journals. Institution journals allow you to create a journal template and then copy that into personal accounts for example. They also allow you to create a news blog for your institution.
Journaux d’institution
Institution : Si vous administrez plus d’une institution, sélectionnez depuis le menu déroulant celle pour laquelle vous désirez créer ou modifier des journaux. Si votre serveur ne comprend qu’une seule institution, son nom est affiché à la place du menu déroulant.
Vous pouvez créer plusieurs journaux. Cliquez à nouveau sur Créer un journal pour créer un nouveau journal.
Tous vos journaux sont listés dans le menu Administration → Institutions → Journaux avec leurs titres. Les titres renvoient à chaque journal.
The number of entries in this particular journal
The description of the journal if it has one
Cliquez sur l’icône en forme de Flèche pour accéder au journal et à ses articles.
Click the New entry button to create a new journal entry from this screen.
Click the Edit button to make changes to your journal title, description, or tags.
Cliquez sur le bouton Supprimer pour supprimer un journal et tout ce qu’il contient.
Avertissement
When you click the Delete button, you receive a confirmation message whether you really want to delete the journal or not. If you used the journal or an entry of it in a page, Mahara lets you know so you can decide whether to delete the journal or not. Once you agree to delete the journal, your journal and all its content are removed permanently and cannot be retrieved again.
11.6.14. Partager des pages et collections de l’institution
Menu Administration → Institutions → Partager
S’affiche ici la liste de toutes les pages et les collections de l’institution.
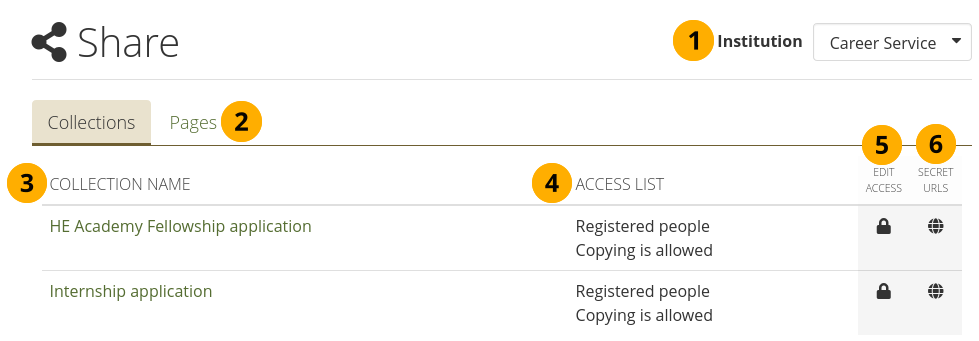
Partager des pages et collections de l’institution
Institution : Si vous administrez plus d’une institution, sélectionnez depuis le menu déroulant celle pour laquelle vous désirez modifier les critères de partage des pages et des collections. Si votre serveur ne comprend qu’une seule institution, son nom est affiché à la place du menu déroulant.
Décidez si vous désirez ou non modifier les droits d’accès d’une page ou d’une collection.
Note
You can select more than one collection or page on the following screen and give them all the same permissions at once.
Nom de la collection / page : Toutes les collections ou les pages pour cette institution sont listées ici.
Pages partagées : Affiche ici la liste des collections et des pages avec les droits d’accès partagés.
Cliquez sur l’icône Modifier l’accès pour modifier les droits d’accès et déterminer qui a le droit d’afficher et de dupliquer les pages ou les collections.
Cliquez sur l’icône Modifier l’URL secrète pour définir une nouvelle URL secrète pour la page ou la collection.
Partager une page ou une collection de l’institution est similaire à partager une page ou une collection d’un portfolio privé. La seule différence est que vous pouvez forcer la copie automatique de celle-ci pour chaque membre lorsqu’il rejoint l’institution pour la première fois.
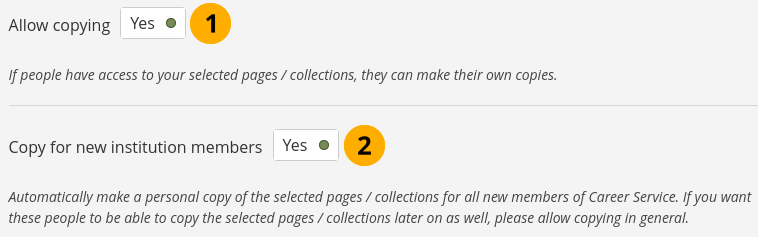
Paramètres pour autoriser la copie des pages pour les nouveaux membres de l’institution
When you clicked the Edit access icon on the Share page for institution pages and collections, click the Advanced options link and change the switch for Allow copying to “Yes”. This now allows everyone who has access to the selected page(s) or collection(s) to copy them.
Copy for new members: Enable this option if all new members in your institution shall receive a copy of the selected page(s) or collection(s) into their portfolios when an account is created for them.
Note
If you enable this option without also enabling the option “Allow copying”, your existing members will not be able to make a copy of the page(s) or collection(s) themselves if they need another one.
Cliquez sur bouton Enregistrer au bas de la page pour enregistrer vos options.
Lorsque un administrateur du site créée et partage une page ou une collection de l’institution, il peut la partager avec les membres de l’institution dans laquelle la page ou la collection a été créée.
11.6.15. Fichiers
Menu Administration → Institutions → Fichiers
La zone de fichiers dans l’institution contient les fichiers qui sont téléversés par les administrateurs. L’importation de ces documents se fait de la même manière que celle décrite pour la zone des fichiers personnels.
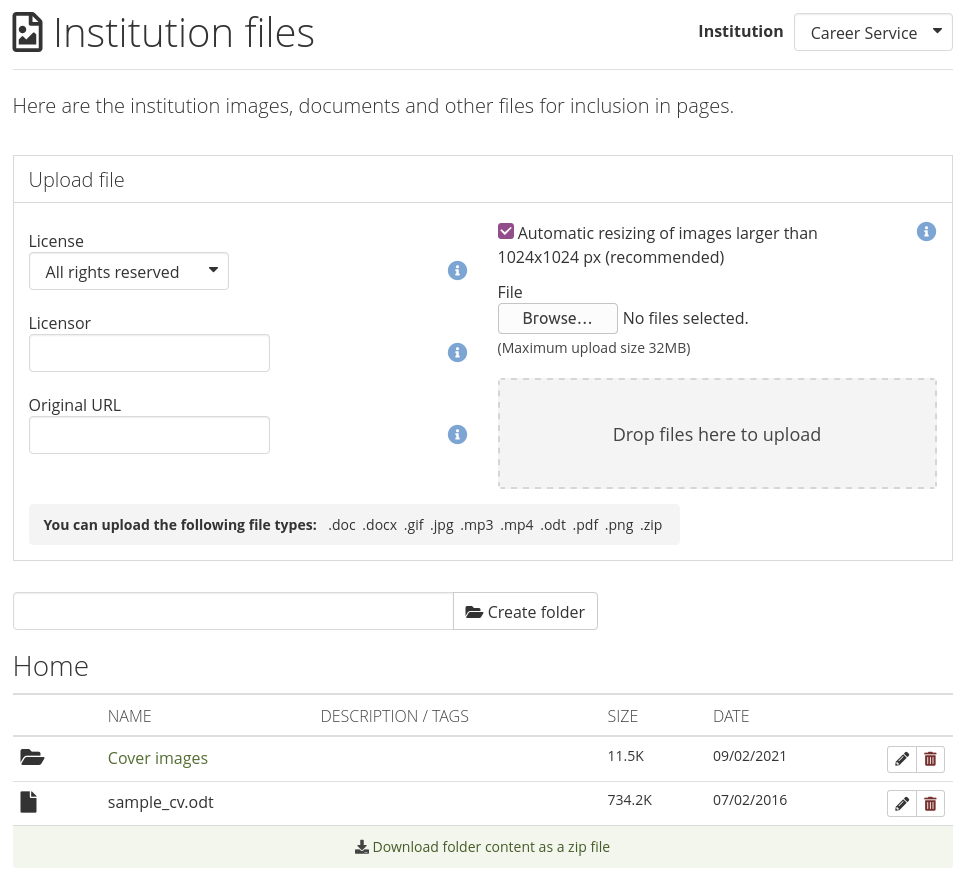
Fichiers de l’insitution
11.6.16. Mots-clés
Menu Administration → Institutions → Mots-clés
11.6.16.1. Gérer les mots-clés d’institution
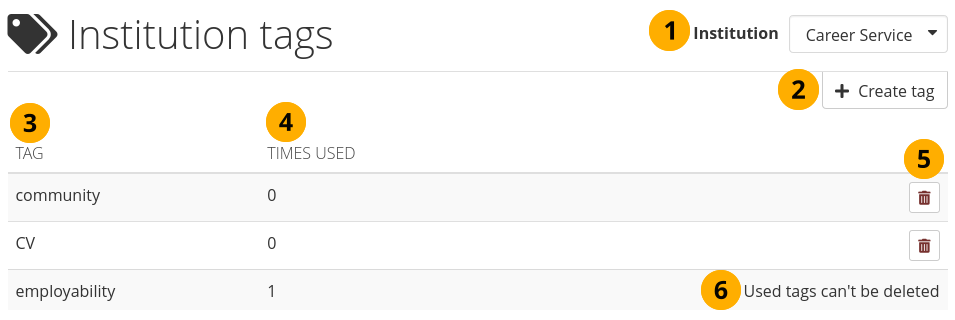
Gérer les mots-clés d’institution
Institution : Si vous administrez plus d’une institution, sélectionnez celle pour laquelle vous souhaitez gérer les mots-clés. S’il n’y a qu’une seule institution, son nom sera affiché sans le menu déroulant.
Cliquez sur le bouton Créer un mot-clé pour créer un nouveau mot-clé.
Mots-clés : Répertorie tous les mots-clé créés dans cette institution.
Nombre de références : Affiche le nombre de fois où le mot-clé a été utilisé par les membres de l’institution.
Cliquez sur le bouton Supprimer pour supprimer un mot-clé.
If a tag is currently in use, you cannot delete it.
11.6.16.2. Créer un mot-clé d’institution
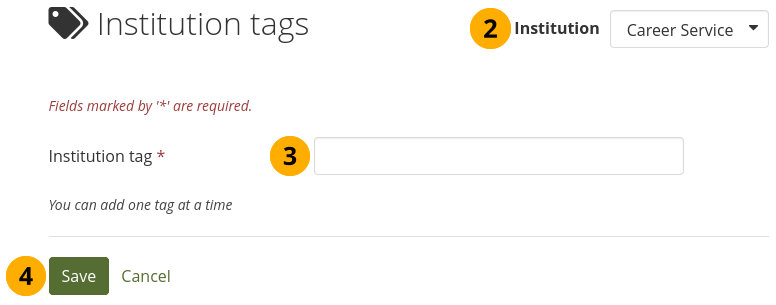
Créer un mot-clé d’institution
Cliquez sur le bouton Créer un mot-clé sur la page Mots-clés pour créer un nouveau mot-clé.
Institution: If you administer more than one institution, make sure the institution in which you want to create the tag is displayed. If there is only one institution, its name will be displayed without the drop-down menu.
Mot-clé de l’institution : Entrez un nouveau mot-clé d’institution. Il peut être composé de plusieurs mots.
Click the Save button to save this new tag, or click Cancel to abort the action.
11.6.16.3. Utiliser un mot-clé d’institution
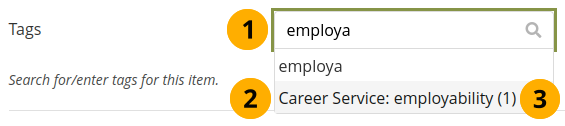
Utiliser les mots-clés d’institution
Vous pouvez utiliser les mots-clés de l’institution à laquelle vous appartenez partout où vous pouvez saisir des mots-clés.
Cliquez dans le champ de recherche des mots-clés et commencez à taper quelques lettres du mot-clé que vous recherchez. La recherche se réduit aux mots-clés potentiels
Les mots-clés d’institution sont préfixés par le nom de l’institution.
Vous voyez le mot-clé actuel après le nom de l’institution, y compris le nombre de fois où vous l’avez utilisé.
11.6.17. Adhésions en suspens
Menu Administration → Institutions → Enregistrements en attente.
When you turn on Confirm registration for an institution in the institution settings, no account in this institution is created without the administrator knowing it. If a person is rejected, no account is created. If the option Confirm registration is not turned on, an account is created in the “No institution” institution but not in the actual institution.
Ci-après est décrit le processus pour un enregistrement automatique d’un nouvel utilisateur lorsque l’option Confirmer les demandes d’enregistrement est activée.
11.6.17.1. Auto-enregistrement pour des comptes internes
When people try to self-register for your institution, they must provide certain details.
Note
Les rubriques du courriel, du prénom et du nom de famille peuvent apparaître dans un ordre différent, si vous avez sélectionné l’option de protection avancée contre les spams.
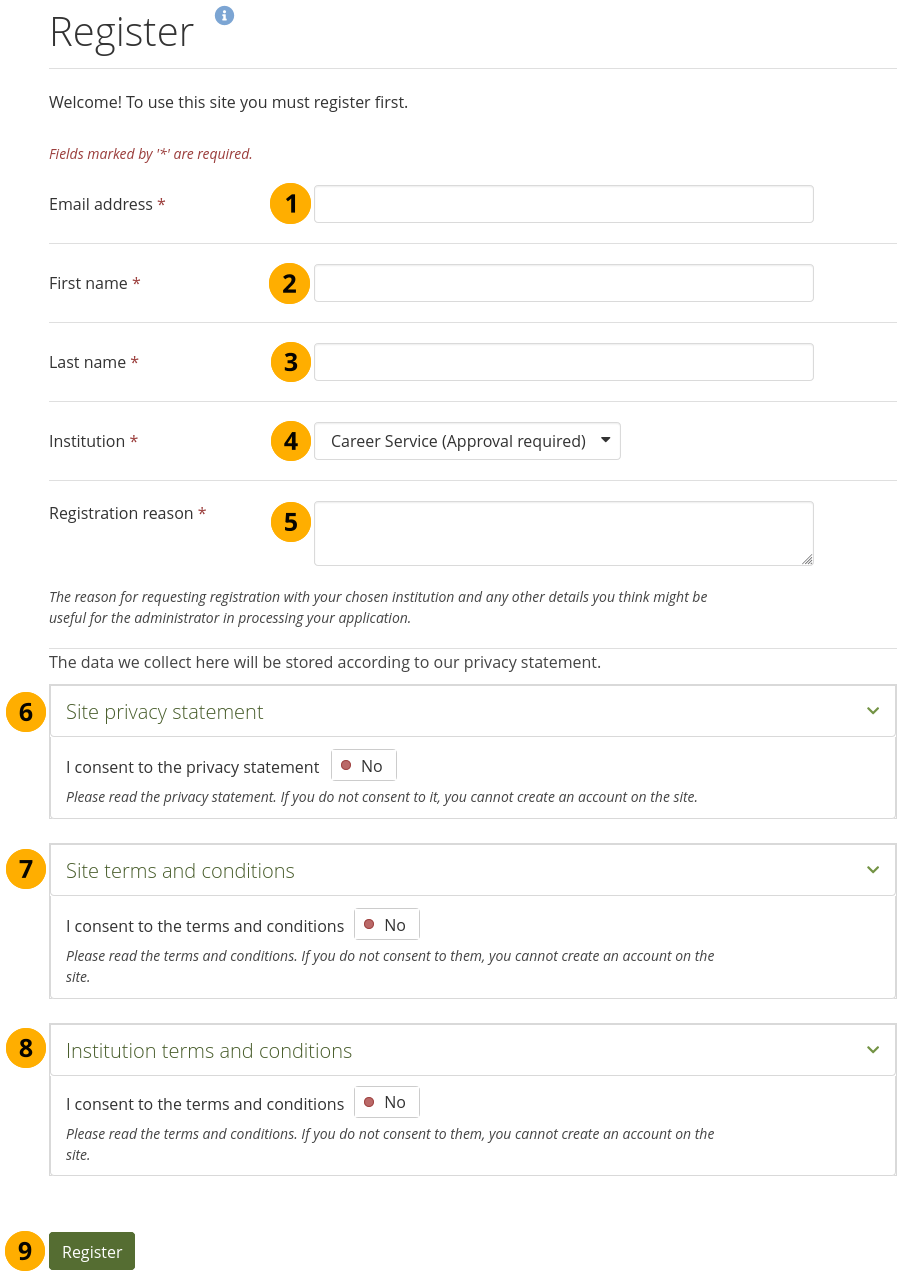
Self-registration for an institution
Prénom : Indiquez votre prénom.
Nom de famille : Indiquez votre nom de famille.
Adresse courriel : Indiquez votre adresse courriel principale.
Institution : Sélectionnez l’institution dans laquelle vous désirez vous enregistrer. Une information indique si l’institution dans laquelle vous voulez vous enregistrer demande tout d’abord l’accord d’un administrateur ou pas.
Raison de l’inscription : Si l’approbation de l’administrateur est requise, vous devez fournir une raison pour laquelle vous voulez rejoindre l’institution.
You may need to accept the site privacy statements if the site has “Strict privacy” turned on or requires that the “Registration agreement” is accepted.
You may need to accept the site terms and conditions for the site. If the institution you are registering for has additional terms and conditions to the general site ones, they will be in the institution terms and conditions.
You may need to review and accept the institution’s privacy statement and / or terms and conditions if there are separate ones to the site’s.
Cliquez sur le bouton Envoyer.
The administrators of that institution receive a notification about the pending registration. They then review pending registrations.
Note
If the institution doesn’t have any institution administrators, the site administrator will receive notifications about account registrations.
If your account is approved, you will receive an email that includes a link to confirm your email address. You must click that link within 24 hours. If you do not, you will have to start the registration process again from the beginning.
11.6.17.2. Gérer les demandes d’enregistrement en suspens
En tant qu’administrateur, vous pouvez consulter les inscriptions en attente pour vos institutions sur la page Inscriptions en attente dans Menu Administration → Institutions → Inscriptions en attente.
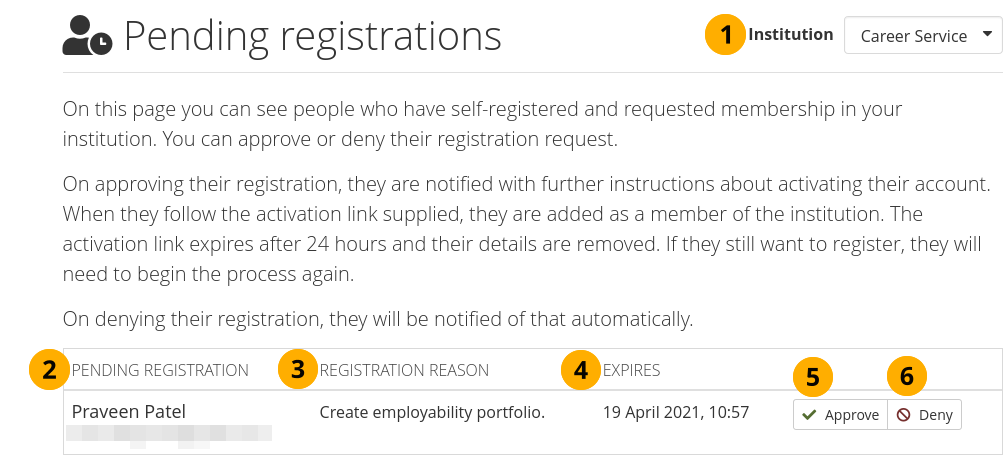
Pages des Adhésions en suspens
Institution : Si vous administrez plus d’une institution, sélectionnez depuis le menu déroulant celle pour laquelle vous désirez gérer les demandes d’enregistrement en attente. Si votre serveur ne comprend qu’une seule institution, son nom est affiché à la place du menu déroulant.
Pending registration: You see a list of all registration requests. They include the names of the requesters and their email addresses.
Raison de la demande d’enregistrement : La raison de la demande d’enregistrement est affichée ici.
Expiration : Le délai dans lequel un administrateur doit approuver cet enregistrement.
Cliquez sur le bouton Accepter si vous désirez accepter la demande d’inscription d’une personne à votre institution. Vous devrez aussi confirmer votre acception sur la prochaine page. Le demandeur recevra alors un courriel avec un lien lui permettant de terminer son inscription.
Cliquez sur le bouton Refuser si vous ne désirez pas donner suite à la demande d’inscription d’une personne dans votre institution.
When you approve accounts, you can decide whether they should receive staff rights. For example, this helps to give all teachers at a school staff access rights upon their self-registration.
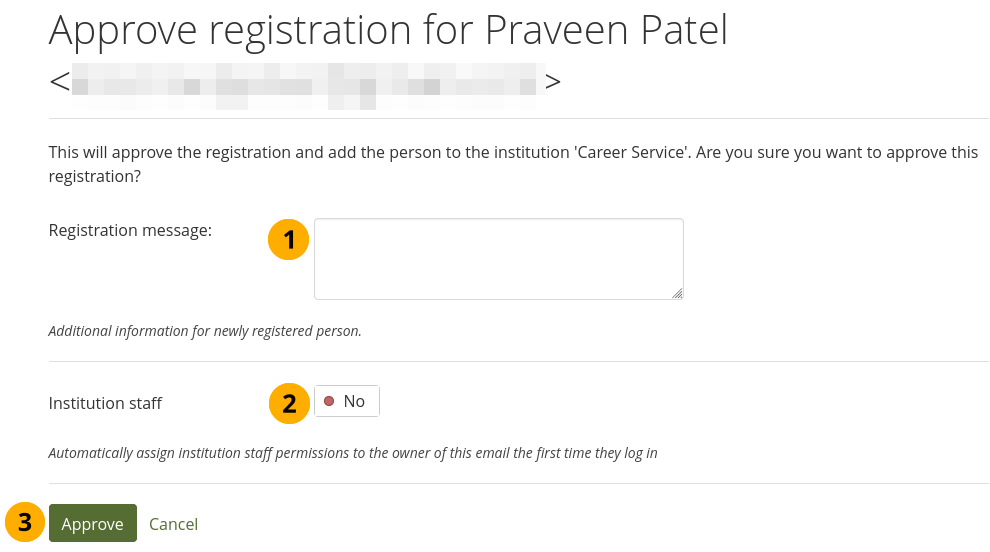
Approuver un enregistrement en attente
Message d’inscription : Envoyer un message à la personne dont vous approuvez le compte. Il peut s’agir d’un message de bienvenue ou d’informations supplémentaires pour l’aider à démarrer.
Institution staff: Switch to “Yes” if the person shall have staff access rights.
Cliquez sur le bouton Accepter si vous désirez accepter la demande d’inscription ou cliquez sur Annuler pour stopper le processu d’acceptation.
Vous pouvez voir le délai dans lequel la personne qui s’inscrit doit terminer le processus d’inscription.

Enregistrement en attente : En attente de l’achèvement de l’enregistrement du compte
Expiration: La date et l’heure auxquelles une personne qui s’inscrit elle-même doit achever le processus d’inscription.
Indicateur indiquant que la personne qui s’auto-enregistre doit compléter l’enregistrement.
Lorsque vous décidez de refuser l’accès à votre institution, vous avez la possibilité d’indiquer à la personne en question la raison de votre refus.
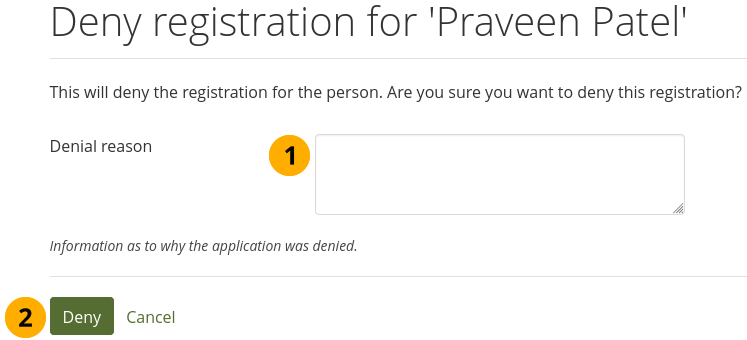
Reason for denying institution membership for a self-registering person
Raison du refus : Vous pouvez donner ici la raison du refus à la demande d’enregistrement d’un utilisateur. Ainsi cette personne saura pourquoi sa demande est refusée.
Cliquez sur le bouton Refuser pour envoyer une notification sur l’adresse courriel du demandeur en indiquant la raison de ce refus; ou cliquez sur Annuler pour annuler le processus de refus.
11.6.17.3. Terminer l’auto-inscription
When people are accepted as members in an institution via this process, they must still complete the registration process. This is necessary to provide information in all required fields besides a password and a username.
Remplir le formulaire d’auto-inscription pour une institution
Nouveau nom d’utilisateur : Indiquez ici un nouveau nom d’utilisateur. Un nom d’utilisateur par défaut est proposé, mais vous pouvez le modifier en proposant votre propre choix. Si le nom d’utilisateur que vous souhaitez est déjà utilisé par un autre utilisateur, le système vous en informera juste après que vous aillez envoyé vos informations.
Nouveau mot de passe : Indiquez ici le nouveau mot de passe que vous désirez utiliser. Cette rubrique doit être renseignée.
Confirmer le mot de passe : Entrez à nouveau votre mot de passe ici. Cette rubrique doit être renseignée.
Click the Submit button to complete your registration. You are taken to your Dashboard.
11.6.18. Suppressions en attente
Menu Administration → Institutions → Suppressions en attente.
When the site administrator required all institutions to review account deletions in the site configuration or an institution administrator required it for their institution in the institution settings, members cannot delete their accounts immediately. Instead, an administrator needs to approve or deny the request.
When a person requested that their account be deleted, the institution or site administrator receives a notification.
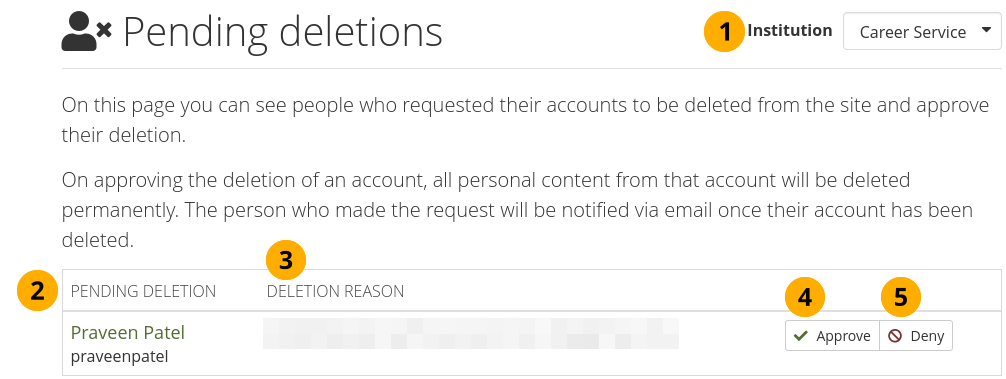
Page des comptes en attente de suppression
Institution : Si vous administrez plus d’une institution, sélectionnez celle pour laquelle vous souhaitez examiner les suppressions en attente. S’il n’y a qu’une seule institution, son nom sera affiché sans le menu déroulant.
Pending deletion: The name and username of the person who wants to delete their account is displayed. Their name is linked to their profile page.
Raison de la demande : Affichage de la raison de la demande.
Click the Approve button when you want to approve the account deletion. You will have to confirm this decision on the next page. The person will receive an email to their primary email address stored in Mahara when the deletion has been completed.
Avertissement
Account deletion is permanent, and content cannot be retrieved once an account has been deleted. Once you approve the account deletion, it will happen immediately.
Click the Deny button if you do not want the account to be deleted right away. Provide a reason for your decision so that the person can get in touch with you to discuss your decision.