11.4. Personnes
Menu Administration → Personnes
Dans le menu Personnes de l’administration les administrateurs du site peuvent :
search for people
change settings for individual people
suspend and delete accounts
make people site staff or administrators
contrôler les paramètres de notifications pour les administrateurs
add and update accounts manually or by CSV
afficher des rapports
Dans le menu Personnes de l’administration les administrateurs de l’institution peuvent :
search for people
change settings for individual people
suspend and delete accounts
contrôler les paramètres de notifications pour les administrateurs de leurs institutions
add and update accounts manually or by CSV
afficher des rapports
11.4.1. People search
Administration menu → People → People search
Note
Site administrators can search for anybody on the entire site while institution administrators can only search among the members of their institution(s).
11.4.1.1. Standard people search
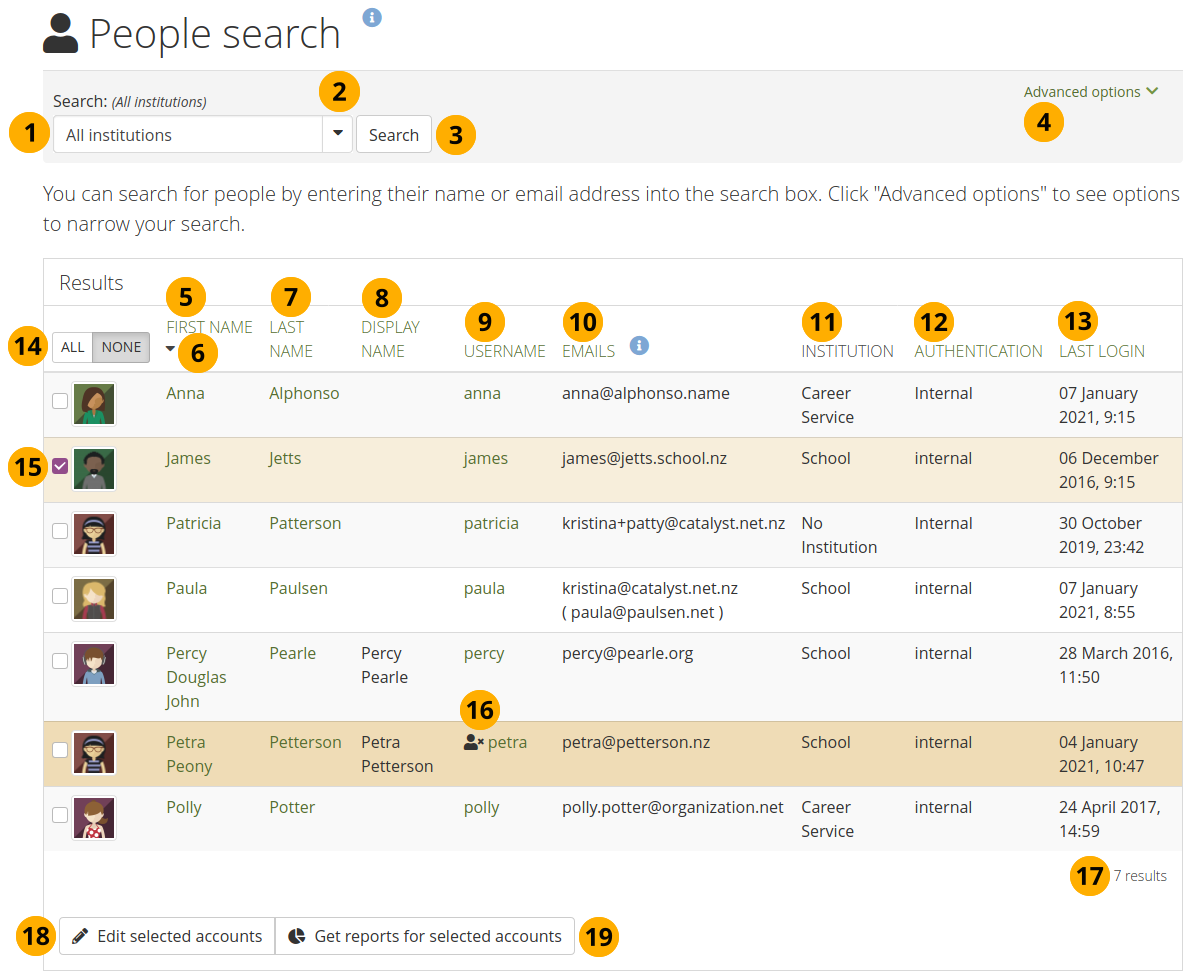
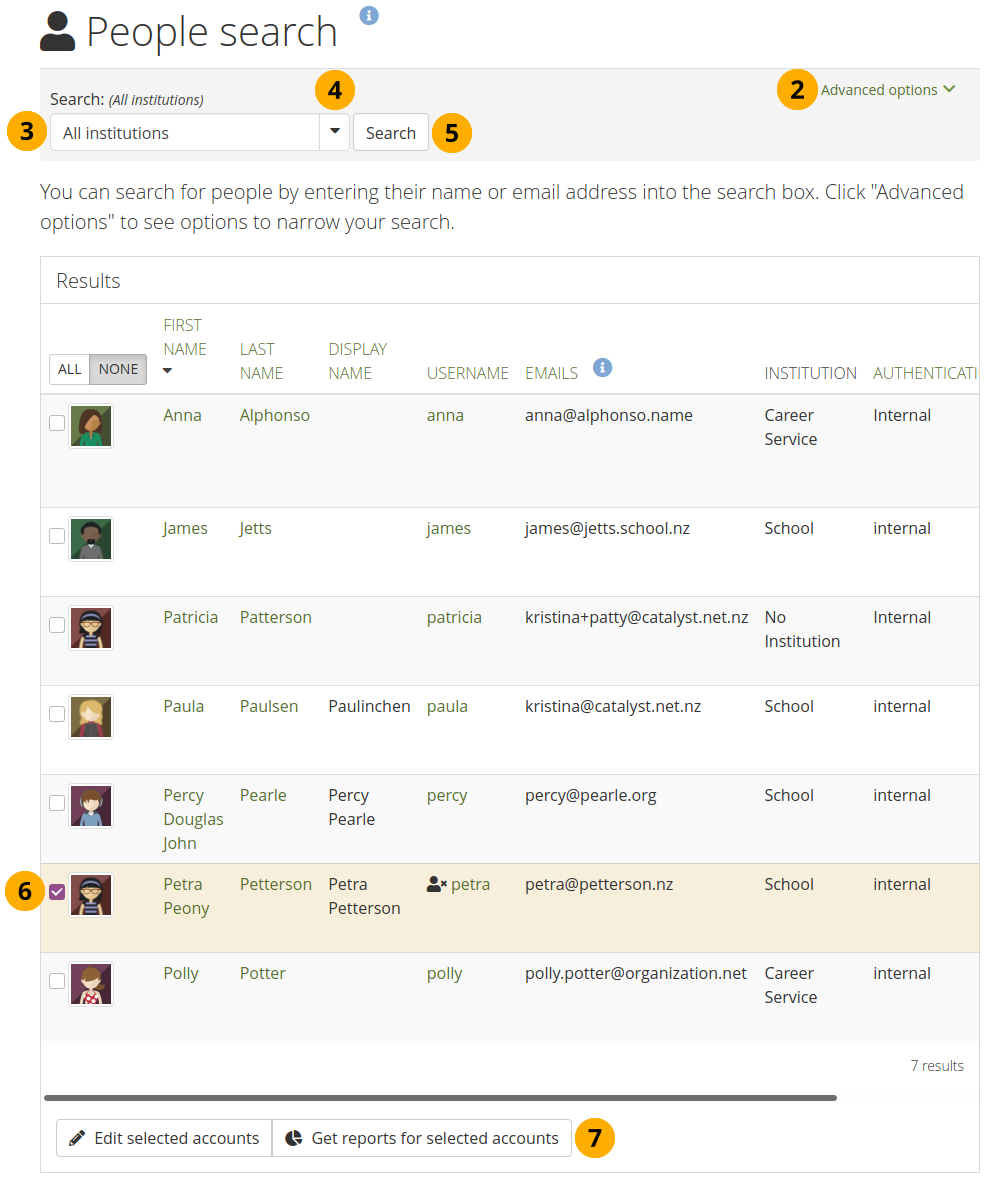
People search
Rechercher : Entrez le critère de recherche. Le texte en gris par défaut dans la rubrique vous informe dans quelle institution vous allez effectuer la recherche. Entrez le nom, le nom d’affichage, le nom d’utilisateur, ou l’adresse de courriel, entièrement ou de manière partielle, pour effectuer la recherche. Si vous avez activé l’option de recherche exacte, vous devez entrer ou l’adresse ou le nom exact de la personne que vous recherchez, car la recherche partielle n’est alors plus possible.
Note
Both primary and secondary email addresses are searchable.
Use the drop-down arrow to choose a single institution in which to search for a person.
Cliquez sur le bouton Rechercher pour lancer la rechercher.
Click the “Advanced options” link to make filtering options visible.
First name: The first name links through to the person’s profile page.
Cliquez sur la flèche pour modifier l’ordre de tri de la colonne. Toutes les colonnes sauf celle de l’institution peuvent être triées.
Last name: The last name links through to the person’s profile page.
Nom d’affichage : Le nom d’affichage est affiché ici.
Username: This is the internal Mahara username. Click the username to go to this person’s account settings page.
Emails: The primary email address as well as all secondary email addresses are displayed.
Note
Les adresses courriel secondaires sont affichées entre parenthèses.
Institution: The institution or institutions that a person belongs to are displayed.
Authentication: The authentication method for this account is shown.
Dernier accès : Date et heure du dernier accès.
Click the All button to select all accounts and click the None button to deselect all accounts.
You can also tick the checkbox for an individual to select them.
Accounts that are suspended or expired have the Inactive account icon next to their username.
The number of search results are available. If there are more than ten accounts in the search results, you have a pager available to go to more results.
Click the Edit selected accounts button to perform the bulk actions to
suspend people
delete accounts
change the authentication method of accounts
Click the Get reports for selected accounts button to
view account reports
download account information for further actions
11.4.1.2. Options avancées pour la recherche des utilisateurs
Vous pouvez combiner la recherche avec des critères pour filtrer les résultats. Attention en utilisant trop de critères vous risquez de n’obtenir aucun résultat.
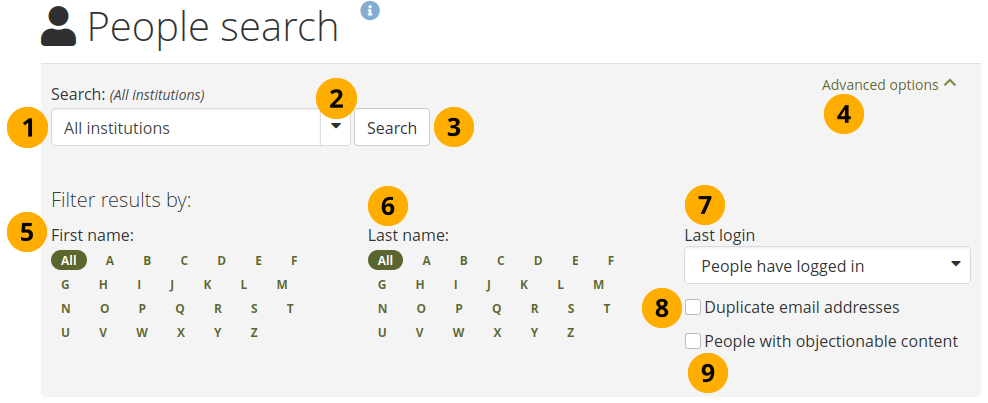
Options avancées pour la recherche des utilisateurs
Rechercher : Sont affichés les contextes au sein des institutions dans lesquels la recherche peut avoir lieu.
Use the drop-down arrow to choose a single institution in which to search for your a person.
Cliquez sur le bouton Rechercher pour filtrer les résultats pour cette institution seulement.
Click the “Advanced options” link to make additional filtering options visible.
First name: Filter the people you wish to display by the initial of their first name. Click the letter of the alphabet to narrow your search.
Last name: Filter the people you wish to display by the initial of their last name. Click the letter of the alphabet to narrow your search.
Dernier accès : Vous avez plusieurs options :
Anybody: Display anybody who fits any other search / filter criteria.
People have logged in: Display everybody who has logged in at least once.
People have never logged in: Display everybody who has never logged in.
People have logged in since: Display everybody who has logged in since a specified date and time. You can choose the date in a date field that is displayed once this option is chosen.
People have not logged in since: Display everybody who has not logged in since a specified date and time. You can choose the date in a date field that is displayed once this option is chosen.
Duplicate email addresses: Tick this checkbox if you only want to display people whose email address is in the system twice so you can deal with them.
Note
Normally, duplicate email addresses are not possible, but if a person imports a Leap2A file or if an external authentication method is used, duplicates can happen.
People with objectionable content: Filter your results by those people who have objectionable content in one or more of their portfolios.
11.4.1.3. Account bulk actions
You can perform a number of bulk actions for accounts on the Bulk actions page:
les suspendre
modifier leur méthode d’authentification
modifier les points de probation
les supprimer
11.4.1.3.1. Suspend accounts
You can suspend accounts in bulk disallowing them to log into their accounts. Their portfolios will not be available any more to others.
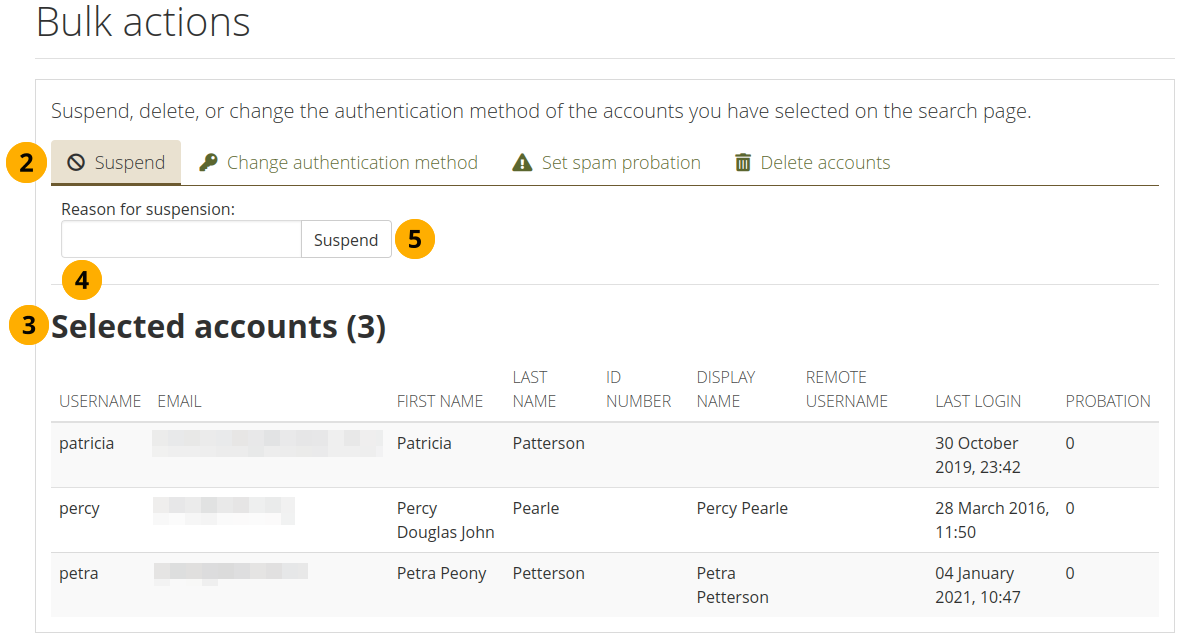
Account bulk actions: Suspend accounts
On the People search page, select the accounts that you wish to suspend and click the Edit button.
Contrôlez que vous êtes bien sur l’onglet Suspendre.
Selected accounts: Review the accounts you have selected.
Reason for suspension: Provide a reason for suspending the accounts listed on this page.
Click the Suspend button to prevent these account holders from accessing their accounts.
Note
If you made a mistake or want to remove a temporary suspension, you can do so under Suspended and expired accounts.
11.4.1.3.2. Modifier la méthode d’authentification
Vous pouvez modifier la méthode d’authentification en même temps pour plusieurs utilisateurs.
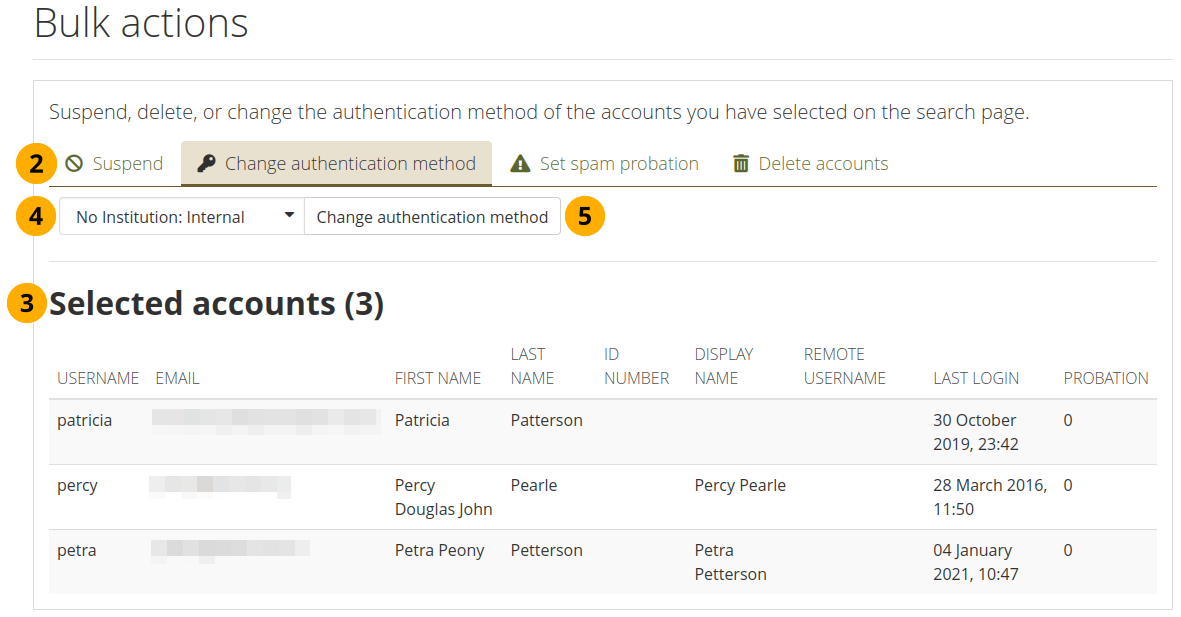
Account bulk actions: Change authentication method
On the People search page, select the accounts for whom you wish to change the authentication method and click the Edit button.
Contrôlez que vous êtes bien sur l’onglet Modifier la méthode d’authentification.
Selected accounts: Review the accounts you have selected.
Sélectionnez une nouvelle méthode d’authentification depuis le menu déroulant. Choisissez aussi la bonne institution et les méthodes d’authentification associées.
Cliquez sur le bouton Modifier la méthode d’authentification pour effectuer le changement.
Note
Vous devez modifier ou ajouter un nom d’utilisateur distant pour certaines méthodes authentification. Ceci se fait dans une étape supplémentaire. Pour plus d’information à ce sujet, consultez les instructions dans le chapitre modifier la méthode d’authentification et le nom d’utilisateur distant.
11.4.1.3.3. Activer le système de probation antispam
You can change the spam probation points for many account holders at once.
Note
Cette fonctionnalité n’est possible que sur les sites où les points de probation anti pourriel ont été activés.
Newly self-registered persons - no matter whether the institution requires explicit administrator confirmation or not - start out with a certain number of “probation points” on their account. While they have any probation points, they are considered a probationary person and cannot create public pages in their portfolio or post links or images to potentially public content such as comments, wall posts or forum posts.
Each time a probationary person makes a post in a forum, and the post is replied to by a non-probationary person, the probationary person loses one probation point. When the number of points reaches zero, they are no longer on probation.
Probation points have no effect on persons who have staff or administrator status.
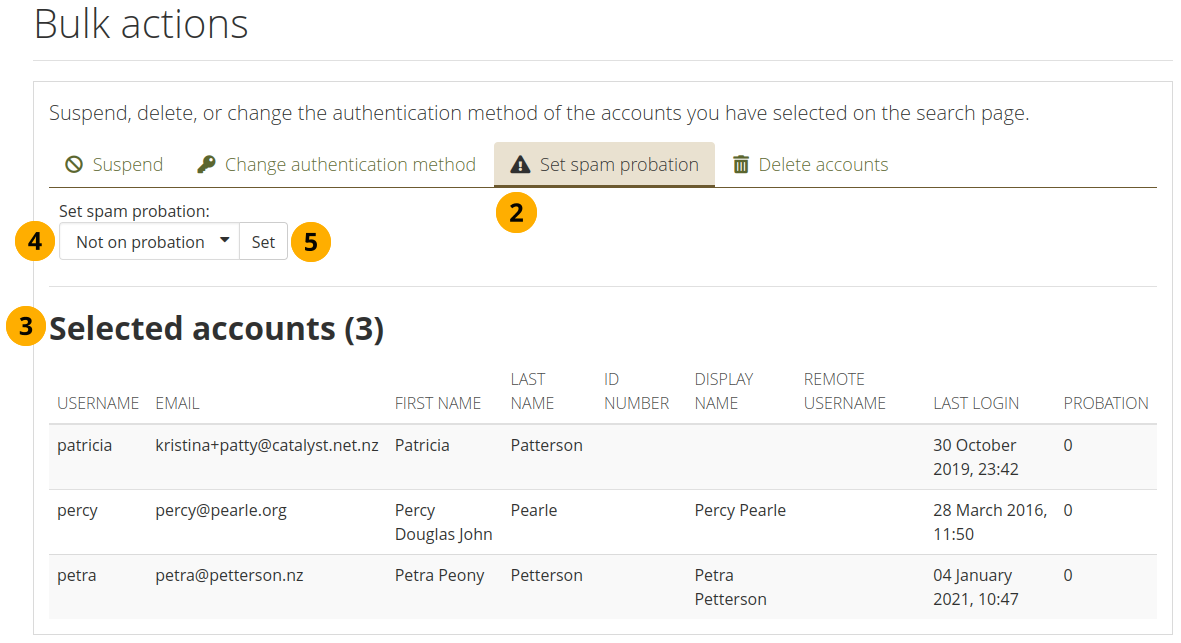
Account bulk actions: Set spam probation
On the People search page, select the accounts for whom you wish to set probation points and click the Edit button.
Contrôlez que vous êtes bien sur l’onglet Activez le système de probation.
Selected accounts: Review the accounts you have selected.
Select the number of probation points from the drop-down menu that you wish to give the selected accounts.
Cliquez sur le bouton Valider pour activer la modification.
11.4.1.3.4. Delete accounts
Vous pouvez supprimer d’un coup plusieurs utilisateurs
Avertissement
When you delete an account, all personal data is wiped from the system. This action cannot be undone. The person’s contributions in groups, e.g. forum messages, uploaded files and pages created in a group, are still available, but are made anonymous by changing the name to “Deleted account” as author where an author is shown.
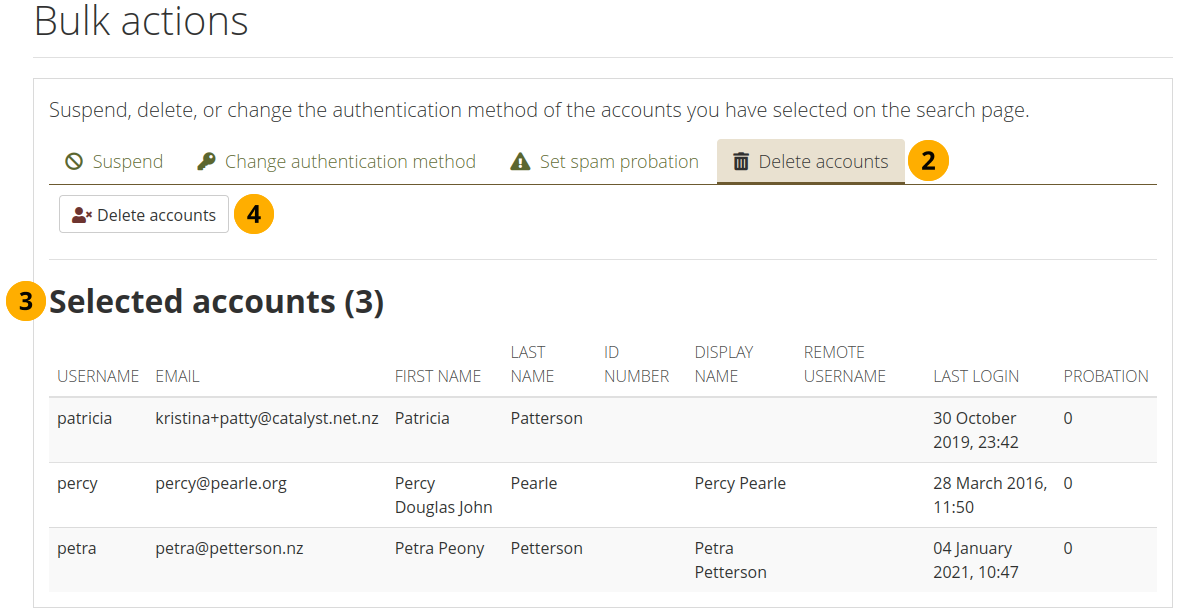
Account bulk actions: Delete accounts
On the People search page, select the accounts that you wish to delete and click the Edit button.
Make sure that you are on the Delete accounts tab.
Selected accounts: Review the accounts you have selected.
Cliquez sur le bouton Supprimer. Les comptes de utilisateurs seront alors irrémédiablement supprimés avec les données qu’ils contiennent.
Note
Forum posts and comments that people have written or portfolio pages in which they were involved in groups are not deleted. However, their name is being removed.
11.4.2. Préférences du compte
Administration menu → People → People search → Click on a username
On the Account settings page of a person in the administration area, you can perform a number of actions to manage the account. However, you cannot change personal information about this person, e.g. name or email, from this page. This can only be done in the Profile area of the account or via the Add people by CSV page.
Overview of the account settings page
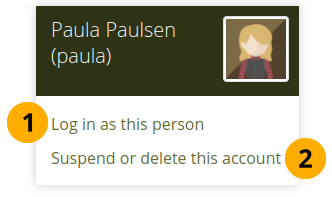
11.4.2.1. Se connecter comme
As administrator you have the power to log in as any person that you manage and masquerade as them.
Note
Site administrator can log in as anybody while institution administrators can only perform this action for members of their institution(s).
It is a great function for troubleshooting an account because you see everything as the person would without having to know the password.
Avertissement
This function can be misused by administrators because you can make changes to the person’s portfolio and artefacts as well as participate in groups while logged in as them. People should be aware of this function and that an administrator can enter their account.
Sites should have clear policies around the use of this function so that the privacy of people and their portfolios and collaborative work is protected. Therefore, there should also not be many people within an institution who have administrator rights.
Log in as another person
Click on the person’s name to go to their profile page. You can then click the Log in as … link to become that person from that screen.
Click the Log in as link to become that person. You see a warning bar at the top of the browser window telling you that you are masquerading as that person.
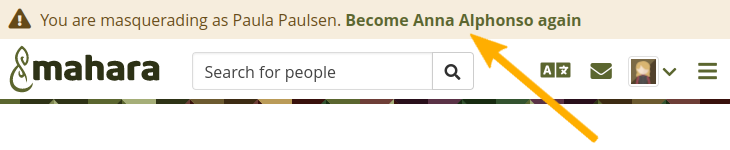
Stop masquerading as another person
Lorsque vous désirez retourner à votre propre identité d’administrateur, cliquez sur le lien Revenir au compte [votre nom] en haut de la fenêtre du navigateur.
When the site administrator enabled the logging of all or just masquerading events, administrators may be required to provide a reason for the masquerading and a notification about this may be sent to the account holder.
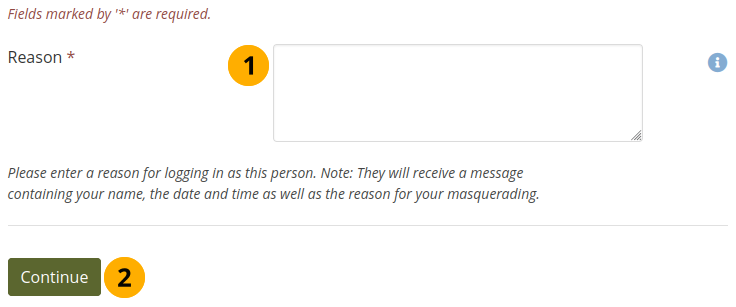
Provide a reason for masquerading as another person
Write why you are masquerading as this person. This reason may be sent to the person if the site administrator demands that.
Click the Continue button to log in as that person.
If the site administrator decided to have account holders notified of the masquerading, you would see the screen notice “The person has been notified of this masquerading session.”
When the site administrator decided to send notifications to people when an administrator logs into their account, the peoples receive this notification in their inbox. Depending on their notification settings, it can also be delivered via email.
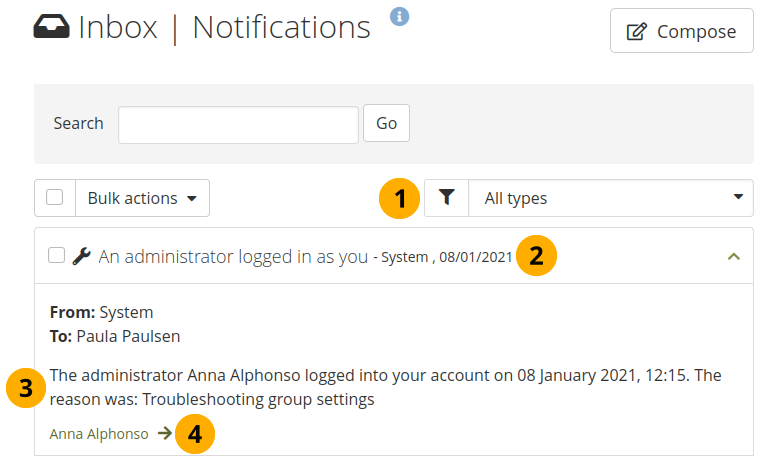
Notification a person receives when an administrator masquerades
Type d’activité : La notification d’accès sous l’identité d’autrui est un message du système. Si vous recevez déjà un grand nombre de notifications, vous pouvez les filtrer pour ne voir que celles-ci.
Cliquez sur la barre pour afficher le message dans son entier.
The system message “An administrator logged in as you” contains the name of the administrator and the time when the administrator started masquerading. If the site administrator requires a reason to be sent for the masquerading, it is displayed as well.
Le nom de l’administrateur qui s’est connecté sous votre nom est indiqué et est lié à sa page du profil où vous trouverez plus d’information sur lui et pourrez lui envoyer un message.
11.4.2.2. Suspend a person
Suspend a person if they do not follow the terms and conditions of the site and behave inappropriately. Suspended people cannot log in, but all their content is still available.
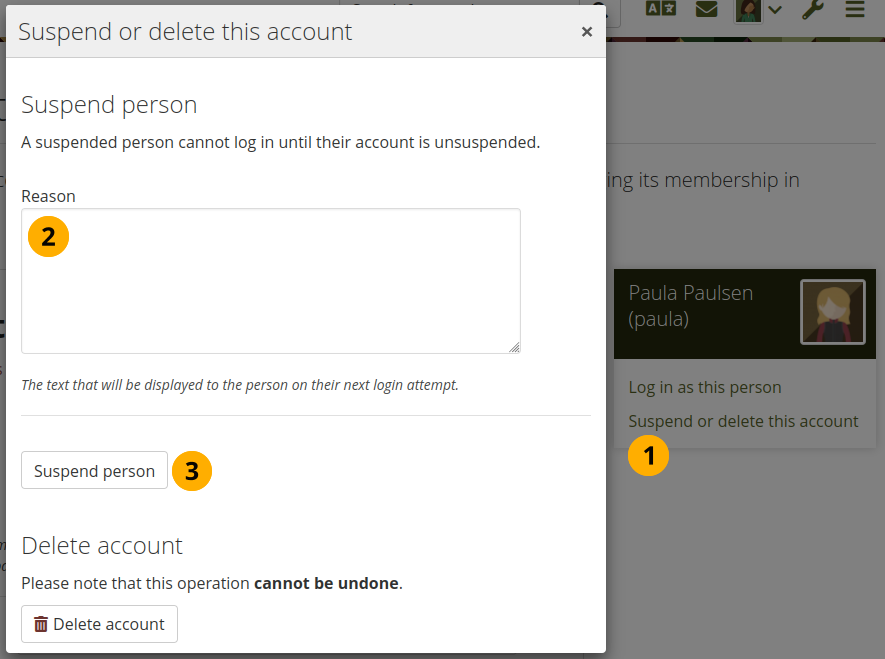
Suspend a person
Click the link Suspend or delete this person. A pop-up windows becomes visible.
Reason: Provide a reason for your suspension. This is particularly useful when you are not the only administrator and / or need to remember after some time why you suspended this person.
Click the Suspend person button to disallow them from logging in.
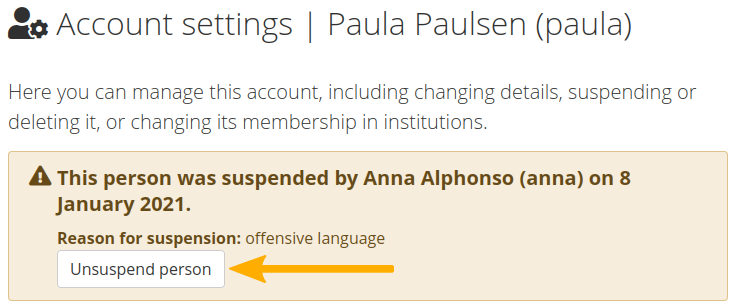
Suspension notice on the person’s account settings page
When a person has been suspended, the suspension message appears on their account settings page stating the reason and the date for the suspension and giving the administrators the possibility to unsuspend the person by clicking the Unsuspend person button.
You can unsuspend a person from this page or together with others on the Bulk actions page.

Suspended person tries to log in and gets suspension message
When the person tries to log in, they will see the suspension message and the reason. They can then contact an administrator via the “Contact us” form for further action.
11.4.2.3. Delete account
Peoples can delete their own accounts in their account settings if self-registration is allowed by their institution. Administrators can also delete accounts at any time.
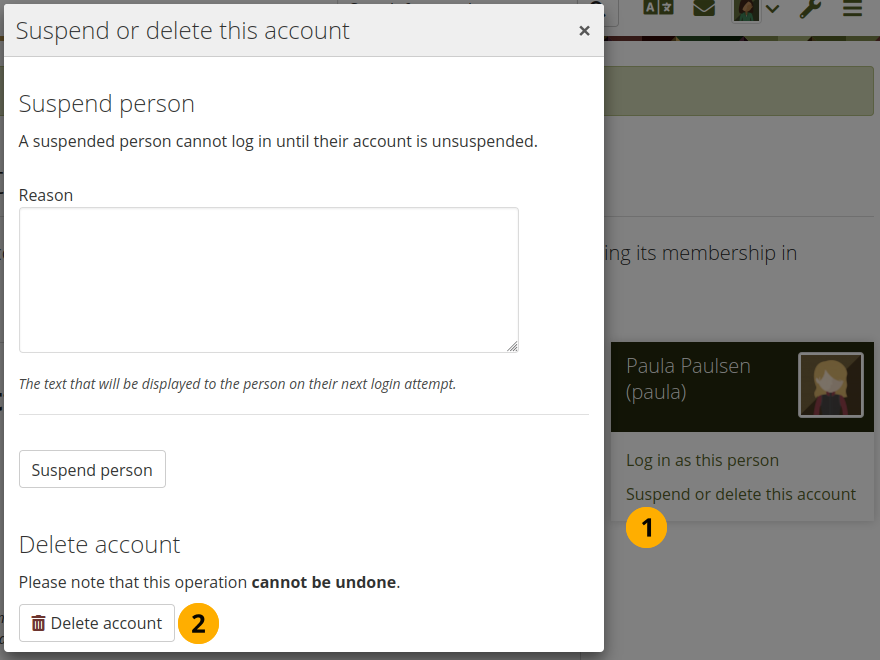
Delete an account
Click the link Suspend or delete this person. A pop-up windows becomes visible.
Click the Delete account button to delete this account permanently. This action cannot be undone. As this is a permanent action, you see a confirmation pop-up window that you will have to acknowledge.
Avertissement
When you delete an account, all personal data is wiped from the system. This action cannot be undone. The person’s contributions in groups, e.g. forum messages, uploaded files and pages created in a group, are still available, but are made anonymous by changing the name to “Deleted account” as author where an author is shown.
Note
If an account was deleted by accident - either by a person themselves or by an administrator - swift action may result in recovery of (most of) the data from a backup file. This requires access to the server’s backups and the backend of Mahara. More information is available on the wiki under Restoring a deleted account.
11.4.2.4. Modifier les préférences du compte
You can view and change a number of settings for an account.
Note
Depending on the authentication method that is associated with this account, you may not be able to edit all settings.

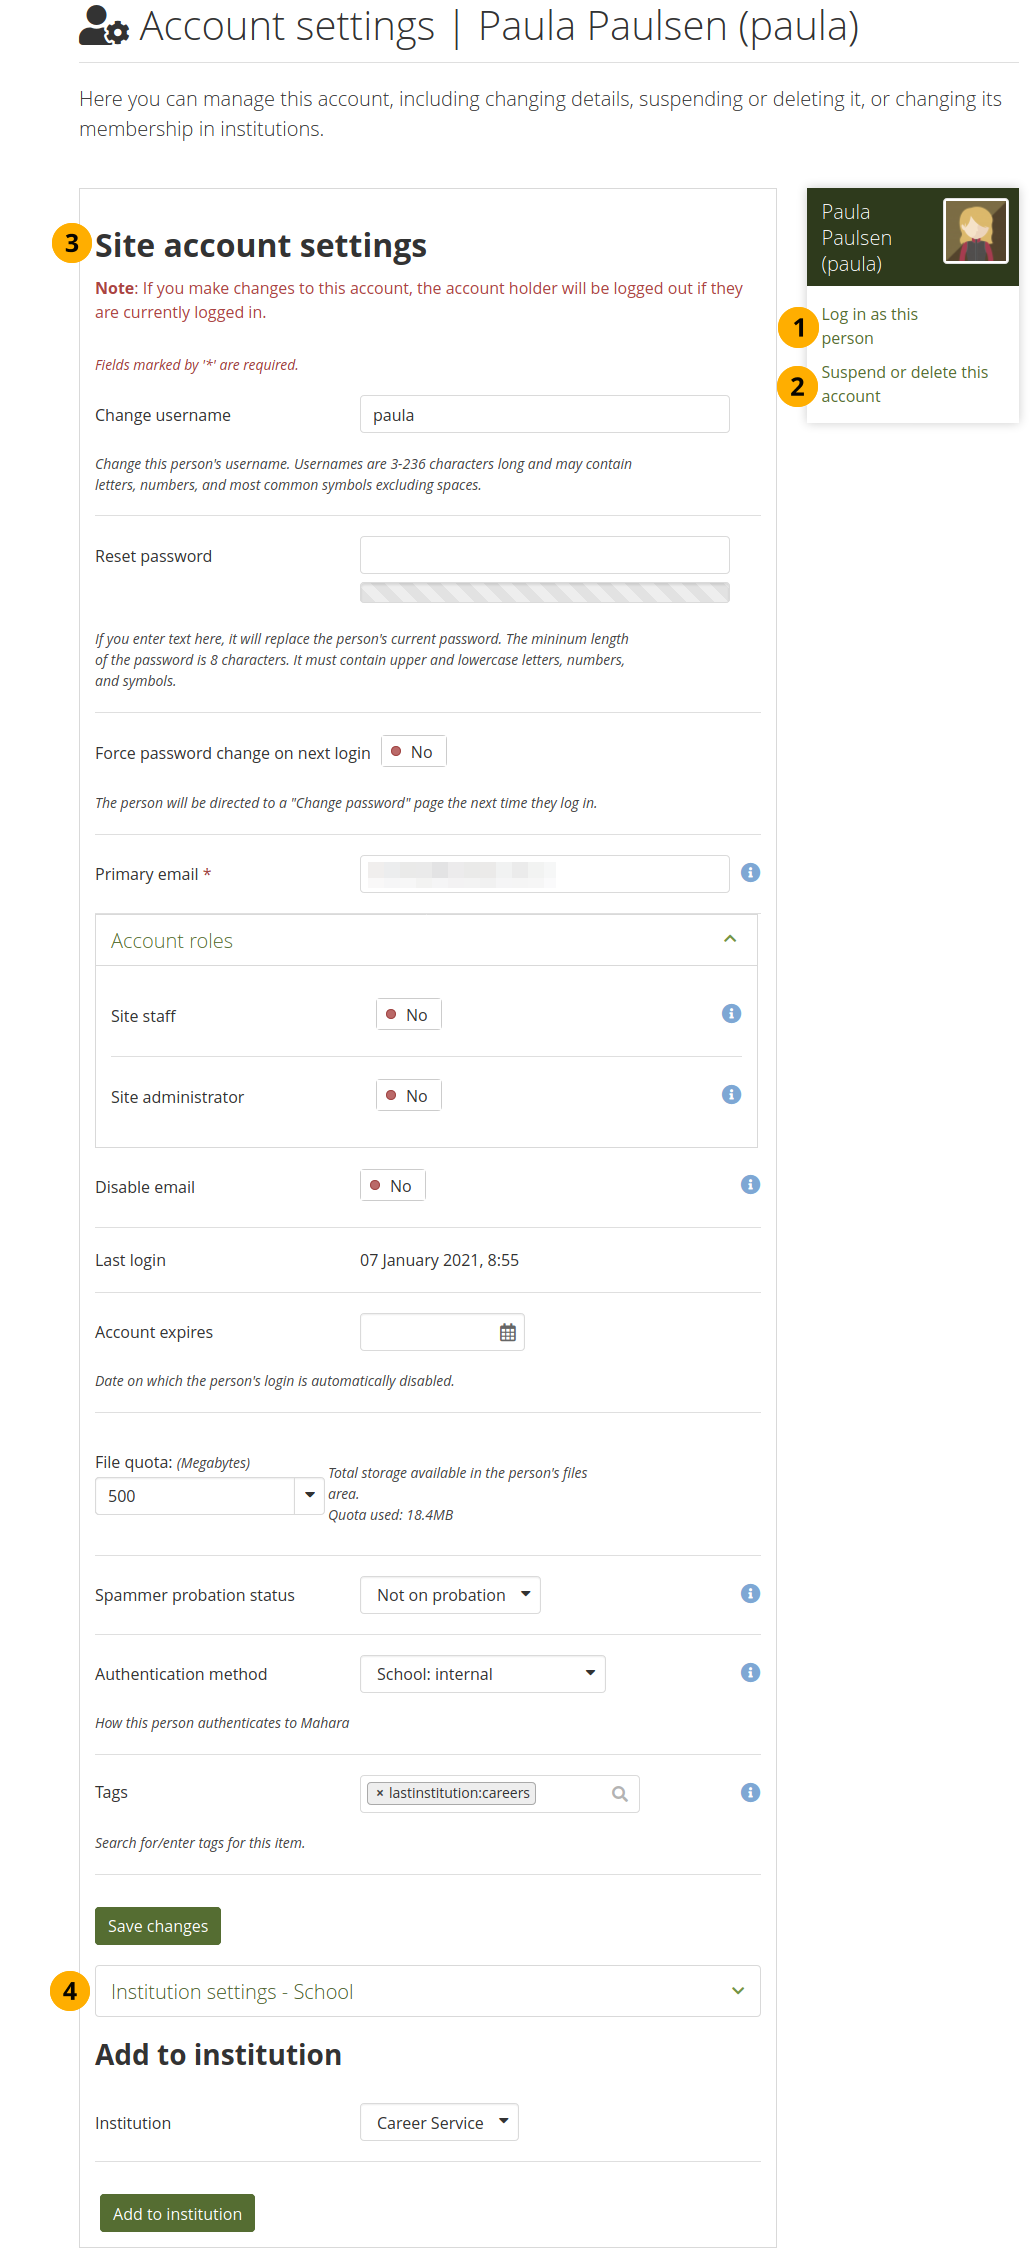
Site account settings of a person
Change username: Give the person a different username. This field is not available when the account is managed by an external authentication method.
Reset password: Change the password for this account. This field is not available when the account is managed by an external authentication method.
L’indicateur de force du mot de passe vous donne une idée de la force de votre mot de passe par rapport à la politique de mot de passe.
Force password change on next login: Change the switch to “Yes” if the person shall change the password upon the next login. This option is not available when the account is managed by an external authentication method.
Primary email: Displayed is the primary email address for this person. This email address is used for any notifications. You can change that email address here.
Note
The previously used email address stays in the account as secondary email address until the person deletes it.
Account roles: All roles possible to associate with an account can be displayed here either for the site or further down in the individual institution(s) in which the person is a member. The default built-in roles are:
Site staff: Change the switch to “Yes” if the person shall become a staff member for the entire site.
Site administrator: Change the switch to “Yes” if the person shall have full administrative rights for the entire site.
Voir aussi
New account roles can be set via SAML for SSO accounts.
Disable email: Change the switch to “Yes” to disable the sending of emails for this account. If email is disabled, notifications and messages can only be viewed in the internal inbox. You can set up your Mahara site so that emails are disabled automatically if they are bounced back.
Avertissement
When the email address is disabled, account holders cannot reset their passwords themselves as no email can be sent.
Last login: The date and time when the person logged into Mahara for the last time is displayed.
Expiration du compte : Entrez une date via le calendrier si vous souhaitez définir une date d’expiration.
Note
The default setting is that the date is not specified. You can set an automatic account expiry date for everyone in the account settings of the site configuration.
File quota: Change the storage allowance for a person’s personal files area. Institution administrators may not be able to update the quota if the site administrator disallowed that. The default value as set in the files configuration in the plugin administration.
Quota used: You can see how much this person has already used of their allocated quota.
Spammer probation status: This setting controls whether the person is considered to be on probation as a possible spammer. See the spam probation levels for more information.
Note
Cette fonctionnalité n’est possible que sur les sites où les points de probation anti pourriel ont été activés.
Authentication method: Choose the authentication method for this person. A site administrator can set up the authentication methods in the institution administration. Depending on the authentication method that you have chosen, you may have to provide a remote username to allow the person to log in.
Note
Vous ne voyez que les méthodes d’authentification que vous êtes autorisé à attribuer à la personne en fonction de son appartenance à une institution.
La rubrique Nom d’utilisateur pour authentification externe n’est affichée que si la méthode d’authentification le nécessite. Cela permet aux administrateurs de déterminer si un nom d’utilisateur a été déjà attribué ou non.
Tags: A person can be tagged by an administrator. The tag of the institution to which the person belonged prior to joining a new institution is not displayed to avoid its deletion.
Cliquez sur le bouton Enregistrer lorsque vous avez terminé de modifier les paramètres globaux.
11.4.2.5. Modifier les paramètres des institutions
You can view and change settings regarding a person’s membership in institutions. Depending on the site settings for institutions, a person may be added to more than one institution.
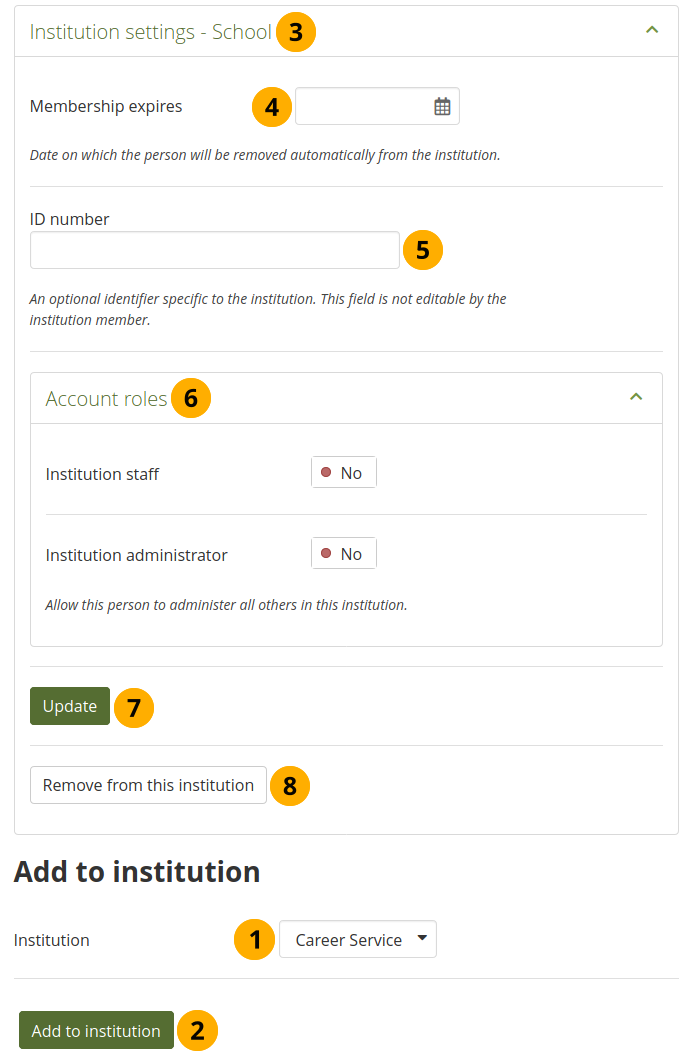
Institution settings for a person
Institution: Choose the institution to which you want to add this person from the drop-down menu.
Note
Seuls les administrateurs du site ou les administrateurs administrant plus d’une institution peuvent voir cette option.
Click the Add to institution button to make this person a member of this institution.
Click the Institution settings bar to see more details about the person in this institution. The bar shows the name of the institution.
Membership expires: Click into the field to view the date picker and choose when you want to remove this person from this institution. They are removed from your institution on that date, but retain their account and can still log in.
Note
The default setting is that the date is not specified. You can set an automatic institution membership expiry date for all members in your institution in the settings for your institution.
ID number: Provide an optional identifier for this person in this institution. This field is not editable by the institution member.
Account roles: While account roles have existed in Mahara for a long time, it is now possible to extend them. All account roles a person has in an institution can be set here. The default built-in roles are:
Institution staff: Change the switch to “Yes” if you want to give this member staff rights in this institution. This will allow the them to create controlled groups for example.
Institution administrator: Change the switch to “Yes” if you want to make this member an administrator of this institution.
Cliquez sur le bouton Mettre à jour pour enregistrer vos modifications.
Click the Remove from this institution button to disassociate this person from this institution. The account will not be deleted. The person will only not be associated with this institution any more.
11.4.3. Suspended and expired accounts
Administration menu → People → Suspended and expired accounts
A list of all suspended and expired accounts is available in the sub-menu Suspended and expired accounts. Here you can unsuspend / reactivate or delete them.
Note
Site administrators see all people whereas institution administrators only see people who are members of their institution(s).
11.4.3.1. Suspended accounts
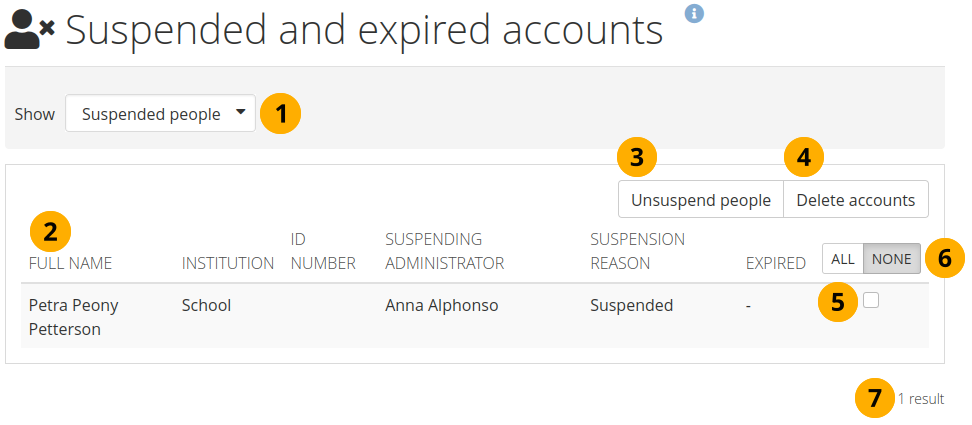
List of all suspended accounts
Show: Select to view suspended accounts.
Les détails de base de chaque compte sont affichés pour s’assurer que vous regardez les bons comptes. Cela inclut l’affichage de la raison de la suspension.
Select the account(s) for which you want to perform the same action.
Click the All button if you want to select all suspended accounts or click the None button to reset your selection.
Click the Unsuspend people button to reinstate the accounts for all selected accounts.
Click the Delete accounts button to delete all selected accounts in bulk. This action cannot be undone and all personal information of these people will be deleted (see delete accounts).
The total number of suspended accounts is shown.
Avertissement
When you delete an account, all personal data is wiped from the system. This action cannot be undone. The person’s contributions in groups, e.g. forum messages, uploaded files and pages created in a group, are still available, but are made anonymous by changing the name to “Deleted account” as author where an author is shown.
11.4.3.2. Expired accounts
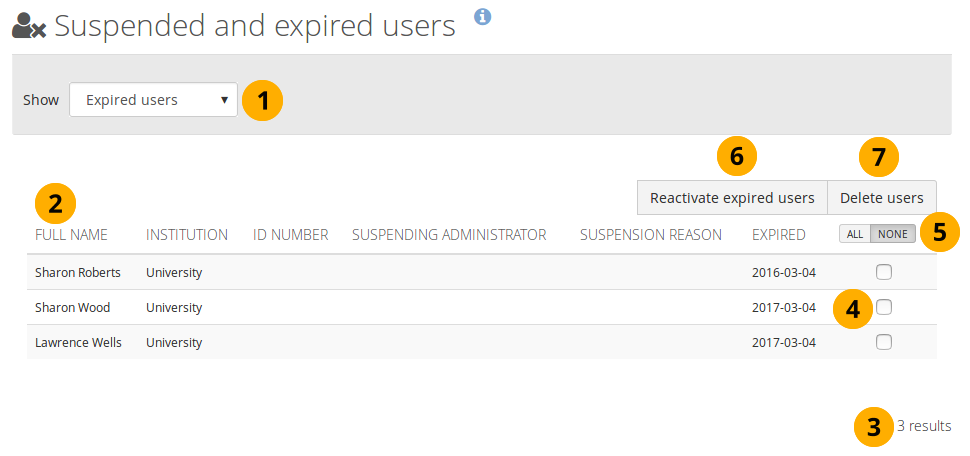
List of all expired accounts
Show: Select to view expired accounts.
Les détails de base de chaque compte sont affichés pour s’assurer que vous regardez les bons comptes. Cela inclut les dates auxquelles les comptes ont expiré.
The total number of expired accounts is shown.
Select the account(s) for which you want to perform the same action.
Click the All button if you want to select all expired accounts or click the None button to reset your selection.
Click the Reactivate expired accounts button if you want to allow these people access to their accounts again.
Click the Delete accounts button to delete all selected accounts in bulk. This action cannot be undone and all personal information will be deleted (see delete account).
Avertissement
When you delete an account, all personal data is wiped from the system. This action cannot be undone. The person’s contributions in groups, e.g. forum messages, uploaded files and pages created in a group, are still available, but are made anonymous by changing the name to “Deleted account” as author where an author is shown.
11.4.4. Personnel du site
Menu Administration → Personnes → Personnel du site
Note
Personnel du site n’est accessible que par les administrateurs du site
On this page you can choose which peoples receive site staff rights. Potential staff members - anybody on the site - are listed on the left while existing site staff members are listed on the right.
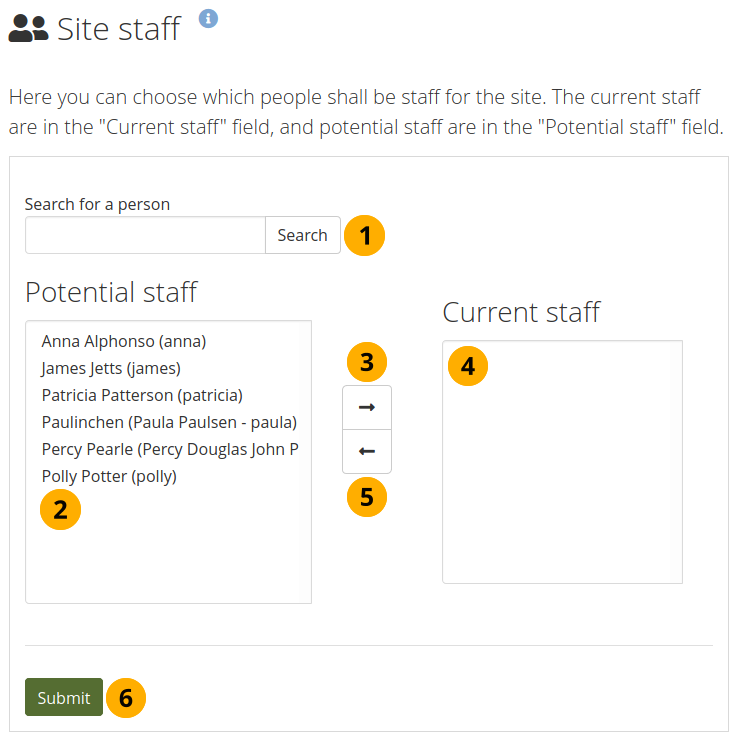
Attribuer le rôle de personnel du site
Recherche : Si vous avez trop de personnes sur votre site et que vous ne pouvez pas voir celles que vous voulez, vous pouvez les rechercher ici.
Potential staff: Select the people you wish to make site staff. You can select multiple persons at once using
CtrlandShiftclick.Add the potential staff members to the right-hand side, “Current staff”, by clicking the right-arrow button .
Current staff: If you want to remove an existing or accidentally added site staff member, you can remove them from the list on the right-hand side by clicking on their name.
Cliquez ensuite sur le bouton flèche gauche , et la personne est supprimée de la liste.
When you have chosen all members you wish to make site staff or removed from the current staff list, click the Submit button.
Note
Vous pouvez aussi double-cliquer sur le nom d’un utilisateur pour le déplacer d’une liste vers l’autre.
11.4.5. Administrateurs du site
Menu Administration → Personnes → Administrateurs du site
Note
La page Administrateurs du site n’est accessible qu’aux administrateurs du site.
Site administrators have powerful permissions. They can make far-reaching changes and also log in as other person. Be careful whom you give these rights. One site administrator is needed for each site. The total number of site administrators should be kept small.
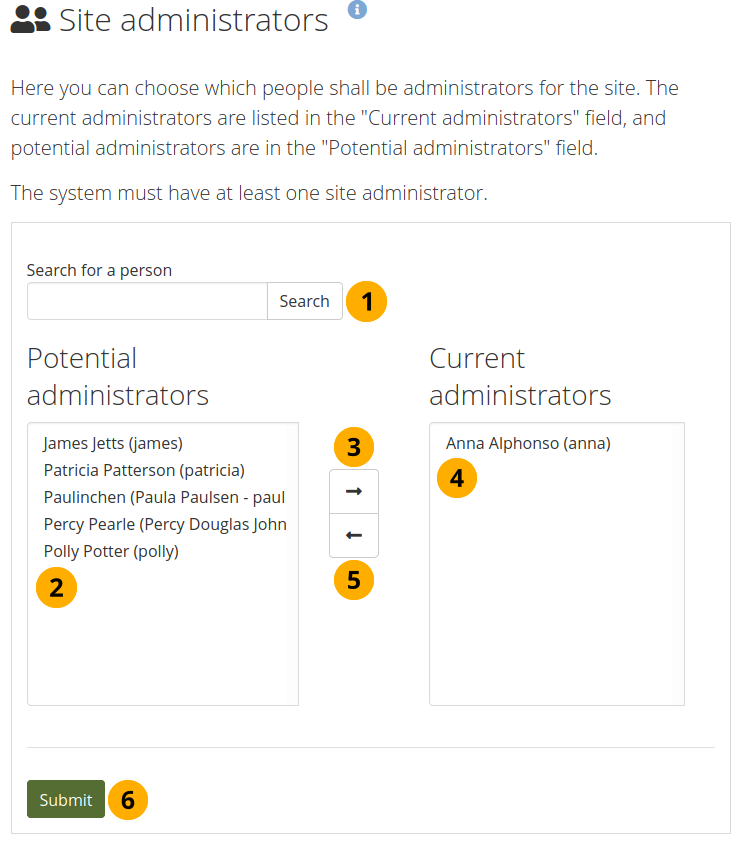
Accorder les droits d’administration du site
Recherche : Si vous avez trop de personnes sur votre site et que vous ne pouvez pas voir celles que vous voulez, vous pouvez les rechercher ici.
Potential administrators: Select the persons you wish to make site administrators. You can select multiple persons at once using
CtrlandShiftclick.Add the potential site administrator to the right-hand side, “Current administrators” by clicking the right-arrow button .
Current administrators: If you want to remove an existing or accidentally added site administrator, you can remove the person from the list on the right-hand side by clicking on their name.
Cliquez ensuite sur le bouton flèche gauche , et la personne est supprimée de la liste.
When you have chosen all members you wish to make site administrators or removed from the current site administrator list, click the Submit button.
Note
Vous pouvez aussi double-cliquer sur le nom d’un utilisateur pour le déplacer d’une liste vers l’autre.
11.4.6. File d’attente d’exportation
Menu Administration → Personnes → Queue d’exportation
Cette fonction est expérimentale
La file d’attente est disponible pour les exportations suivantes :
Quand au sein d’un groupe les tuteurs ou les administrateurs libèrent un portfolio qui avait été envoyé pour commentaires/évaluation. Ce portfolio sera envoyé dans la file d’exportation et libéré seulement quand l’exportation se sera déroulée correctement.
If the site administrator enabled the feature to queue exports, exports that account holders initiate via Main menu → Manage → Export are also queued. Once completed, a notification is sent to download the export file within 24 hours.
All available export formats are considered for the export since Mahara 20.04 and only one combined export made.
Voir aussi
La file d’exportation nécessite que le cron fonctionne.

Export queue for exports
Rechercher : Entrer un critère de recherche. Le texte par défaut dans la rubrique vous indique dans quel contexte de l’institution votre recherche va s’effectuer. Entrez le nom, nom d’affichage, nom d’utilisateur, ou l’adresse courriel; même de manière partielle. Si vous avez activé la recherche exacte, vous devez entrez le nom ou l’adresse courriel au complet pour retrouver l’utilisateur.
Use the drop-down arrow to choose a single institution in which to search for a person.
Cliquez sur le bouton Aller pour lancer votre recherche.
In the results table you see the profile picture of the person.
Prénom : Affiche le prénom de la personne. Il s’agit de la colonne par défaut pour le tri des résultats.
Note
Cliquez sur les autres titres de colonnes de la table pour trier celle-ci sur d’autres critères.
Nom de famille : Affiche le nom de famille de la personne.
Nom d’affichage : Affiche le nom d’affichage de la personne.
Username: Clicking on the username, you are taken to the person’s account settings page instead of their profile page as you would with the other names.
Exporter le contenu : Aperçu de ce qui sera exporté.
Statut : Affiche le statut de l’export. Seuls les travaux échoués ou en attentes sont affichés.
Exporter : Sélectionnez les boîtes à cocher dans cette colonne si vous désirez relancer un export qui aurait échoué. Vous pouvez sélectionner toutes les boîtes à cocher en cliquant sur le bouton Tout et tout désélectionner en cliquant sur le bouton Aucun.
Cliquez sur le bouton Replacer dans la file pour relancer les exports qui ont échoués.
Supprimer : Sélectionnez les boîtes à cocher dans cette colonne si vous désirez supprimer un export en attente d’exécution dans la file d’exportation, ou des exportations qui ont échoué. Vous pouvez sélectionner toutes les boîtes à cocher en cliquant sur le bouton Tout et tout désélectionner en cliquant sur le bouton Aucun.
Cliquez sur le bouton Supprimer pour supprimer toutes les exportations sélectionnées.
11.4.7. Add a person
Administration menu → People → Add a person
You can add people to your site (site administrator) or your institution (institution administrator) by creating accounts for them manually one by one.

Add a person manually
Click the Create new account from scratch radio button if you want to create an empty account. Provide the first name, last name and email address for this person.
Click the Upload Leap2A file radio button if you want to import an account from another Mahara instance or a system that supports the Leap2A standard. Such a person could have exported their portfolio from another Mahara instance.
Username: Give the new account holder a username. It may contain letters, numbers and most common symbols. It must be from 3 to 236 characters in length. Spaces are not allowed.
Mot de passe : Choisissez un mot de passe pour ce nouveau compte. Celui doit contenir au moins six caractères.
L’indicateur de force du mot de passe vous donne une idée de la force de votre mot de passe par rapport à la politique de mot de passe.
Site staff: Switch to “Yes” if the new account holder should have site staff rights. Only site administrators see this option.
Site administrator: Switch to “Yes” if the new account holder should have site administrator rights. Only site administrators see this option.
Institution: Choose the institution of which the person should be a member. You also select the authentication method directly here.
Note
Si la méthode d’authentification requière l’utilisation d’un nom d’utilisateur distant, vous pouvez entrer cette information sur l’écran suivant dans les réglages utilisateurs.
File quota: Review the allocated file quota. You may change it here for this person if you are allowed to.
Institution administrator: Switch to “Yes” if the new account holder should have institution administrator rights in the chosen institution.
General account options: Click this link to see default account options that you may choose to change while creating this account. These are the general account options a person can change on the Settings page.
Note
You can only define the default account settings for an account, but not force the person to keep them forever. You could only do that by customising the system on the code level.
Click the Create account button.
The person will receive an email with the account details.
11.4.8. Add and update people by CSV
Administration menu → People → Add people by CSV
You can use this function to upload new accounts in bulk via a CSV file (comma-separated file) and to update existing accounts. The first row of your CSV file should specify the format of your data. For example, it should look like this:
username,password,email,firstname,lastname,studentid
For new accounts, this row must include:
nom d’utilisateur
mot de passe
courriel
prénom
nom
Note
Mahara also accepts CSV files that have a semicolon as separator instead of a comma.
If you want to update existing accounts, you do not need to set a password and can leave that field off entirely.
Note
You can mix new and existing accounts in your CSV file. When you add a new account, the password field must be present. If you do not wish the password to be changed for existing accounts, leave that field empty for these accounts.
If your site or institution has locked fields or fields that are mandatory, then you do not have to include them as fields in your CSV upload.
Voici la liste complète des rubriques additionnelles que vous pouvez utiliser dans un fichier CSV.
address - Adresse postale de l’utilisateur
blogaddress - URL vers le blogue de l’utilisateur
businessnumber - Numéro de téléphone professionnel
city - Ville
country - Pays
expiry - Définit la date à laquelle la connexion d’une personne est désactivée automatiquement. Il doit s’agir d’une date valide dans le futur, par ex.
2019-03-25
25 Mar 2019
+3 months
faxnumber - Numéro de fax
homenumber - Numéro de téléphone privé
industry - Secteur d’activité, affiché dans le profil
introduction - Le texte d’introduction affiché dans le profil
mobilenumber - Numéro de téléphone mobile
occupation - Emploi actuel, affiché dans le profil
officialwebsite – Site web professionnel
personalwebsite - Site web personnel
preferredname - Nom d’affichage
remoteuser - Nom d’utilisateur sur la plateforme d’authentification distante
studentid - Numéro de l’étudiant qui est affiché dans le profil
town - Localité
Votre fichier CSV pourrait resembler à l’exemple ci-dessous :
username,email,firstname,lastname,studentid,preferredname,remoteuser, password"nicolas","nmartignoni@martignoni.net","Nicolas","Martignoni","","","nicolas.martignoni","mahara1""paula","paula@caterino.net","Paula","Caterino","","","paula.caterino","mahara1""philippe","philippe@petitqueux.net","Philippe","Petitqueux","","","philippe.petitqueux","mahara1""admin","admin@mahara.school","Admin","Mahara","","","","mahara1""pascalehp","pascale@hyboud.com","Pascale","Hyboud-Peron","","","","mahara1"Lorsque vous avez fini de créer votre fichier CSV, vous êtes prêt à l’importer.
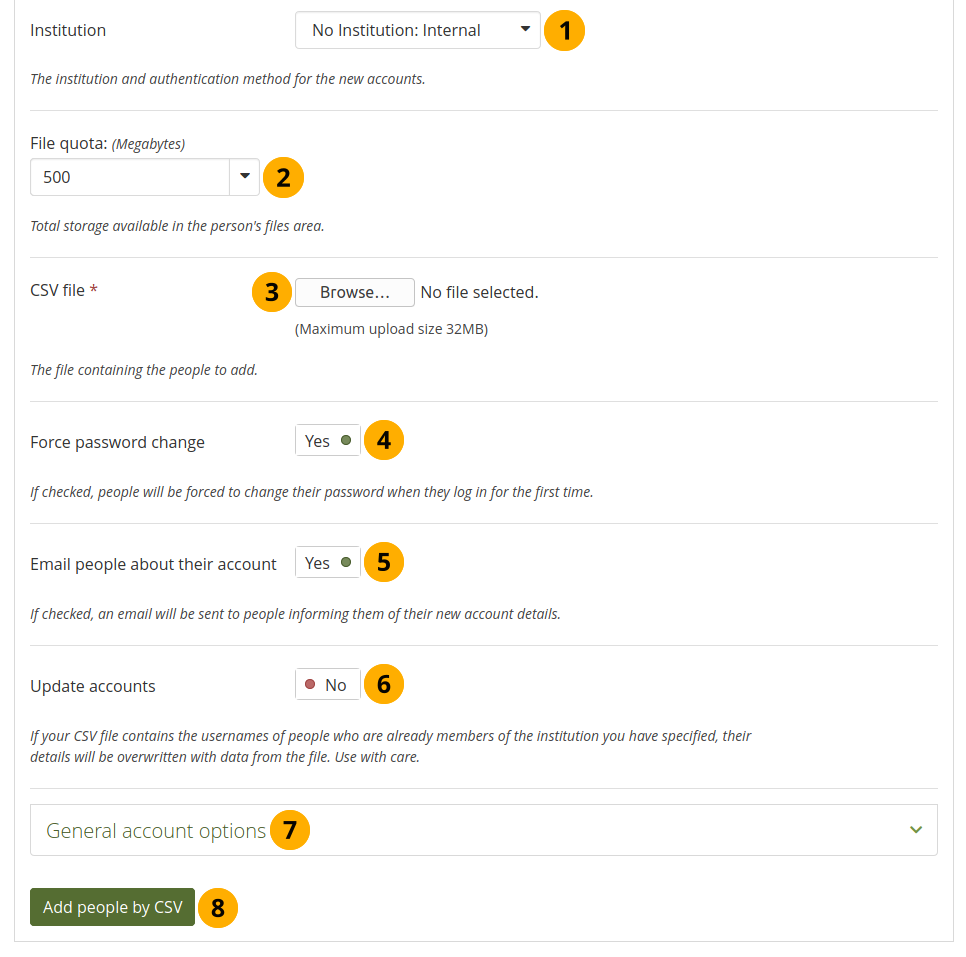
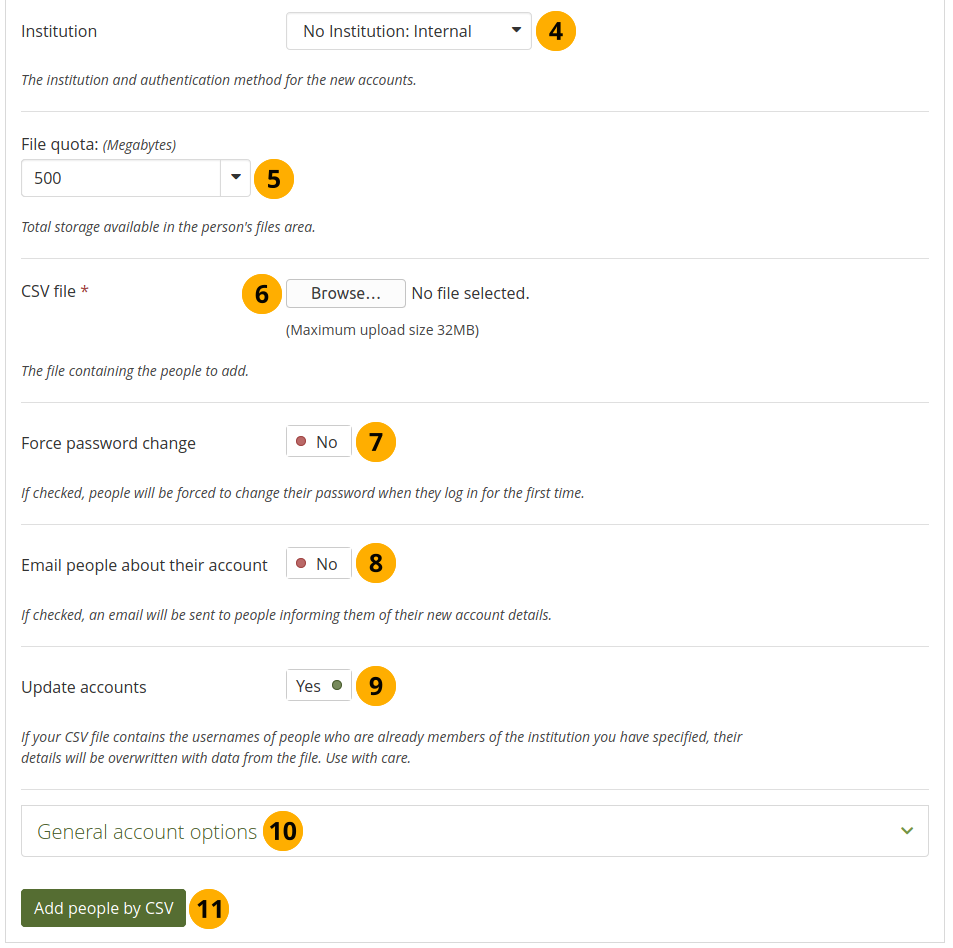
Add people by CSV file
Institution: Choose the institution and the authentication method for the accounts that you upload and / or change.
Quota d’espace disque : Si vous le désirez, vous pouvez fixer ici un quota différent pour chaque compte dans votre fichier CSV. Les administrateurs d’une institution ne peuvent faire cela que si l’administrateur du site leur en a donné l’autorisation.
Fichier CSV : Vous devez téléverser un fichier au format CSV en cliquant sur le bouton Browse ou Parcourir, puis en sélectionnant le fichier depuis votre ordinateur.
Force password change: If you select this option, people need to change their password before they can log in for the first time.
Email people about their account: Change the switch to “Yes” and people will receive an email with their account information. This is in particular good for internal accounts.
Note
For accounts that are managed by an external authentication method such as Moodle or LDAP, do not select this option because the account holders already know their login information.
Update accounts: Change the switch to “Yes” if your CSV file contains changes for existing accounts.
Note
When you add a new email address for a person to update the account settings, this new email address becomes the primary email address.
The previously used email address stays in the account as secondary email address until the account holder deletes it.
General account options: Expand this menu to see default account options that you may choose to change while creating or updating accounts. These are the general account options a person can change on the Settings page.
Click the Add people by CSV button to upload and / or change accounts.
Note
Depending on your server settings and / or the size of your installation, you may not be able to upload all accounts at once. You may wish to upload them in bunches of 100 instead.
A progress bar shows the percentage of the completed upload of your accounts.

11.4.9. Modifier la méthode d’authentification et le nom d’utilisateur distant de plusieurs utilisateurs
Après que vous ayez invité ou ajoutés de nouveaux membres à votre institution, vous pouvez modifier leur méthode d’authentification. Cela peut se révéler d’autant plus utile si la méthode d’authentification dans cette institution est différente de celle que vos utilisateurs utilisaient dans l’institution précédente; et que vous voulez lier les nouveaux comptes à des comptes distants en utilisant :
serveur LDAP
un compte Moodle par MNet
système SSO (single sign-on) d’un prestataire de service Internet
Note
The change in the authentication method for existing accounts should be done before people try to log in with their new credentials to avoid the creation of a second account for them.
You can change the authentication method for multiple accounts at once to save you time manually updating each account. Changing the authentication method usually also entails changing the remote username (a.k.a. username for external authentication). Therefore, these two are dealt with together to describe the work flow.
Find accounts in an institution to change their remote username
Go to Administration menu → People → People search.
Click the Advanced options link to show filter options. Select any that you want to use.
If you want to look for a particular name, display name, username, email address, or any partial thereof, type it into the search field. If you turned on the exact search, you need to provide the correct name or email address and not a partial one. The default text in the field shows you in which institution context you perform your search.
If your site has more than one institution, you can limit your search to a particular one.
Click the Search button to see results.
Note
If you have more than 10 results, change the Results per page to see more results per page.
Select the persons whose authentication method and remote username you want to change by either putting a check mark in the checkboxes or clicking on All to select all accounts on that page.
Click the Get reports for selected accounts button to proceed to the next step. You are taken to the Account details report page.
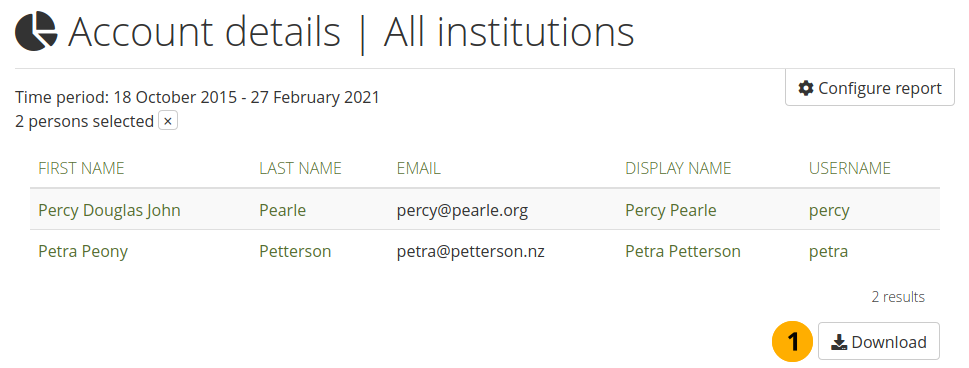
Account details reports page

Mettre à jour le nom d’utilisateur et le mot de passe par fichier CSV
Update accounts in bulk
Click the Download button so that you get a CSV file which contains all necessary information for you to change the remote username in bulk. This is necessary if their internal Mahara username is not the same as the one they use to authenticate on your system that is linked to Mahara or if they already have a remote username that would be incorrect for your institution.
Note
You do not need to see the column “Remote username” for the data to be in the CSV download. If you wish to see it on screen, click the Configure report button and select the “Remote username” column.
Open the CSV file in your preferred spreadsheet software. In the column remoteuser, add or change the username that your account holders have when authenticating in your regular system that you have connected to Mahara. You may also change other fields, e.g. their name, email address etc. If you want to add a new person directly in this CSV file, you can do so as well.
Note
You must provide a password for a new account. All others do not need to have a value in the password field. If you only want to update existing accounts, you can leave the password field entirely off.
You must remove the column “lastlogin”. Mahara will produce an error if you leave it in the file.
Go to Administration menu → People → Add people by CSV.
Institution: Choose the correct current institution and authentication method for the accounts that you are updating.
File quota: Choose a different file quota here if you want to update it for accounts you update.
Fichier CSV : Sélectionnez le fichier CSV que vous avez modifié sur votre ordinateur.
Force password change: Switch this option to “No” even if you have a password in your CSV file. Since it’s assumed that the accounts you are updating or creating are external accounts, nobody will need or can use their Mahara password.
Email people about their account: Switch this option to “No” as you are only wanting to update the remote username. Therefore, it is assumed that they don’t need to reset their password.
Update accounts: Switch this option to “Yes” because you want to update existing accounts.
General account options: You can make changes to the default account options for everyone, e.g. give them multiple journals by default, change their interface language etc. This will overwrite any changes that the account holders may have made in their personal settings.
Click the Add people by CSV button to start the update. This process may take a little while depending on how many accounts you are changing.
You receive a report on the page upon the successful completion of the upgrade. If the upgrade fails, error messages help you to resolve the problem. No accounts are updated until all errors are resolved.
Note
If you intend to update more than 100 accounts at the same time, you may run into problems, and the server may reject your CSV file as the update process is a very memory intense one. If that is the case, you would have to split your CSV file into smaller ones with fewer accounts in them.
You are now ready to update the authentication method for these accounts:
Go to Administration menu → People → People search.
Sélectionnez l’institution dans laquelle vous désirez vérifier les propriétés des membres.
Click the Search button to see results.
Select the accounts for whom you want to change the authentication method.
Click the Edit selected accounts button to proceed to the next step. You are taken to the Bulk actions page page.
You see the remote username in a column.
Click the Change authentication method tab.
Select the institution and authentication method to which you want to change the selected accounts.
Click Change authentication method to make the change.
Voir aussi
If you only want to change the authentication method of certain accounts but do not have to worry about a remote username or updating any other information, you can change the authentication method directly on the bulk actions screen without the export of the account details.