9.6. 拡張機能
管理 → 拡張機能管理
注釈
拡張機能 にはサイト管理者のみアクセスすることができます。
Maharaの拡張機能はシステム内で特定の機能を提供します。拡張機能はどのタイミングでもインストールすること、また非表示にすることもできます。
9.6.1. プラグイン管理
管理 → 拡張機能 → プラグイン管理
*プラグイン管理*には現在あなたのMaharaインスタンスにインストールされているプラグインすべてが一覧表示されます。また、利用可能なプラグイン設定へのリンクが提供されます。
Plugins in Mahara are always installed and can be accessed if users know the URLs and would otherwise have access. Rather than enabling and disabling the functionality, plugins are hidden or made visible by clicking on the hide or show links beside the plugins. When hiding an artefact type plugin, Mahara stops the display of the blocks related to it.
プラグインがインストールされていない場合の警告
If you added a plugin to your site or if a new plugin was added to Mahara since the last upgrade that you performed, you will need to go through its installation. A plugin that is not yet fully installed is marked with a warning and  listed first in its section. Click the Install link to start the installation process.
In order to delete a plugin completely, you must delete the code and all database tables that pertain to the plugin. Additionally, you need to delete it from a number of system tables, e.g. 「artefact」, 「artefact_config」, 「artefact_cron」, etc. As an example, view the information on how to uninstall the My Learning plugin.
注釈
Core Mahara functionality can be made unavailable to users by hiding it. This may be useful if you connect Mahara to another system that already provides this functionality or if you do not wish your users to use that functionality. However, the decision about hiding a functionality should be considered thoroughly as it may also mean that users may not be able to have as many artefacts available to them as they should have.
以下では追加設定のあるプラグインのみに関して説明します。
9.6.1.1. ブロックタイプ: ファイル/ フォルダ
You can decide the default sort order for files displayed in a Folder block and whether viewers of portfolio pages that contain a Folder block should be able to download the contents of the folder as zip file in one go.
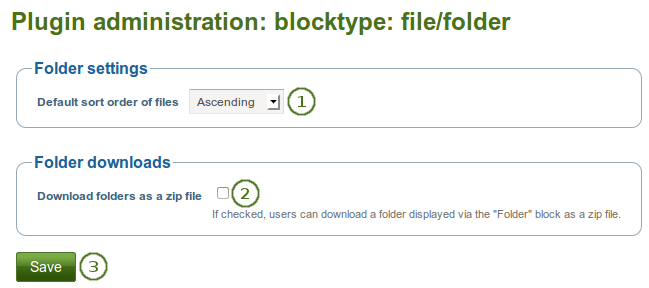
フォルダ ブロックを設定する
デフォルト並べ替え順: フォルダ 内のファイル表示の並べ替え順デフォルトをアルファベットの昇順または降順に決定してください。
注釈
ページ作成者はそれぞれのブロックで並べ替え順を変更することができます。
Download folders as zip files: If you tick the checkbox, you can download the contents of a folder displayed in a Folder block as zip file. Thus, it is very easy for a viewer to grab all files at once and download them to their computer.
参考
サイト管理者は アーティファクトタイプ ファイル設定 でどのくらいの時間ZIPファイルをサーバ内に保持するか決定します。
9.6.1.2. ブロックタイプ: ファイル/ギャラリー
あなたは追加イメージギャラリー設定を提供して、ユーザがFlickrおよびPhotobucketイメージギャラリーを利用できるようにすることもできます。このページでの設定はすべてのユーザのデフォルト設定となります。
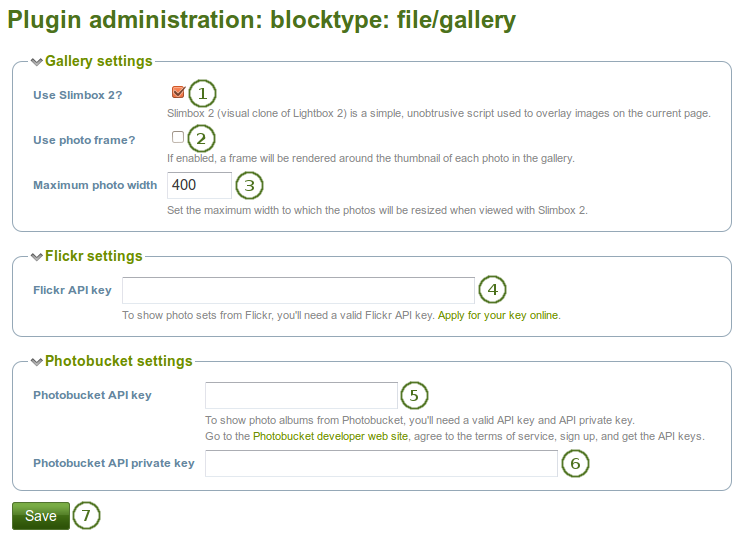
*イメージギャラリー*ブロックを設定する
- Slimbox2を使用する: あなたが現在のページのイメージオーバレイにこのスクリプトを使用したい場合、このチェックボックスをチェックしてください。
- フォトフレームを使用する: フォトギャラリー内写真のサムネイル周囲にフレームを表示したい場合、このチェックボックスをチェックしてください。
- 最大写真幅: Slimbox2で表示する場合にリサイズするための写真の最大幅 (ピクセル) を設定してください。
- Flickr APIキー: ユーザにFlickrからの写真表示を許可したい場合、あなたは有効なFlickr APIキーが必要です。あなたはFlickr <http://www.flickr.com/services/api/keys/apply/>でキーを適用することができます。
- Photobucket APIキー: ユーザにPhotobucketからの写真表示を許可したい場合、あなたには有効なAPIおよび秘密鍵が必要です。あなたはそれらの鍵を Photobucket開発者ページ <http://developer.photobucket.com/> から取得することができます。
- Photobucket API プライベートキー: あなたがPhotobucketから受信するプライベートAPIキーを提供してください。
- あなたの変更を保持するには*保存*ボタンをクリックしてください。
9.6.1.3. ブロックタイプ: ファイル/内部メディア
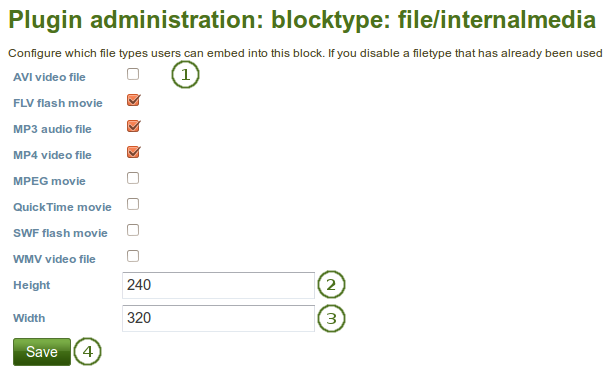
ユーザが 埋め込みメディアブロック 内に埋め込むことの出来るファイルタイプを設定します。あなたがすでに使用されているファイルタイプを無効にした場合、それ以降表示されなくなります。
MaharaにはFLV、MP4 (in H.264 format) および MP3ファイルを再生することのできる「Flowplayer <http://flowplayer.org/>」 が同梱されています。ビデオは埋め込まれて、オーディオファイルはこのプレイヤーにより再生されます。
他のビデオも有効にすることができますが、ユーザは適切なソフトウェアを自分のコンピュータにインストールしてブラウザで再生できるよう個別のプラグインを有効にする必要があります。
*埋め込みメディア*ブロックを設定する
- あなたのユーザのポートフォリオページに表示させたいファイルタイプを選択してください。
- 幅: ビデオのデフォルト幅 (ピクセル) を選択してください。
- 高さ: ビデオのデフォルトの高さ (ピクセル) を選択してください。
- あなたの変更を保持するには*保存*ボタンをクリックしてください。
注釈
あなたがFlowplayerで再生できないファイルタイプの埋め込みを許可した場合、これらのファイルタイプを表示するためにインストールする必要のあるソフトウェアを複数のユーザがインストールしていない可能性があります。
9.6.1.4. ブロックタイプ: テキスト
あなたはインスタンス全体において:ref:ノート <note_block> ブロックを テキスト ブロックにコンバートすることができます。
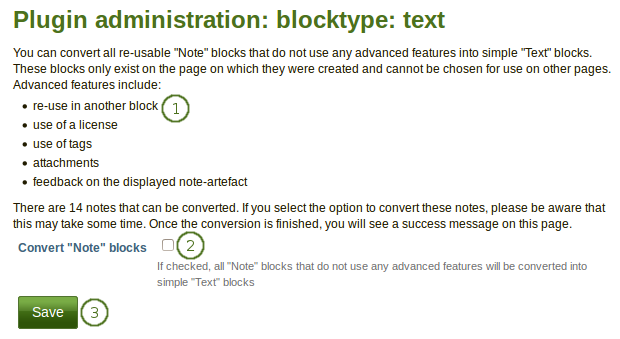
テキスト設定を設定する
- Mahara calculates how many notes can be converted. Notes with the following characteristics are included in the conversion process. Notes that:
- have not been re-used in another block;
- do not have a license attached;
- タグを使用しない
- do not have any attachments;
- have not received any feedback.
- すべてのノートを変換するには 「ノートブロック」を変換する の隣にあるチェックボックスをチェックしてください。
- Click the Save button to start the conversion process. This may take some time depending on how many notes are to be converted.
9.6.1.5. ブロックタイプ: ウォール
あなたはこの設定で:ref:`ウォール <wall>`に投稿する文字数を制限することができます。既存の投稿は変更されません。

ウォールを設定する
- あなたのウォール投稿の最大文字数を選択してください。
- あなたの変更を保持するには*保存*ボタンをクリックしてください。
9.6.1.6. アーティファクトタイプ: コメント
コメントレーティングを有効にすることによりアーティファクトおよびパージのフィードバックセクションで5つ星のレーティングを有効にすることができます。
注釈
自分のものは評価することができません。また、コメントまたはファイル添付が必須入力です。

コメントレーティングを有効にする
- コメントレーティングを有効にするにはチェックボックスをチェックしてください。
- あなたの変更を保持するには*保存*ボタンをクリックしてください。
9.6.1.7. アーティファクトタイプ: ファイル
あなたはファイルのアップロードに関して様々なオプションを設定することができます:
- デフォルトユーザクオータ
- デフォルトグループクオータ
- アップロード同意書
- アップロード時、イメージをリサイズする
- プロファイル写真サイズ
- コメント
- フォルダダウンロード
9.6.1.7.1. デフォルトユーザクオータ
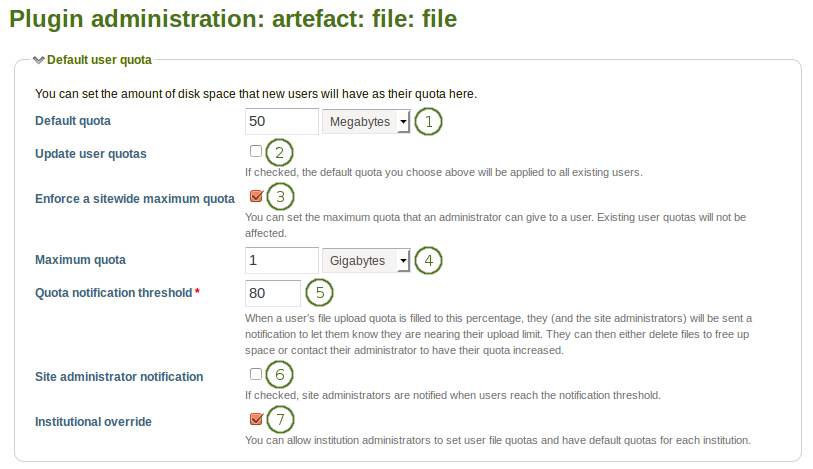
デフォルトユーザクオータを設定する
- デフォルトクオータ: あなたは**新しいユーザ**が使用することのできる合計ディスクスペースを設定することができます。既存のユーザは変更されません。
- ユーザクオータを更新する: あなたが**デフォルトクオータ**以下の**既存ユーザ**のファイルクオータ更新したい場合、このチェックボックスをチェックしてください。この場合のみ更新されます。
- サイト全体の最大クオータを強制する: あなたが管理者に許可される最大クオータを超えて欲しくない場合、この設定を有効にしてください。
- 最大クオータ: あなたは管理者がユーザに与えることのできる最大クオータを設定することができます。既存のユーザクオータは影響を受けません。
- Quota notification threshold: You can set a percentage for when a user receives a notification about reaching the upload limit for files. They can then decide to delete files to free up space or contact the site or institution administrator to check if they can receive more space.
- Site administrator notification: Check this box if the site administrator shall receive the quota notification emails for individual users to take action.
- Institutional override: Check this box if you want to allow institution administrators to set user file quotas and have default quotas for each institution.
- Click the Save button at the bottom of the page when you are finished making your changes or continue to the next section on this page.
9.6.1.7.2. デフォルトグループクオータ

デフォルトグループクオータを設定する
- デフォルトグループクオータ: あなたは それぞれのグループ がクオータとして持つことのできるディスクスペース総量を設定することができます。既存のグループは影響を受けません。
- グループクオータを更新する: デフォルトクオータ よりも値の低い 既存のグループ のファイルクオータを更新するにはこのチェックボックスをチェックしてください。この場合のみ設定値が更新されます。
- Click the Save button at the bottom of the page when you are finished making your changes or continue to the next section on this page.
9.6.1.7.3. アップロード同意書
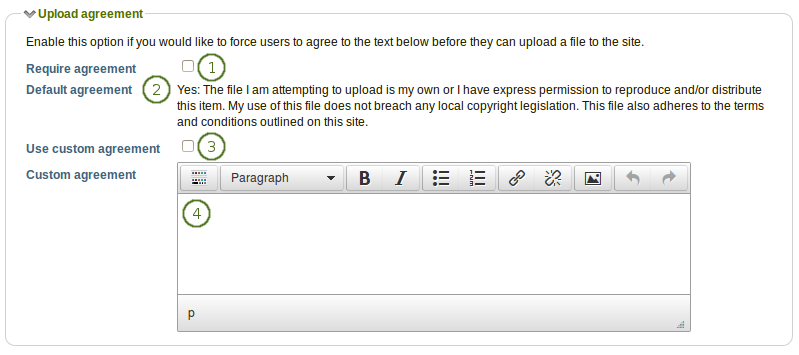
アップロード同意を設定する
- Require agreement: Enable this option if you want to force users to agree to certain terms before they can upload a file to the site. They must accept this agreement before they are able to choose a file from their computer to upload to Mahara.
- Default agreement: This is the default agreement that will be displayed if you selected the option Require agreement and if you don’t want to use your own custom agreement.
- カスタム同意書を使用する: あなた独自のアップロード同意書を執筆したい場合、同意を必要とする に加えて、このチェックボックスをチェックしてください。
- カスタム同意書: あなたがカスタムアップロード同意書を使用したい場合、ここで記述してください。
- Click the Save button at the bottom of the page when you are finished making your changes or continue to the next section on this page.
9.6.1.7.4. アップロード時、イメージをリサイズする
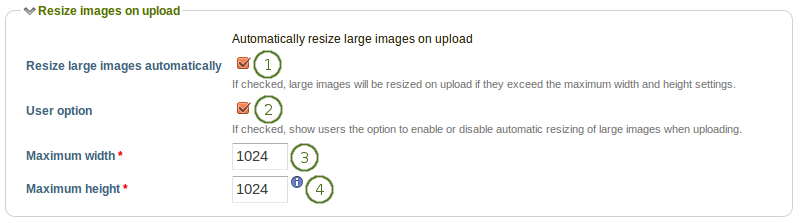
イメージリサイズオプションを設定する
- 大きなイメージを自動的にリサイズする: このオプションを有効にすることによりアップロードされたイメージすべてが設定の最大幅および高さにリサイズされます。
- ユーザオプション: ユーザの:ref:`アカウント設定 <account_settings>`にイメージの自動リサイズに関するオプションを表示します。
- Maximum width: Choose the maximum width (in pixels) to which images will be resized upon uploading.
- Maximum height: Choose the maximum height (in pixels) to which images will be resized upon uploading.
- Click the Save button at the bottom of the page when you are finished making your changes or continue to the next section on this page.
9.6.1.7.5. プロファイル写真サイズ

プロファイル写真のサイズを設定する
- Width: Choose the maximum width (in pixels) of the profile pictures for users.
- Height: Choose the maximum height (in pixels) of the profile pictures for users.
- Click the Save button at the bottom of the page when you are finished making your changes or continue to the next section on this page.
注釈
All images uploaded to the profile pictures area will be resized to these dimensions if they are larger.
9.6.1.7.6. コメント
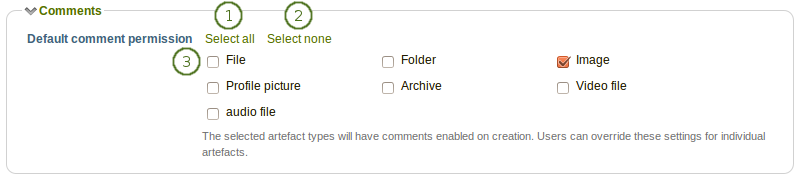
Configure the default comment settings for different file types
- すべてを選択する によりすべてのファイルタイプをマークすることができます。
- Select none to clear your selections from the checkboxes.
- デフォルトコメントパーミッション: デフォルトでコメントを有効にするアーティファクトタイプを選択してください。ユーザは:ref:`ファイルエリア <files_area>`でこれらの設定を個別にオーバーライドすることができます。あなたが有効にできるコメントは次のとおりです:
- アーカイブ 例) 圧縮ファイル
- オーディオファイル
- ファイル
- フォルダ
- イメージ
- プロファイル写真
- ビデオファイル
- Click the Save button at the bottom of the page when you are finished making your changes or continue to the next section on this page.
9.6.1.7.7. フォルダダウンロード

Configure the folder download settings
- Length of time to keep zip files: Choose the amount of time for how long you want to keep the zip files on the server that are created during the folder download process. The default time frame is 3,600 seconds (1 hour).
- あなたの変更を終了した場合、保存 ボタンをクリックしてください。
9.6.1.8. アーティファクトタイプ: プロファイル
プロファイル情報に関して、あなたは手動またはCSVファイル経由でユーザアカウントが作成された時にユーザが提供する必要のあるフィールドを決定することができます。これらのフィールドは 必須フィールド としてマークされます。
検索可能フィールド がマークされているプロファイルフィールドはログインユーザが検索することができます。
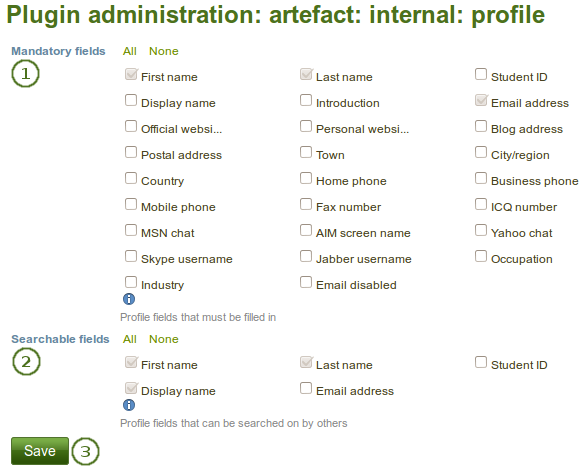
必須および検索可能なプロファイルフィールドを選択する
- 必須フィールド: あなたがユーザすべてに入力させたいフィールドを選択してください。特定のフィールドは選択解除できません。
- 検索可能フィールド: 他のユーザが検索することのできるフィールドを選択してください。特定のフィールドは選択解除できません。
- あなたの変更を保持するには*保存*ボタンをクリックしてください。
9.6.1.9. 認証: SAML
あなたのサイトで:ref:`SAML認証<saml>`を使用したい場合、これらの設定内でSAML phpファイルへのパスを提供する必要があります。
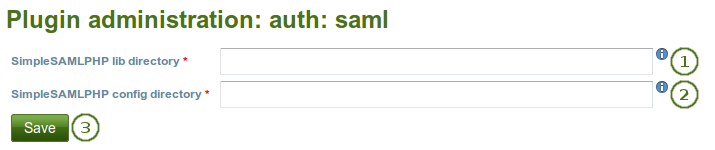
あなたのサイトのSAML認証を準備する
- SimpleSAMLphp lib directory: Provide the fully qualified path to the library directory of SimpleSAMLphp, e.g. if the full path to the bootstrap autoload.php is
/some_path_to/simplesamlphp_1_3/lib/_autoload.phpthen this value should be/some_path_to/simplesamlphp_1_3/ - SimpleSAMLphp config directory: Provide the fully qualified path to the configuration directory to be used for this Service Provider (SP) SimpleSAMLphp, e.g. if the full path to the config.php is
/some_path_to/simplesamlphp_1_3/config/config.phpthen this value should be/some_path_to/simplesamlphp_1_3/config/ - あなたの変更を保持するには*保存*ボタンをクリックしてください。
9.6.1.10. 検索: 内部検索
Iあなたのサイトに多くのユーザが登録されてPostgreSQLデータベースを使用している場合、「ユーザ厳密検索」を有効にすることでユーザ検索が速くなります。この設定はMySQLデータベースでも使用できますが、検索パフォーマンスが極めて高くなるということはありません。
The advantage of the exact user search is that if you have 20 users with the first name 「Percy」 but different last names, you may find the user you are looking for more quickly because you can search for 「Percy Pearle」 and the result list will not show 「Percy Pearl」, 「Percy Sutter」, 「Percy Townsend」 etc.
しかし、プロファイルの一部の合致では検索結果は戻されません。例えばあなたに「Percy」というユーザがいる場合、検索ボックスに「Perc」と入力してもユーザを探すことはできません。
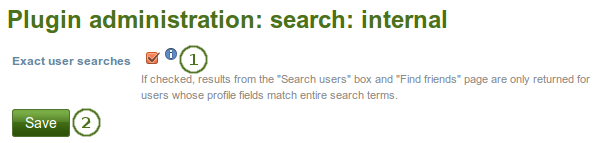
内部検索プラグインを設定する
- ユーザ厳密検索: あなたがユーザ厳密検索を有効にしたい場合、このチェックボックスをチェックしてください。
- あなたの変更を保持するには*保存*ボタンをクリックしてください。
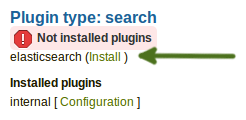
9.6.1.11. 検索: Elasticsearch
The regular Mahara search is limited to finding users and in certain places titles, descriptions and tags of pages or collections. However, Mahara can be extended to use allow for fulltext search capabilities. The Mahara core project team chose to use Elasticsearch. This is a powerful and extensible fulltext search engine. It does require a Java server, e.g. Tomcat, to run and thus may not be available for small instances of Mahara.
注釈
現在、プラグインはPostgreSQLデータベースで運用されているMaharaインスタンスのみに使用することができます。Mahara 1.9のMySQL にもサポートを広げるために対応中です。
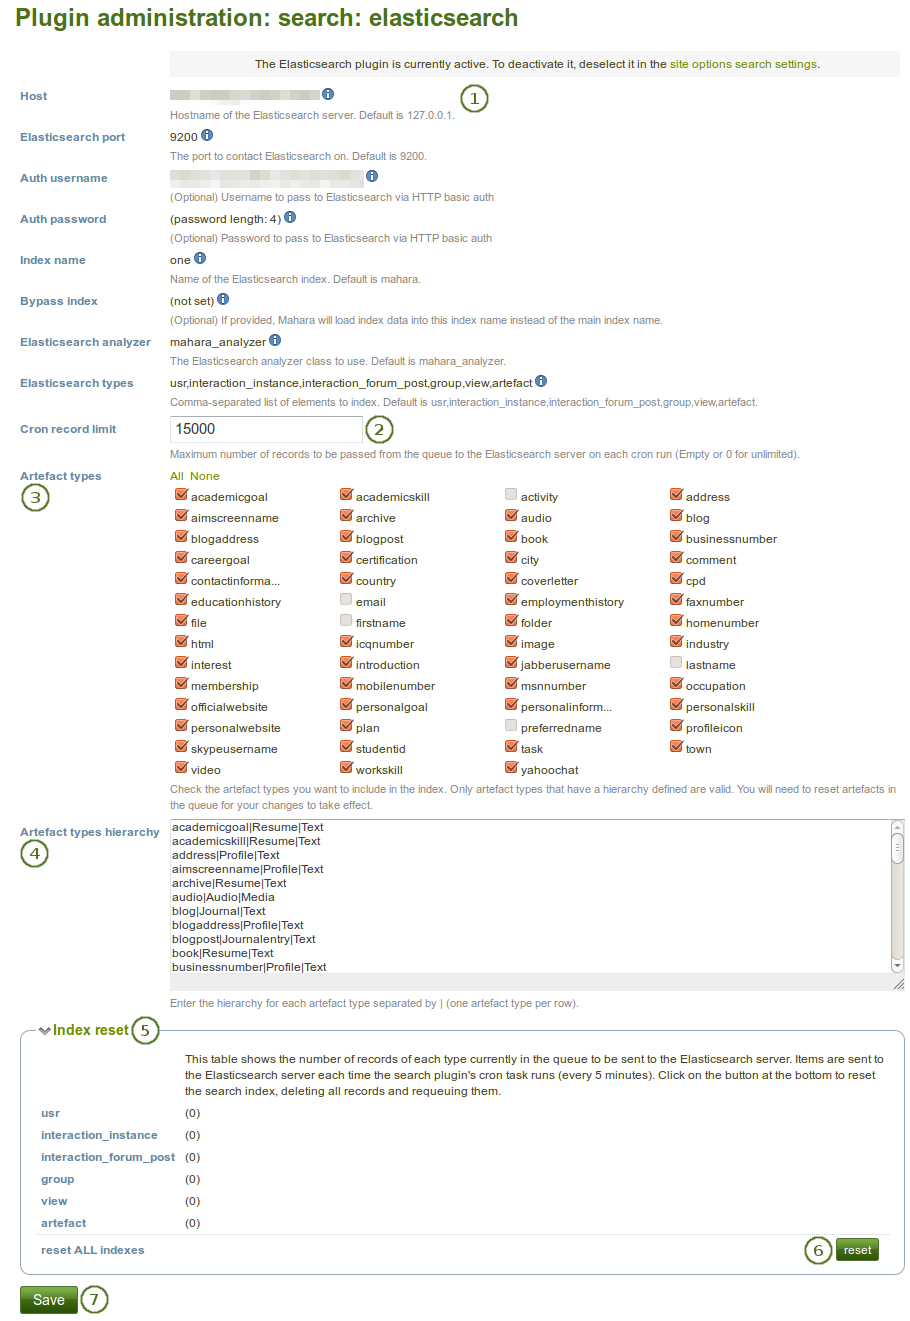
Elasticsearchプラグインを設定する
- ほとんどのElasticsearchの設定はサーバレベルで実施する必要があります。ここであなたは設定を閲覧のみすることができます。また、直接設定を変更することはできません。
- Cronレコード制限: それぞれのcron実行でキューからElasticsearchサーバに渡される最大レコード数を決定してください。空白フィールドまたは「0」は制限なしを意味します。
- Artefact types: Check the artefact types that you want to include in the search index. Only artefact types that have a hierarchy defined below are valid. You will need to reset artefacts in the queue below for your changes to take effect.
- アーティファクトタイプ階層: それぞれのアーティファクトタイプの階層を
|(パイプ) で区切って入力してください。それぞれのアーティファクトを1行に入力してください。 - Index reset: View the number of records of each type currently in the queue to be sent to the Elasticsearch server. Items are sent to the Elasticsearch server each time the search plugin’s cron task runs (every 5 minutes).
- 検索インデックスをクリアしてレコードすべてを削除した後に再度キューに入れるには リセット ボタンをクリックしてください。
- あなたの変更を受け付けるには 保存 ボタンをクリックしてください。
参考
You can find more information about Elasticsearch in Mahara on the wiki. There are also some developer notes to get you started.
9.6.1.12. インタラクション: フォーラム
The post delay setting determines the time (in minutes) that users have for editing their forum posts before they are mailed out. Once a forum post has been mailed and further edits are made, the date, time and editor are mentioned in the post.
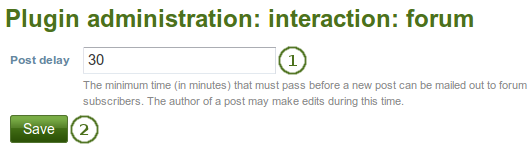
フォーラム投稿が固定されるまでの時間を設定します。
- 投稿遅延: 投稿が確定してさらなる編集ができなくなるまでの時間 (分) を設定してください。
- あなたの変更を保持するには*保存*ボタンをクリックしてください。
9.6.2. HTMLフィルタ
管理 → 拡張機能管理 → HTMLフィルタ
Mahara uses HTML Purifier to filter out malicious code that could threaten the security of the system. If you have code, e.g. iFrames or JavaScript that you wish to use and that otherwise gets filtered out, you will have to write a filter to circumvent that. Filters should always be specific to their purpose and not give 『carte blanche』 to ensure security as much as possible.
Mahara already comes with a number of installed filters. Others can be uploaded and then installed. If you have created a new set of HTML filters, you can install them by unzipping the files into the folder /htdocs/lib/htmlpurifiercustom and then click the Install button.
Custom filters for iFrames that allow the embedding of media content such as YouTube and WikiEducator allow users to grab the URL of the page on which the media is displayed instead of having to find the actual embed code.
注釈
You do not necessarily require bespoke filters for media that you wish to embed via <iframe> embed code. If you are happy to use the original embed code, you can add it to the list of allowed iframe sources.
代わりに (YouTubeビデオのように) URLをペーストできるようにしたい場合、 あなたはbespokeフィルタが必要です。
9.6.3. 許可済みiframeソース
管理 → 拡張機能設定 → iframeソースを許可する
This feature allows you as site administrator to specify the base URLs for media that you want your users to be able to embed. These iframes are then considered safe and will not be stripped out of a Text or Note block, the External media block or a journal entry where you can use them. You do not have to write bespoke filters for using these iframe sources.
あなたは管理インターフェースでこれらのソースを簡単に追加および管理することができます。Maharaにはあなたがサンプルとして使用できる多くの埋め込みiframeソースが同梱されています。
許可されたiframeソースを追加および編集する
- サイト: iframeコードのベースURLです。
- 表示名: 外部メディアブロック内 ユーザに表示されるものを設定します。
- 既存のiframeソースまたはファビコンソースの表示名を更新するには*編集*|edit| タンをクリックしてください。
- 既存のiframeソースを削除するには*削除*ボタン|delete|をクリックしてください。
- 表示名: ここで*編集*ボタン|edit|をクリックした後、既存のiframeソースの表示名を変更します。
- アイコンホスト: 自動的に取得できない場合、サイトのファビコン (favicon) を探すためのベースURLを入力してください。
- このサイトのあなたの変更を保持するには*保存*ボタンをクリックしてください。
- サイト: ここにベースURLを入力することにより新しいiframeソースを追加します。忘れずに
http://``を除外してください。半角英数字および. / - _``のみ許可されます。 - 表示名: あなたのiframeソースの表示名を選択してください。通常、これは外部コンテンツを保持しているサイト名です。
- あなたの新しいサイトを許可されたiframeソース一覧に追加するには*追加*ボタンをクリックしてください。ファビコンが表示されない場合、あなたのサイトを編集してステップ6でアイコンホストを指定してください。
注釈
Some sites can be reached via a variety of URLs, e.g. GoogleApps, Glogster. You need to provide all possible base URLs to ensure that the iFrames are displayed. If you give the individual sites of one provider the same name, it will only show up once in the list of iFrame sources in the external media block and not clutter the space unnecessarily.
参考
Community members started to collect iFrame sources that they are using on their sites to share which URLs would need to be provided to get the iFrames to work. You can check out the list on the wiki and also add your own iFrame sources there.
9.6.4. クリーンURL
管理 → 拡張機能 → クリーンURLs
あなたのサイトが人間が解読可能なURLを ユーザプロファイル、グループ および (グループ) プロファイルページ に使用するよう設定することができます。例えば次のようになります:
- プロファイルページ: http://mahara.example.com/user/bob
- プロファイルページ: http://mahara.example.com/user/bob/bobs-portfolio-page
- グループホームページ: http://mahara.example.com/group/bobs-group
- グループポートフォリオページ: http://mahara.example.com/group/bobs-group/an-interesting-group-page
あなたはこのオプションでさらに記憶しやすいURLを作成することができます。
参考
Please follow the configuration instructions on the wiki for enabling this feature on your site. You need access to the server to do so.
管理者エリアにおいて、あなたは既存のユーザ、グループおよびページのクリーンURLを生成することができます。これはあなたが前のバージョンからアップグレードしてカスタムURLすべてをリセットしたい場合に便利です。
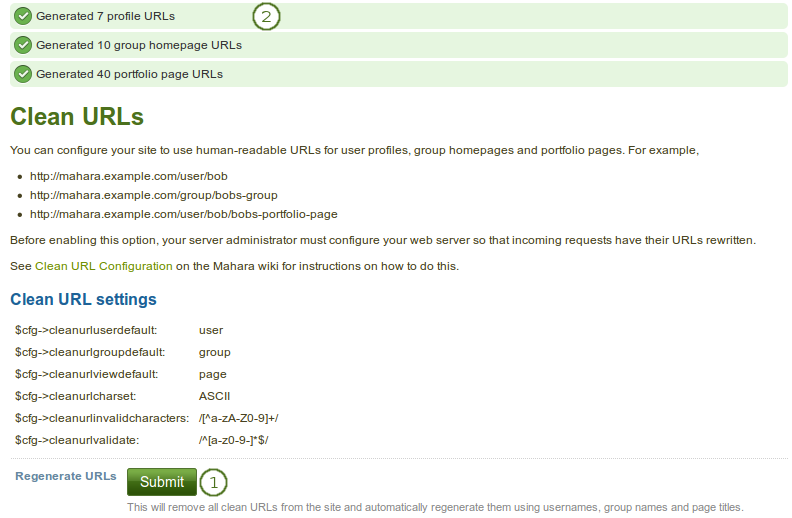
既存ユーザのクリーンURLを一括再生成する
- クリーンURLを再生成するには 送信 ボタンをクリックしてください。既存のクリーンURLが破棄されることに留意してください。
- 操作結果が画面最上部に表示されます。
警告
If you generate clean URLs for all users from here, those who have already changed their URLs will lose their changes and links will be broken. We recommend you use this feature only when upgrading your Mahara site or when things have gone wrong with the clean URL generation.