6.4. 個人情報
このタブ内のアーティファクトに関してあなたの プロファイル の情報をポートフォリオに含むことができます。あなたがテキストまたはイメージを変更したい場合、コンテンツ → プロファイル に移動してください。
さらにあなたのプロファイルページのみに存在するよう特定のブロックを配置することができます:
- マイフレンド
- マイグループ
- マイページ
- ウォール
6.4.1. マイフレンド

あなたのプロファイルページにフレンドのプロファイル画像および氏名を表示するブロックを追加します。これはあなたのプロファイルページのデフォルトブロックです。
あなたのプロファイルページにブロックを配置することのみ可能です。さらなる設定はありません。
6.4.2. マイグループ

Add a block that displays your groups on your profile page. It is a standard profile page block.  You can decide on the sort order of the groups and also limit the number of groups to be shown before a paginator is displayed.
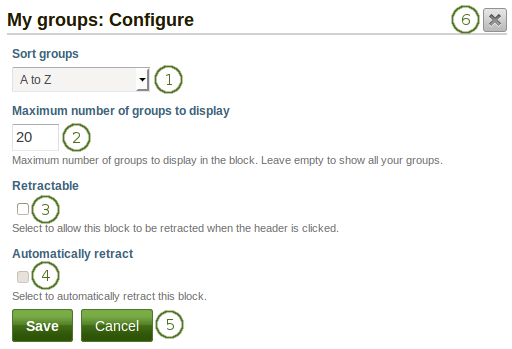
*マイグループ*ブロックを設定する
- 並べ替え順: あなたのグループをどのように並べるか並べ替え順を決定してください。
- Most recently joined: Groups are displayed in chronologically reverse order to show the groups that you joined recently first.
- Earliest joined: This option displays your groups in the order in which you joined them.
- A → Z: AからZのアルファベット順です。これはデフォルトオプションです。
- Maximum number of groups to display: Decide how many groups you wish to display in the block before the paginator is shown and the remaining pages can be seen on the next page within the block. Leave this field empty if you wish to display all your groups.
- 格納: あなたのユーザがブロックのページをヘッディングのみに減らせるようにしたい場合、このチェックボックスをチェックしてください。ユーザはヘッディングのみを表示させるために*格納*アイコン
 をクリックすることができます。
 - Automatically retract: Tick this checkbox if you want to show only the block’s heading when a user views the page. The user can click the Retracted icon
 to view the entire block.
 - あなたの変更を受け入れるには*保存*ボタンをクリックしてください。または*キャンセル*ボタンをクリックしてブロックコンテンツをそのままにしてください。あなたが最初ページにブロックを置いた時のみ*削除*ボタンが表示されます。
- You can also click the Close button
 in the top right-hand corner to either remove a newly created block before it is being saved or to cancel any changes and leave the block’s content as it is.
6.4.3. マイページ

Add a block that displays your pages on your profile page. It is a standard profile page block. This block should stay on your profile page because other users can see all your pages to which they have acceess.
あなたのプロファイルページにブロックを配置することのみ可能です。さらなる設定はありません。
注釈
他のユーザがあなたのプロファイルページを閲覧する場合、アクセスが許可されたページのみ表示されます。これは他のユーザが閲覧不可または少しだけ閲覧できるのに対して、あなたがすべてのページを閲覧できることを意味します。
6.4.4. プロファイル情報

あなたのページにプロファイルフィールドのブロックを追加します。
注釈
Only display as much information as you wish anybody to see. Especially when you make your pages available to the public, i.e. everybody on the Internet, or all logged-in users, decide carefully whether you want to display your street address and / or phone number.
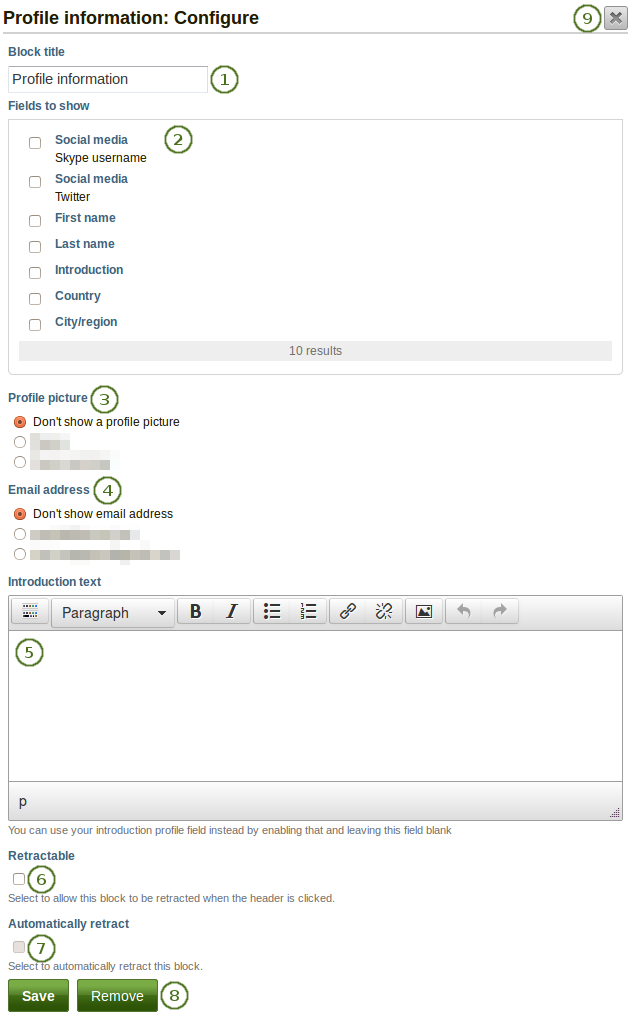
*プロファイル情報*ブロックを設定する
- ブロックタイトル: あなたのブロックのタイトルを選択してください。
- 表示するフィールド: どのフィールドをページに表示するか決定してください。あなたが表示したいそれぞれのフィールドの前にあるチェックボックスをチェックしてください。あなたがコンテンツを提供したフィールドのみ表示されます。
- プロファイル画像: 表示するあなたのプロファイル画像または「なし」を選択してください。
- Eメールアドレス あなたのプロファイルページに入力したメールアドレスを*コンテンツ*の下に表示するかどうか決定してください。
- イントロダクションテキスト: あなたのプロファイルにイントロダクションテキストを表示したくない場合、このページで別のテキストを記述することができます。このブロックを削除した場合、そのテキストを失うことになります。
- 格納: あなたのユーザがブロックのページをヘッディングのみに減らせるようにしたい場合、このチェックボックスをチェックしてください。ユーザはヘッディングのみを表示させるために*格納*アイコン をクリックすることができます。
- Automatically retract: Tick this checkbox if you want to show only the block’s heading when a user views the page. The user can click the Retracted icon to view the entire block.
- あなたの変更を受け入れるには*保存*ボタンをクリックしてください。または*キャンセル*ボタンをクリックしてブロックコンテンツをそのままにしてください。あなたが最初ページにブロックを置いた時のみ*削除*ボタンが表示されます。
- You can also click the Close button in the top right-hand corner to either remove a newly created block before it is being saved or to cancel any changes and leave the block’s content as it is.
6.4.5. ソーシャルメディア
あなたのページにソーシャルネットワークのリンクのあるブロックを追加します。
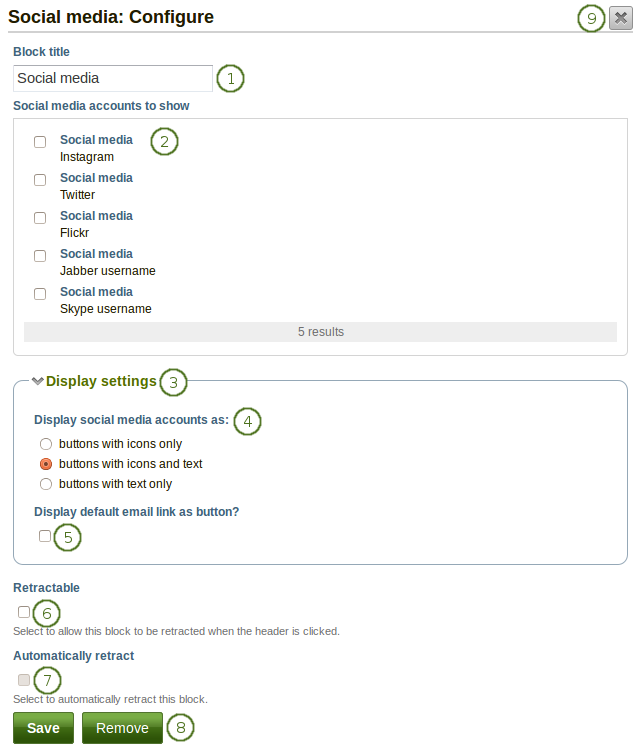
*ソーシャルメディア*ブロックを設定する
ブロックタイトル: あなたのブロックのタイトルを選択してください。
Social media accounts to show: Decide which accounts shall appear on the page. Put a check mark in front of each one that you want to show. Displayed are only the ones for which you provided content.
表示設定: 可能な表示設定を表示するにはこのリンクをクリックしてください。
ソーシャルメディアアカウントを表示する: あなたのソーシャルメディアアカウントのリンクを表示する方法を決定してください。
- Buttons with icons only: Show only the logos of the social media accounts. This option is a good one if you have lots of accounts and want to save space on your page. However, it might be trickier for people to know instantly which accounts are displayed if they are not familiar with the logos.
注釈
If you added a lot of social media accounts through the option 「Other」, this option here would not be a good one as the logo for all the services is just a generic icon.
- アイコンおよびテキストのボタン: これはデフォルトのオプションです。ソーシャルネットワークのロゴが名称と共に表示されます。
- テキストのみのボタン: このオプションではソーシャルネットワーク名のみが表示されます。
ボタンとしてデフォルトメールリンクを表示しますか? あなたの主メールアドレスのボタンを提供したい場合、このチェックボックスをチェックしてください。
格納: あなたのユーザがブロックのページをヘッディングのみに減らせるようにしたい場合、このチェックボックスをチェックしてください。ユーザはヘッディングのみを表示させるために*格納*アイコン
をクリックすることができます。Automatically retract: Tick this checkbox if you want to show only the block’s heading when a user views the page. The user can click the Retracted icon
to view the entire block.あなたの変更を受け入れるには*保存*ボタンをクリックしてください。または*キャンセル*ボタンをクリックしてブロックコンテンツをそのままにしてください。あなたが最初ページにブロックを置いた時のみ*削除*ボタンが表示されます。
You can also click the Close button
in the top right-hand corner to either remove a newly created block before it is being saved or to cancel any changes and leave the block’s content as it is.
ここでは個別のオプションがあなたのページでどのように表示されるか設定します。
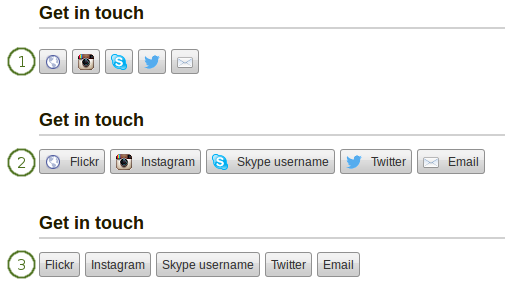
あなたのソーシャルメディアアカウントを表示する3つのオプション
- アイコンのみのボタンです。
- アイコンおよびテキストのボタンです。
- テキストのみのボタンです。
6.4.6. ウォール

Add a block that displays your wall on your profile page. It is a standard profile page block. Other users can leave messages for you, i.e. write on your wall, and they can decide whether everyone looking at your profile page can see them or only they and you.
あなたのプロファイルページにブロックを配置することのみ可能です。さらなる設定はありません。
あなたのプロファイルページのウォール (または他の人のウォール) を閲覧する場合、次が表示されます。
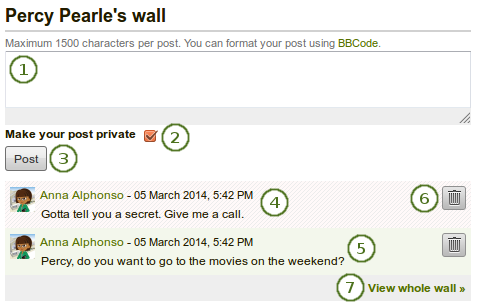
プロファイルページのウォール
あなたのメッセージをテキストボックスに入力してください。あなたのメッセージをフォーマットするためにBBコードを使用することができます。
注釈
あなたはBBCodeを使ってメッセージに太字またはイタリック体にフォーマットした文字を含むことができます。
For example, to make a word bold, you would write it like this: [b]hello[/b]. In your message, the word will show up as hello. The BBCode markers - the [b] and [/b] - disappear.
次のBBコードを使用することができます:
- [b] および [/b] で文字を太字にします。 例) [b]ポニー[/b]
- [i] および [/i] で文字を斜体にします - 例) [i]驚いた![/i].。
- [img] および [/img] を使用してイメージを挿入します - 例 [img]http://mahara.org/favicon.ico[/img]
- [url] および [/url] を使用してリンクを挿入します。例 [url]http://google.co.nz[/url] or [url=http://google.co.nz/]Google[/url]
あなたのメッセージ内のリンクは自動的にクリックできるようになります。
あなたの投稿をプライベートにする: あなたの投稿を誰が閲覧できるか決定します。投稿をプライベートにした場合、あなたおよびウォールの所有者のみ投稿を閲覧することができます。
あなたのメッセージをウォールに追加するには*投稿*ボタンをクリックしてください。
A wall post always contains the name of the person who made the post, the date and the actual message. Wall posts that ae private are highlighted in a special color / pattern. In the default theme it red stripes.
パブリックウォールの投稿はプロファイルページにアクセスできる誰でも閲覧することができます。
あなたのウォールに特定の投稿を残したくない場合、*削除*ボタン|delete|をクリックしてください。投稿者およびウォールのオーナーのあなたは投稿を削除することができます。
古いウォール投稿を表示するには*ウォール全体を表示する*リンクをクリックしてください。
6.4.7. レジュメ
あなたはレジュメ全体または一部をポートフォリオページに表示することができます。レジュメの一部のみを選択した場合、あなたはさらに情報をコントロールすることができます。
6.4.7.1. 私のレジュメ全体

あなたのレジュメ全体のブロックをあなたのページに追加します。
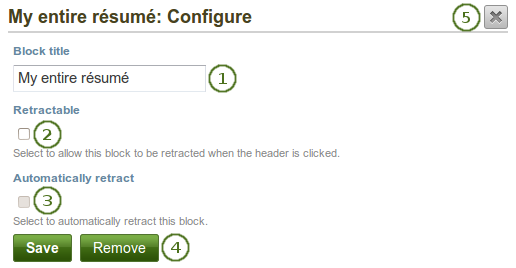
*私のレジュメ全体*ブロックを設定する
- ブロックタイトル: あなたのブロックのタイトルを選択してください。
- 格納: あなたのユーザがブロックのページをヘッディングのみに減らせるようにしたい場合、このチェックボックスをチェックしてください。ユーザはヘッディングのみを表示させるために*格納*アイコン をクリックすることができます。
- Automatically retract: Tick this checkbox if you want to show only the block’s heading when a user views the page. The user can click the Retracted icon to view the entire block.
- あなたの変更を受け入れるには*保存*ボタンをクリックしてください。または*キャンセル*ボタンをクリックしてブロックコンテンツをそのままにしてください。あなたが最初ページにブロックを置いた時のみ*削除*ボタンが表示されます。
- You can also click the Close button in the top right-hand corner to either remove a newly created block before it is being saved or to cancel any changes and leave the block’s content as it is.
注釈
When you use this block, you do not have control over the order in which the information is displayed, but Mahara decides that. In order to be more flexible, you can choose to display one résumé field at a time with the next block.
6.4.7.2. 単一レジュメフィールド

あなたのページに単一レジュメフィールドのブロックを追加します。
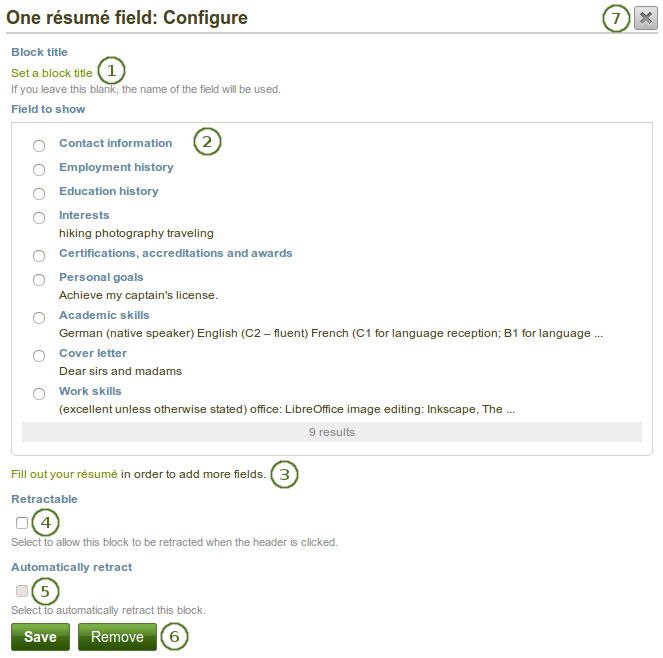
*単一レジュメフィールド*ブロックを設定する
- ブロックタイトル: 異なるタイトルを提供しない限りあなたが表示したいレジュメフィールドのタイトルは自動的に選択されます。
- 表示するフィールド: あなたが表示したいレジュメ情報を選択してください。あなたは1度に1つのフィールドを選択することができます。
- あなたはさらにコンテンツを追加するためこのポップアップウィンドウよりレジュメセクションに直接ジャンプすることができます。
- 格納: あなたのユーザがブロックのページをヘッディングのみに減らせるようにしたい場合、このチェックボックスをチェックしてください。ユーザはヘッディングのみを表示させるために*格納*アイコン をクリックすることができます。
- Automatically retract: Tick this checkbox if you want to show only the block’s heading when a user views the page. The user can click the Retracted icon to view the entire block.
- あなたの変更を受け入れるには*保存*ボタンをクリックしてください。または*キャンセル*ボタンをクリックしてブロックコンテンツをそのままにしてください。あなたが最初ページにブロックを置いた時のみ*削除*ボタンが表示されます。
- You can also click the Close button in the top right-hand corner to either remove a newly created block before it is being saved or to cancel any changes and leave the block’s content as it is.