8.3. ユーザ
サイト管理 → ユーザ
ユーザ メニューにおいて、サイト管理者は次のことができます:
- ユーザを検索する
- 個々のユーザの設定を変更する
- ユーザを利用停止および削除する
- ユーザをサイトスタッフまたは管理者にする
- 管理通知設定を確認する
- 手動またはCSVでユーザを追加および更新する
- レポートを表示する
8.3.1. ユーザ検索
サイト管理 → ユーザ → ユーザ検索
Site administrators can search for any user on the entire site. You can search for their
- 名
- 姓
- 表示名
- ユーザー名
- メールアドレス
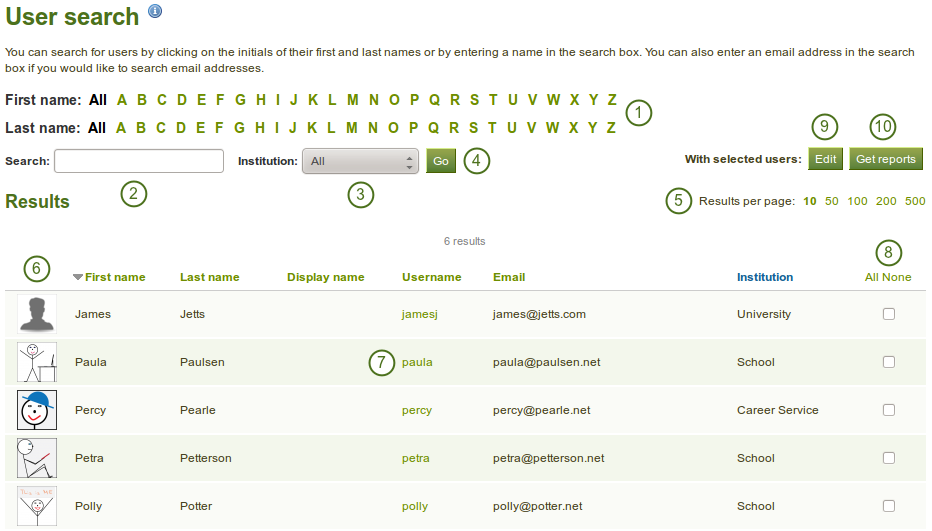
ユーザ検索
あなたは検索およびフィルタオプションも組み合わせることができます。あまりにも多くを組み合わせた場合、あなたは結果を取得できない場合があります。
- あなたが表示したいユーザの姓または名のイニシャルをフィルタします。
- Type the name, display name, username or email address or any partial thereof you wish to search for in the search field.
 If you turned on the exact search, you need to provide the correct name or email address and not a partial one.
 - あなたがユーザを探したいインスティテューションをドロップダウンメニューより選択してください。
- 検索を開始するには、Go ボタンをクリックしてください。
- あなたがページあたりに表示したい結果数を指定してください。
- View your results. The default order is alphabetically according the the first name. However, you can change the order of the results by clicking on a heading and sort that column in ascending or descending order.
- あなたが さらに操作したい ユーザのユーザ名をクリックしてください。
- バルク操作のため、ユーザすべてまたは数名を選択してください。
- Click the Edit button to perform the bulk actions to
- ユーザを利用停止する
- ユーザを削除する
- ユーザの認証方法を変更する
- Click the Get reports button to
- ユーザレポートを表示する
- 処理のため、ユーザアカウント情報をダウンロードする
8.3.1.1. ユーザバルク処理
バルク処理 ページにて、あなたはユーザに関する数多くのバルク処理を実行することができます。

User bulk actions
Once you have selected users for whom you wish to perform the same action on the User search page and clicked on the Edit button, you can take any of the following steps.
- あなたが選択したユーザをレビューします。
- これらのユーザがアカウントにアクセスすることを防ぐには 利用停止 ボタンをクリックしてください。同時にあなたは利用停止理由を提供することができます。
- これらのユーザアカウントを削除するには、削除 ボタンをクリックしてください。
- ドロップダウンメニューから新しい認証方法を選択してください。
- 認証方法を新しい認証方法に変更するには、送信 ボタンをクリックしてください。
警告
あなたがアカウントを削除した場合、ユーザデータすべてを失います。また、サーバのバックアップファイルからを除き、回復することはできません。
8.3.1.2. ユーザレポート
簡単に更新できるよう、あなたはユーザ基本情報をCSVファイルでダウンロードすることができます。
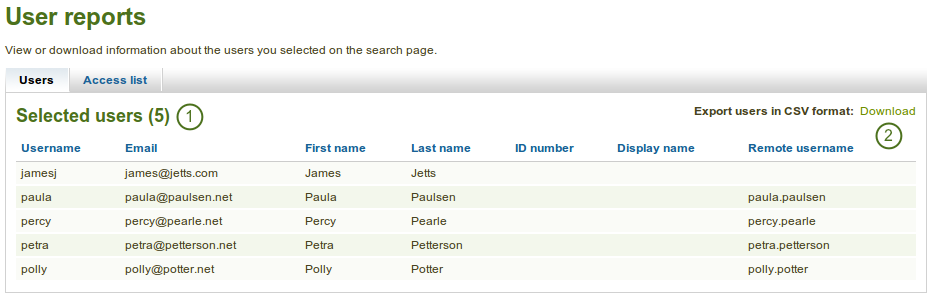
User reports
In order to get to the User reports page, you must select users for whom you wish to perform the same action on the User search page and click on the Get reports button.
- あなたはCSVファイルに含まれる情報をレビューすることができます。
- あなたがこのページで閲覧している情報をCSVファイルとしてダウンロードしたい場合、 ダウンロード リンクをクリックしてください。
注釈
既存のアカウントを変更するため、あなたはこのCSVファイルを使用することができます。
In addition to downloading basic user information, you can also view all the pages that have been created by the users and with whom they have been shared. This facilitates for example troubleshooting when users cannot view pages of others and the administrator would have to log in to the user account to check page permissions.
注釈
This list is only available to site and institution administrators unless staff receive access to this list as well. The site administrator can decide that in the User settings in the option 「Staff report access」.
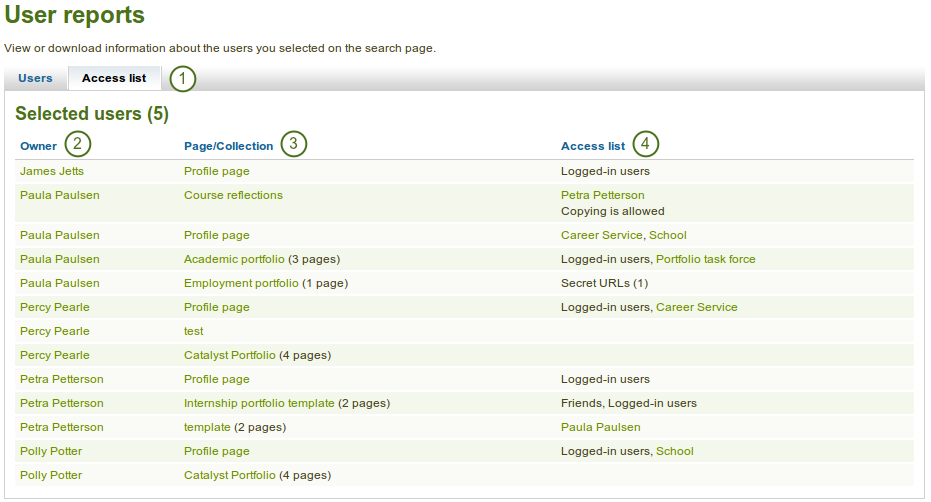
User report page access list
- ユーザレポート ページの アクセスリスト タブをクリックしてください。
- ページオーナーが一覧表示されます。
- ユーザが作成したページすべてが一覧表示されます。代わりにコレクションが一覧表示される場合、含まれるページ数が表示されます。
- ページまたはコレクションにアクセスできるユーザまたはグループメンバーが表示されます。
注釈
あなたがアクセスリストに未登録またはグループのメンバーではない場合、すべてのページ、コレクションおよびグループはリンクされますが直接アクセスすることはできません。
8.3.2. ユーザアカウント設定
サイト管理 → ユーザ → ユーザ検索 → ユーザ名をクリックする
On the Account settings page of a user in the administration area, you can perform a number of actions to manage the user’s account. However, you cannot change personal information about this user, e.g. name, email, from this page. This can only be done in the Content area of the user’s account or via the Add users by CSV page.
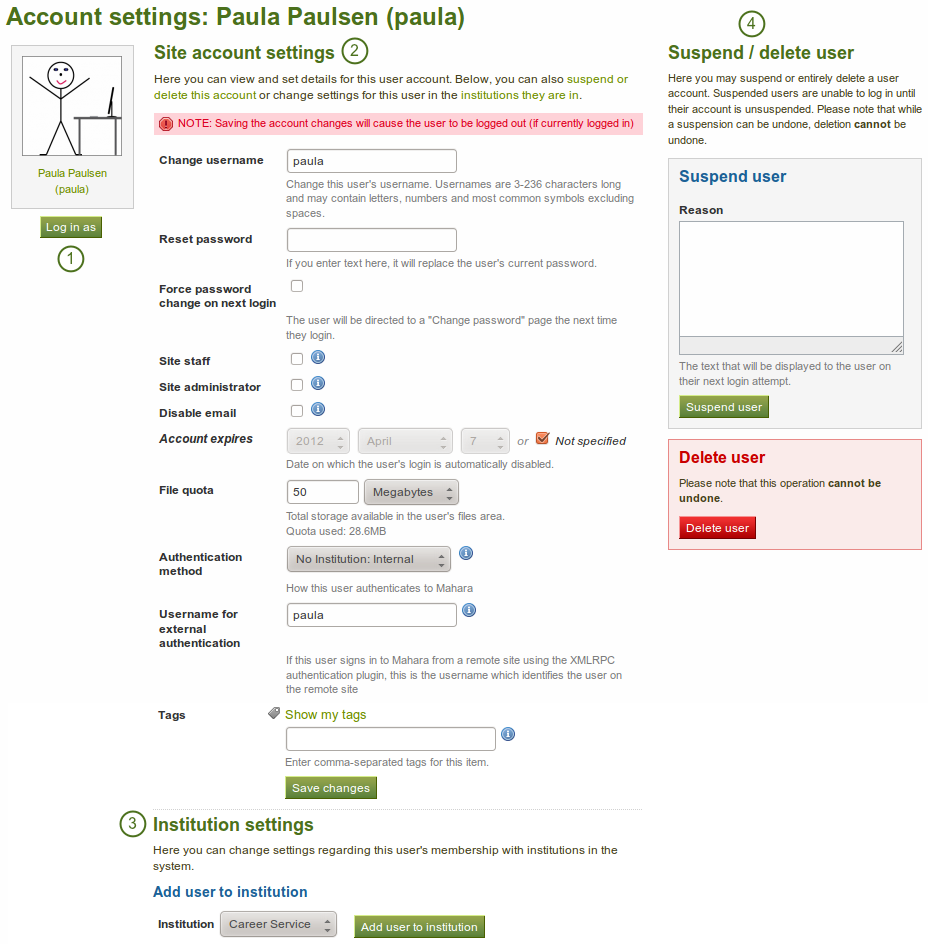
Overview of the user account settings page
- 代理ログイン
- サイトアカウント設定を変更する
- インスティテューション設定を変更する
- このユーザを 利用停止 および 削除 する
8.3.2.1. 代理ログイン
As administrator you have the power to log in as any user that you manage and masquerade as them. If you are a site administrator, you can log in as any user while institution administrators can only perform this action for any user who is in their institution.
あなたはパスワードを知らずにユーザに表示されるすべてを確認することができるため、これはユーザアカウントのトラブルシューティングに関して素晴らしい機能と言えます。
警告
This function can be misused by administrators because you can make changes to the user’s portfolio and artefacts as well as participate in groups while logged in as that user. Users should be aware of this function and that an administrator can enter their account.
Sites should have clear policies around the use of this function so that the privacy of users and their portfolios and collaborative work is protected. Therefore, there should also not be many users within an institution who have administrator rights.
Login as another user
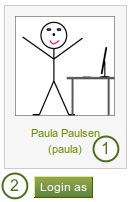
- ユーザ名をクリックすることにより、このユーザのプロファイルページに移動します。 … としてログインする リンクをクリックすことにより、あなたはそのユーザになることができます。
- そのユーザになる場合、xxxxx としてログインする ボタンをクリックしてください。あなたが別のユーザとしてログインしていることを示す赤いバーがブラウザウィンドウ上部に表示されます。
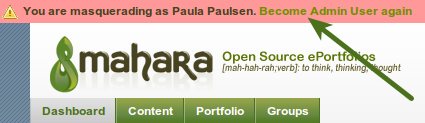
Stop masquerading as another user
再度あなたのアカウントに戻りたい場合、ブラウザウィンドウの最上部にある [あなたのユーザ名] に戻る リンクをクリックしてください。
8.3.2.2. サイトアカウント設定を変更する
あなたはユーザアカウントの多くの設定を表示および変更することができます。
注釈
このユーザに関連付けられている認証方法により、あなたはすべての設定を編集できない場合もあります。
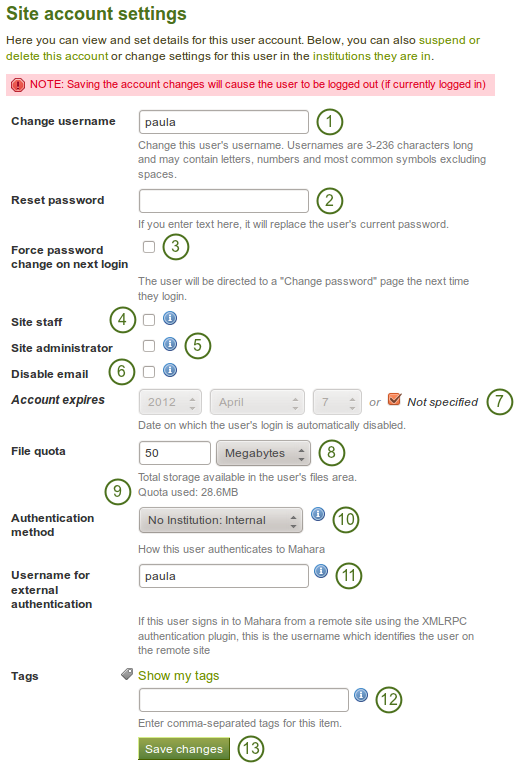
Site account settings of a user
- ユーザ名を変更する: 異なるユーザ名を入力してください。アカウントが外部認証方法で管理されている場合、このフィールドは利用できません。
- パスワードをリセットする: このユーザアカウントのパスワードを変更します。アカウントが外部認証方法で管理されている場合、このフィールドは利用できません。
- Force password change on next login: Check this box if the user shall change the password upon the next login. This field is not available when the account is managed by an external authentication method.
- サイトスタッフ: ユーザをサイト全体のスタッフメンバーにするには、このチェックボックスをチェックしてください。
- サイト管理者: ユーザにサイト全体を管理するための権限を与えるには、このチェックボックスをチェックしてください。
- Disable email: Check this box to disable the sending of emails for this user. If email is disabled, notifications and messages can only be viewed in the internal inbox. Depending on your setup, if emails are bounced back to the sender, then email may be automatically disabled.
- Account expires: Choose the date on which the user’s login is automatically disabled. The default setting is that the date is not specified. You always see the current date in the greyed out date fields. You can set an automatic account expiry date for all users in the account settings of the site configuration.
- File quota: Change the storage allowance for a user’s personal files area. The default value as set in the files configuration in the plugin administration.
- 利用クオータ: あなたは割り当てられているクオータをどのくらい利用しているか閲覧することができます。
- Authentication method: Choose the authentication method that the user uses to log in to Mahara. The authentication methods can be set up in the institution administration. Depending on the authentication method that you have chosen, you may have to provide a remote username to allow the user to log in.
- 外部認証のユーザ名: 選択した外部認証のリモートユーザ名を追加または変更します。外部認証方法が選択されない場合、デフォルトでは内部ユーザ名が表示されます。
- Tags: A user can be tagged by an administrator. The tag of the institution to which the user belonged prior to joining a new institution is not displayed to avoid its deletion.
- あなたが設定編集を完了した場合、変更を保存する ボタンをクリックしてください。
警告
メールアドレスが無効にされた場合、メールが送信されないため、ユーザはパスワードをリセットすることができません。
8.3.2.3. インスティテューション設定を変更する
ユーザのインスティテューション内でのメンバーシップに関してあなたは設定を閲覧および変更することができます。:ref:`インスティテューションのサイト設定 <institution_settings>`に基づきユーザは1つ以上のインスティテューションを追加することができます。
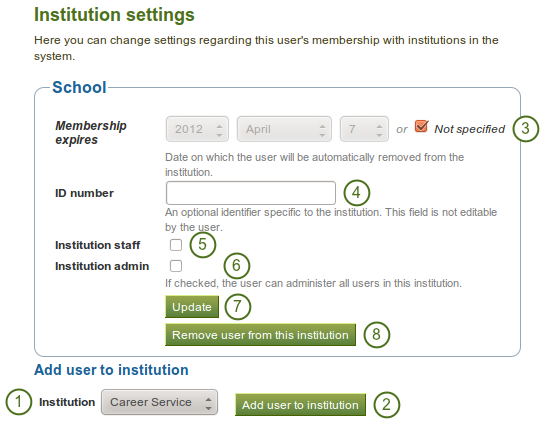
Institution settings for a user
- このユーザを追加したいインスティテューションをドロップダウンメニューより選択してください。
- このユーザをこのインスティテューションのメンバーにするには、ユーザをインスティテューションに追加する ボタンをクリックしてください。
- Membership expires: If you wish, specify the date when the user will be removed from this institution automatically. If you click the 「Not specified」 check box, no end date will be set.
- IDナンバー: インスティテューションにおけるユーザの任意のIDを入力してください。ユーザはこのフィールドを編集することはできません。
- インスティテューションスタッフ: あなたがこのユーザにこのインスティテューションのスタッフ権限を与えたい場合、このチェックボックスをチェックしてください。これにより、例えば管理グループを作成することができるようになります。
- インスティテューション管理者: あなたがこのユーザをインスティテューション管理者にしたい場合、このチェックボックスをチェックしてください。これにより、例えば、このインスティテューションのユーザすべてを管理することができるようになります。
- あなたの変更を保存するには、更新 ボタンをクリックしてください。
- このインスティテューションとユーザとの関係を解除するには、このインスティテューションからユーザを削除する ボタンをクリックしてください。この処理ではユーザは削除されません。このインスティテューションとユーザとの関係が解除されるのみです。
8.3.2.4. ユーザを利用停止する
Suspend a user if he does not follow the terms and conditions of the site and behaves inappropriately. Suspended users cannot log in, but all their content is still available.
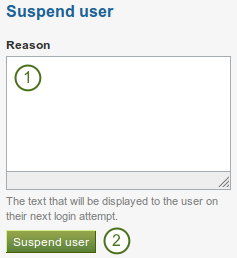
Suspend a user
- Provide a reason for your suspension. This is particularly useful when you are not the only administrator and / or need to remember after some time why you suspended this user.
- ユーザのログインを禁止するには、ユーザを利用停止する ボタンをクリックしてください。
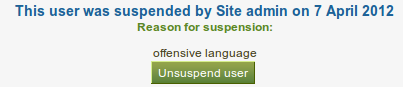
Suspension notice on the user account settings page
When a user has been suspended, the suspension message appears on the user’s account settings page stating the reason and the date for the suspension and giving the administrators the possibility to unsuspend the user by clicking on the Unsuspend user button.

Suspended user tries to log in and gets suspension message
When the user tries to log in, he will see the suspension message and the reason. He can then contact an administrator via the 「Contact us」 form for further action.
8.3.2.5. ユーザを削除する
インスティテューションで自己登録が許可されている場合、ユーザは:ref:アカウント設定 <user_delete_account> で自分のアカウントを削除することができます。管理者はいつでもユーザアカウントを削除することができます。
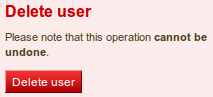
ユーザアカウントを削除する
このユーザを完全に削除するには ユーザを削除する ボタンをクリックしてください。この操作は元に戻すことができないため、あなたが承認する必要のある確認ポップアップウィンドウが表示されます。
警告
When you delete a user account, all personal data is wiped from the system. This applies to everything that is in a user’s Content and Portfolio area. This action cannot be undone. The user’s contributions in groups, e.g. forum messages, uploaded files and pages created in a group, are still available, but are made anonymous by changing the name to 「Deleted user」 as author where an author is shown.
注釈
If an account was deleted by accident - either by a user or by an administrator - swift action may result in recovery of (most of) the data from a backup file. This requires access to the server’s backups and the backend of Mahara. More information is available on the wiki under Restoring a deleted user.
8.3.3. 利用停止および有効期限切れユーザ
サイト管理 → ユーザ → 利用停止ユーザ
A list of all suspended and expired users is available in the sub-menu Suspended users. Here you can unsuspend / reactivate or delete them.

すべての利用停止または有効期限切れユーザ一覧
- あなたが表示したい利用停止または有効期限切れユーザを選択してください。
- 同じ処理を実行したユーザを選択してください。
- 選択されたユーザすべてのアカウントを復活させるには、ユーザの利用停止を解除する ボタンをクリックしてください。
- 選択したユーザすべてを一括削除するには ユーザを削除する ボタンをクリックしてください。この操作は元に戻すことができません。また、すべてのユーザの個人情報も削除されてしまいます。 (詳細は ユーザを削除する をご覧ください)。
- あなたがユーザのアクセスを再度許可したい場合、ユーザの利用停止を解除する ボタンをクリックしてください。
8.3.4. サイトスタッフ
サイト管理 → ユーザ → サイトスタッフ
On this page you can choose which users receive site staff rights. Potential staff members - any user on the site - are listed on the left while existing site staff members are listed on the right.
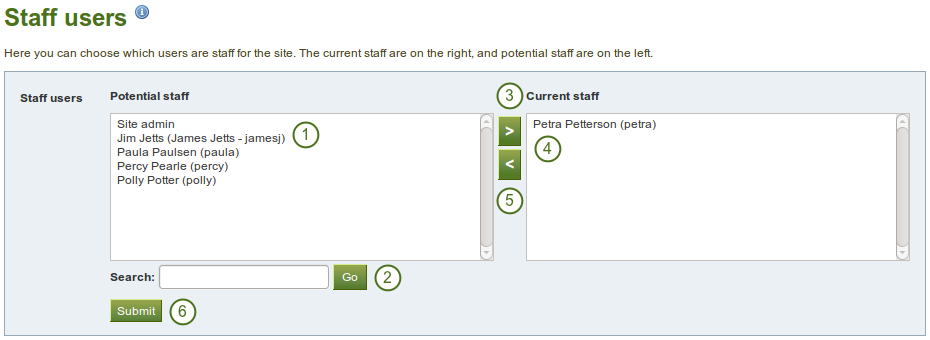
サイトスタッフ権限を与える
- あなたがスタッフにしたいユーザを 潜在的なスタッフ 一覧から選択してください。あなたはCtrlおよびShiftキーを押してクリックすることにより複数ユーザを一度に選択することもできます。
- サイトにあまりにも多くのユーザが登録されていて検索することができない場合、あなたは 検索 ボックスでユーザを探すことができます。
- 右矢印 ボタンをクリックすることにより潜在的スタッフメンバーを右側の 現在のスタッフ に追加します |右矢印|。
- 既存または間違って追加したサイトスタッフを削除したい場合、あなたは右側のリストのユーザをクリックすることにより削除することができます。
- 左矢印 ボタンをクリックしてください。リストからユーザが削除されます。
- あなたがサイトスタッフにしたいメンバーすべてを選択した後、送信 ボタンをクリックしてください。
注釈
You can also double-click a name and it will be moved to the other side. This goes for all functionalities that are similar to this one here.
8.3.5. サイト管理者
サイト管理 → ユーザ → サイト管理
Site administrators have powerful rights. They can make far-reaching changes and also log in as other users. Be careful whom you give these rights. One site administrator is needed for each site. The total number of site administrators should be kept small.
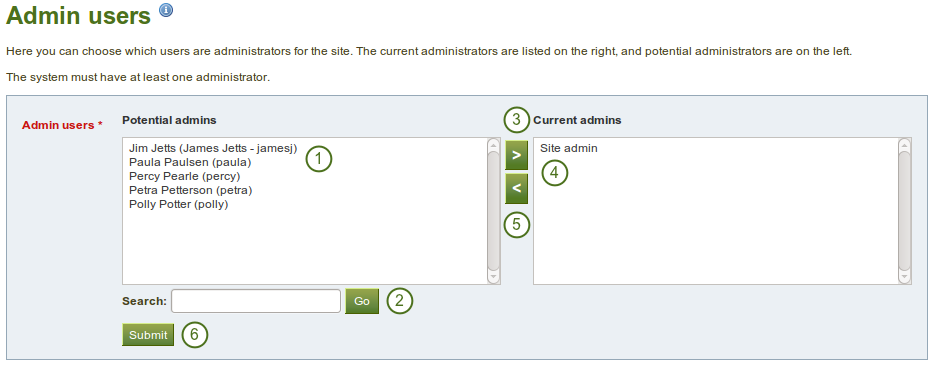
サイト管理者権限を与える
- あなたがサイト管理者にしたいユーザを 潜在的管理者 リストより選択してください。あなたはCtrlおよびShiftキーを同時にクリックすることにより複数ユーザを選択することもできます。
- サイトにあまりにも多くのユーザが登録されていて検索することができない場合、あなたは 検索 ボックスでユーザを探すことができます。
- Add the potential site admin to the right-hand side - Current Admins - by clicking on the right-arrow button
 .
. - あなたが既存または間違って追加したサイト管理者を削除したい場合、ユーザをクリックすることで、右側のユーザ一覧から削除することができます。
- 左矢印 ボタンをクリックしてください。リストからユーザが削除されます。
- あなたがサイト管理者にしたいユーザを選択した後、送信 ボタンをクリックしてください。
注釈
You can also double-click a name and it will be moved to the other side. This goes for all functionalities that are similar to this one here.
8.3.6. 管理者通知
サイト管理 → ユーザ → 管理者通知
The Admin notifications page lists all users with institution and site administrator access on your site. It shows their selected notification preferences for all admin notifications. There should be at least one administrator receiving each type of message generated. Admin notifications are:
- お問い合わせ
- 好ましくないコンテンツ
- ウイルスアップロードの繰り返し
- ウイルスフラグリリース

管理者通知タイプ概要
8.3.7. ユーザを追加する
サイト管理 → ユーザ → ユーザを追加する
手動で1つずつ作成することで、あなたのサイトにユーザを追加することができます。
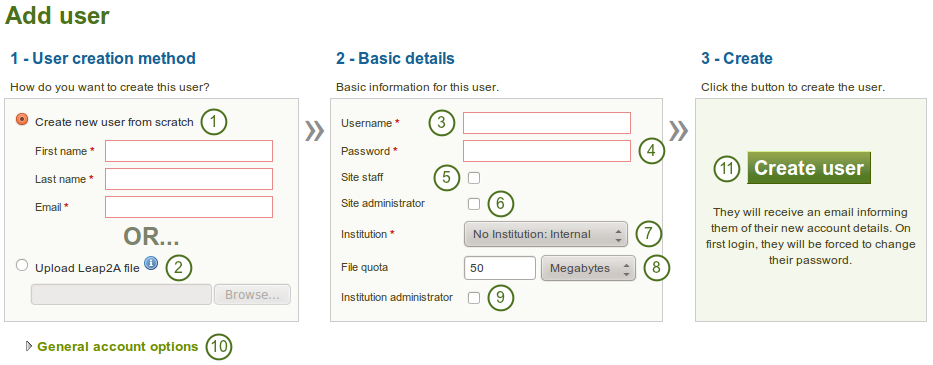
ユーザを手動で追加する
- あなたが空のアカウントを作成したい場合、ユーザをスクラッチから作成する ラジオボタンをクリックしてください。このユーザに対して、姓名およびメールアドレスを入力してください。
- Click the Upload Leap2A file radio button if you want to import a user from another Mahara instance or a system that supports the Leap2A standard. Such a user could have exported his portfolio from another Mahara instance.
- ユーザ名: 新しいユーザ名を入力してください。ユーザ名には半角英数字および標準的な記号を使用することができます。また、ユーザ名の長さは半角3-236文字にしてください。空白は許可されません。
- パスワード: アカウントのパスワードを選択してください。パスワードは少なくとも半角6文字必要です。
- サイトスタッフ: 新しいユーザにサイトスタッフの権限を与えるには、このボックスをチェックしてください。
- サイト管理者: 新しいユーザにサイト管理者の権限を与えるには、このボックスをチェックしてください。
- インスティテューション: ユーザがメンバーであるインスティテューションを選択してください。
- ファイルクオータ: 割り当てられたファイルクオータを確認してください。あなたはこユーザに関して、ここで変更することができます。
- インスティテューション管理者: 選択したインスティテューションにおいて、新しいユーザにインスティテューション管理者権限を与える場合、このチェックボックスをチェックしてください。
- General account options: Expand this menu to see default account options that you may choose to change while creating this user. These are the general account options a user can change on the Settings page.
- ユーザを作成する ボタンをクリックしてください。
- ユーザはアカウント詳細を記述したメールを受信します。
注釈
あなたはユーザのデフォルトのアカウント設定のみを定義することができますが、ユーザがそれらの設定を長期間に渡って保持するよう強制することはできません。あなたがコードレベルでシステムをカスタマイズした場合のみ、設定の保持を強制することができます。
8.3.8. ユーザをCSVで追加および 更新する
サイト管理 → ユーザ → CSVでユーザを追加する
あなたはこの機能をCSVファイルで新しいユーザを一括アップロードおよび既存のユーザを更新するために使用することができます。あなたのCSVファイルの最初の行ではユーザデータのフォーマットを指定してください。最初の行は次のようになります:
username,password,email,firstname,lastname,studentid
新しい ユーザの場合、この行を**含む必要**があります:
- ユーザー名
- パスワード
- Eメール
- 名
- 姓
注釈
既存のユーザを更新したい場合、あなたはパスワードを設定する必要はありません。パスワードカラム自体は保持されます。
あなたはCSVファイルの中に新規および既存のアカウントを混ぜることができます。
It must also include fields that are mandatory for all users to fill out and any fields locked for the institution you are uploading the users for.
他のフィールドすべては任意です。これはあなたのCSVファイルアップロードに追加することのできる完全なフィールドリストです。
- studentid - プロファイルに表示される学生ID
- preferredname - 表示名
- イントロダクション - プロファイルに表示されるイントロダクション
- officialwebsite - 公式ウェブサイト
- personalwebsite - パーソナルウェブサイト
- blogaddress - ブログのURLです。
- 住所 - 所在地住所
- 市町村 - 市町村
- city - 市町村
- country - 国
- homenumber - 自宅電話
- businessnumber - 勤務先電話
- mobilenumber - 携帯電話
- faxnumber - FAX番号
- icqnumber - ICQニックネーム
- msnnumber - MSNニックネーム
- aimscreenname - AIMスクリーンネーム
- yahoochat - ヤフーチャットユーザ名
- skypeusername - Skype ID
- jabberusername - Jabber ID
- 職業 - プロファイルに表示される職業
- 職種 - 職種はプロファイルに表示されます。
- maildisabled - Eメールアドレスを無効するには選択してください。
- remoteuser - 外部認証のリモートユーザ名
例えば、あなたのCSVファイルは次のようになります:
"percy","percy@pearle.net","Percy","Pearle","","","percy.pearle","mahara1""petra","petra@petterson.net","Petra","Petterson","","","petra.petterson","mahara1""polly","polly@potter.net","Polly","Potter","","","polly.potter","mahara1""admin","admin@mahara.school","Admin","User","","","","mahara1""jamesj","james@jetts.com","James","Jetts","","","","mahara1"CSVファイルを作成した時点で、あなたはアップロードの準備ができています。
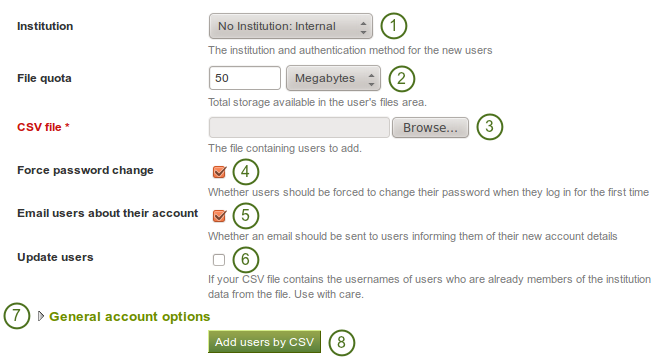
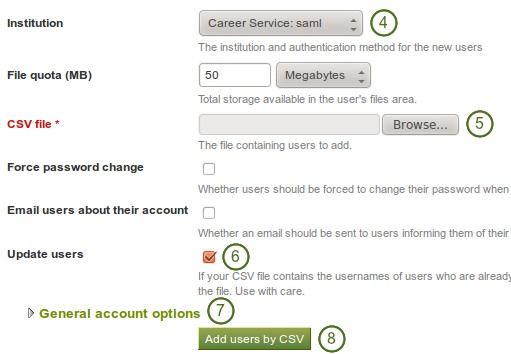
CSVファイルでユーザを追加する
- インスティテューション: あなたがアップロードまたは更新したいユーザアカウントのインスティテューションおよび認証方法を選択してください。あなたは後で認証方法を一括変更することはできませんが、ユーザ個別に変更することは可能です。
- ファイルクオータ: 希望する場合、あなたはすべてのアカウントに関して異なるファイルクオータをCSVファイルで設定することができます。
- CVSファイル: 閲覧 ボタンをクリックした後、あなたのコンピュータのファイルエリアからCSVファイル選択してアップロードしてください。
- パスワード変更を強制する: あなたがこのオプションを選択した場合、初回ログイン時にユーザはパスワードを変更する必要があります。
- Email users about their account: If you select this option, users will receive an email with their account information. This is in particular good for internal accounts. For user accounts that are managed for example by Moodle or through LDAP, you do not have to select this option because the users should already know their login information.
- ユーザを更新する: あなたのCSVファイルに既存ユーザの変更が含まれている場合、このオプションを選択してください。
- General account options: Expand this menu to see default account options that you may choose to change while creating or updating users. These are the general account options a user can change on the Settings page.
- ユーザをアップロードまたは変更するには、CSVでユーザを追加する ボタンをクリックしてください。
注釈
あなたのサーバ設定およびインストールのサイズにより一度にすべてのユーザアカウントをアップロードできない場合があります。あなたは代わりに100件ずつにまとめてアップロードすることができます。
8.3.9. 認証方法およびリモートユーザ名を大量に変更します。
After an admin has successfully invited or added new members into an institution, he can change their authentication method. That can be useful if the authentication method differs from the one in the previous institution and the admin wants to link the new accounts to a remote username using:
- LDAPディレクトリ
- MNet経由のMoodleアカウント
- IdPプロバイダ経由のシングルサインオン
注釈
The change in the authentication method for existing accounts should be done before users try to log in with their new credentials to avoid the creation of a second account for that user.
You can change the authentication method for multiple users at once to save you time manually updating each user. Changing the authentication method usually also entails changing the remote username (a.k.a. username for external authentication). Therefore, these two are dealt with together to describe the work flow better.
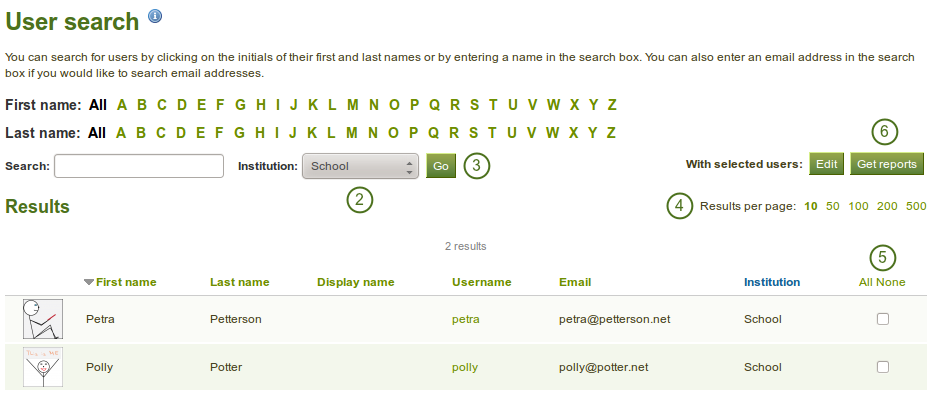
リモートユーザ名を変更するため、インスティテューションのユーザを検索する
- サイト管理 → ユーザ → ユーザ検索 にアクセスしてください。
- あなたが変更または追加したいユーザの認証方法およびユーザ名を含むインスティテューションをドロップダウンメニューから選択してください。
- これらのインスティテューションメンバーに関して結果を制限したい場合、Go ボタンをクリックしてください。
- あなたが1ページに10名以上のユーザを表示したい場合、1ページあたりの表示ユーザ数 を変更してください。
- チェックボックスをチェックするか すべて をクリックしてページのユーザすべてを選択することにより、あなたが認証方法およびリモートユーザ名を変更したいユーザを選択してください。
- 次のステップに進むため、レポートを取得する ボタンをクリックしてください。あなたは ユーザレポート ページに移動します。
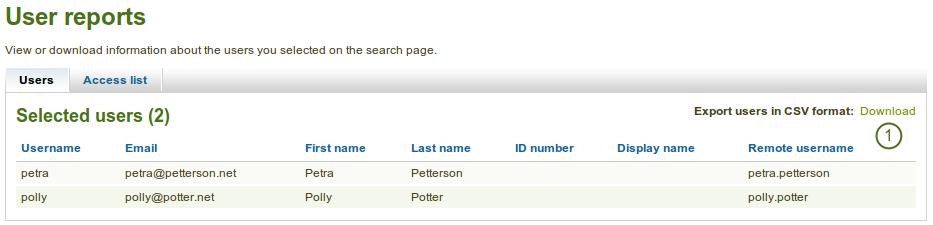
ユーザレポートページ

CSVファイルでリモートユーザ名およびパスワードを更新する
ユーザアカウントを一括更新する
- Click on the Download link next to Export users in CSV format so that you can change their remote username in bulk. This is necessary if their internal Mahara username is not the same as the one they use to authenticate on your system that is linked to Mahara or if they already have a remote username that would be incorrect for your institution.
- Open the CSV file in your preferred spreadsheet software. In the column remoteuser, add or change the username that your users have when authenticating in your regular system that you have connected to Mahara. You may also change other fields, e.g. their name, email address etc. If you want to add a new user directly in this CSV file, you can do so as well.
- サイト管理 → ユーザ → CSVでユーザを追加する にアクセスしてください。
- インスティテューション: あなたがユーザを更新したいインスティテューションおよび認証方法を選択してください。これによりあなたはCSVファイル内のユーザすべての認証方法を別の方法に変更することができます。
- CSVファイル: あなたのコンピュータから更新したCSVファイルを選択してください。
- ユーザを更新する: あなたが既存のユーザアカウントを更新したい場合、チェックボックスをチェックしてください。
- 一般アカウントオプション: あなたはすべてのユーザのデフォルトアカウントオプションを変更することができます。例) デフォルトで複数日誌を許可する、インターフェース言語を変更する等。
- ユーザを更新するには、CSVでユーザを追加する ボタンをクリックしてください。あなたが変更するユーザに応じて、この処理は時間を要する場合があります。
- You receive a report on the page upon the successful completion of the upgrade. If the upgrade fails, error messages help you to resolve the problem. No users are updated until all errors are resolved.
注釈
If you intend to update more than 100 users at the same time, you may run into problems and the server may reject your CSV file as the update process is a very memory intense one. If that is the case, you would have to split your CSV file into smaller ones with fewer users in them.
あなたはリモートユーザ名が追加されているアカウントを確認することができます:
- サイト管理 → ユーザ → ユーザ検索 にアクセスしてください。
- あなたはチェックしたいメンバーが所属しているインスティテューションを選択してください。
- あなたのユーザをこのインスティテューションに制限するため、Go ボタンをクリックしてください。
- あなたがリモートユーザ名を確認したいユーザを選択してください。
- 次のステップに進むため、レポートを取得する ボタンをクリックしてください。あなたは ユーザレポート ページに移動します。
- 最終カラムにリモートユーザ名が表示されます。