8.2. サイト設定
管理 → サイト設定
注釈
*サイト設定*はサイト管理者のみアクセスすることができます。
あなたは*サイト設定*で次のことができます:
- あなたのMaharaサイトの一般的なパラメータを設定します。
- サイトページを編集する
- 特定メニューアイテムの表示を設定します。
- Moodleまたは別のMaharaとのネットワーキングを許可する
- サイトページおよびコレクションを作成および共有する
- サイトファイルをアップロードする
8.2.1. サイトオプション
管理 → サイト設定 → サイトオプション
あなたはサイト全体にデフォルトで適用されるグローバルオプションを*サイトオプション*で設定することができます。
注釈
あなたのconfig.phpファイルの設定によりオーバーライドされている場合、1つまたはそれ以上のフィールドを無効にすることができます。
あなたが1つまたはそれ以上の設定を完了した場合、ページ下部の*サイトオプションを更新する*ボタンをクリックしてください。
8.2.1.1. サイト設定
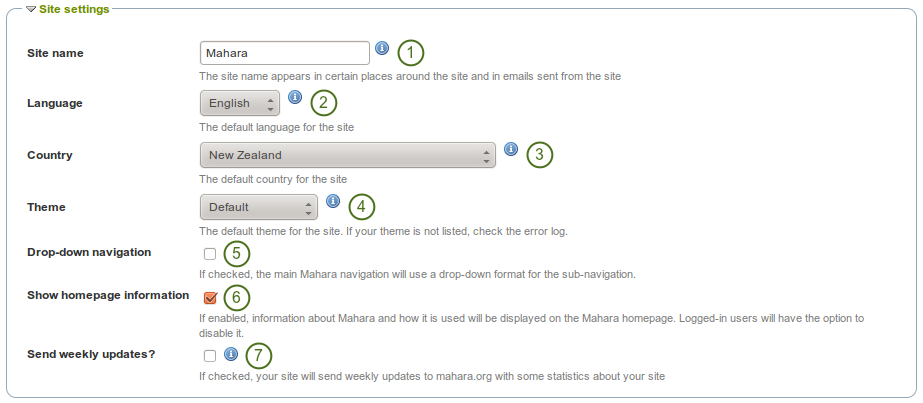
サイト設定
- サイト名: あなたのMaharaインスタンスの名称を選択してください。これはサイトの特定の場所に表示されます。例えばブラウザのタイトルバーおよびサイトから送信されたメールに表示されます。そのため長過ぎないようにしてください。
- 言語: あなたのサイトのデフォルト言語を設定してください。複数言語パックをインストールしている場合、あなたにはドロップダウンメニューが表示されます。そうでない場合、標準言語の英語が表示されます。
- 国: 選択された国はあなたのMaharaインストレーションのデフォルトの国となります。例) 連絡先情報.
- Theme: Mahara comes with a number of themes that you can use. Choose one from the drop-down menu to make it the default theme for your site. If you have institutions set up, they can choose their own theme. You can search for community-contributed themes on the Mahara wiki.
- ドロップダウンナビゲーション: この設定を有効にした場合、Maharaメインナビゲーションにサブナビゲーションとしてドロップダウンメニューが使用されます。
- ホームページ情報を表示する: この設定を有効にした場合、ログアウトのホームページまたはログインユーザの*ダッシュボード*にMaharaの使用に関する情報が表示されます。:ref:`クイックリンク <dashboard_quick_links>`もご覧ください。
- Send weekly updates?: If checked, your site sends weekly updates to mahara.org with some statistics about your site. See also Register your Mahara site.
注釈
あなたはさらに言語パックをインストールすることができます。`言語パックに関するWiki <https://wiki.mahara.org/index.php/Language_Packs>`および`完全なリスト <http://langpacks.mahara.org/>`があります。
8.2.1.2. ユーザ設定
ユーザ設定
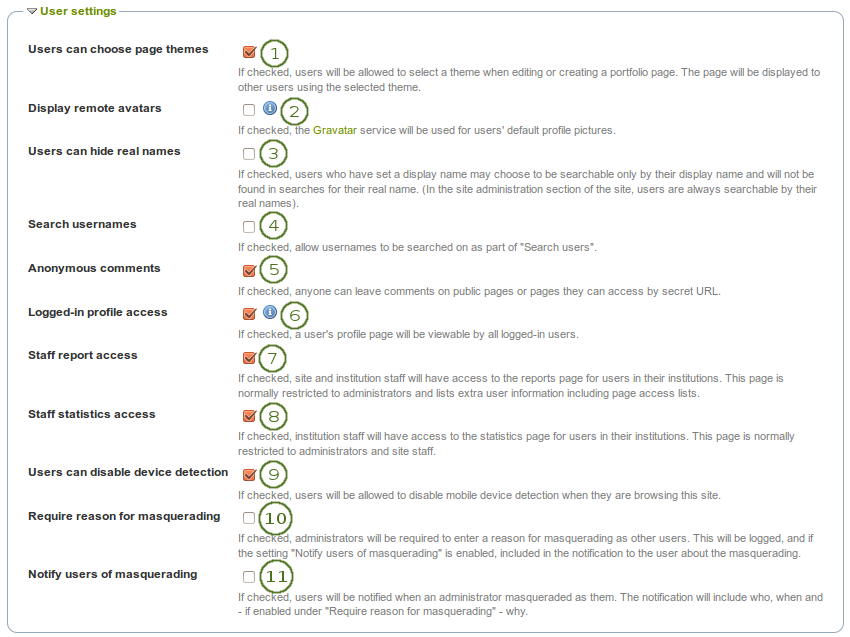
ユーザはページテーマを選択できる: この設定を有効にした場合、ユーザはプロファイルページでテーマを選択することができます。これによりインスティテューションまたはサイトテーマはオーバーライトされます。
リモートアバタを表示する: この設定を有効にした場合、ユーザのデフォルトプロファイル写真は`Gravatar <http://gravatar.com>`の写真となります (remote avatar)。これを動作させるためにはユーザはGravatarのアカウントが必要です。
注釈
If you use your own avatar server to provide profile pictures for your users, you can use that instead of Gravatar for the default profile pictures. In order to do so, you need to add
$cfg->remoteavatarbaseurl = 'http://example.com/avatar/';(with the correct URL to your service) to your config.php.Users can hide real names: If checked, users who have set a display name may choose to be searchable only by their display name and will not be found in searches by their real name. In the administration section of the site, users are always searchable by their real names. An administrator (site and institution) always sees the display name, first and last name and username.
ユーザ名を検索する: この設定を有効にした場合、:ref:「ダッシュボード <dashboard>」の「ユーザを検索する」および:ref:「フレンドを探す <find_friends>」を使用してユーザ名を検索することができます。
匿名アクセス: この設定を有効にした場合、ログアウトユーザ/ログインしていないユーザがパブリックページまたはシークレットURLでアクセスできるページにコメントを投稿することができます。
Logged-in profile access: If this option is unchecked, profile pages are initially viewable by all logged-in users, but the owner is allowed to restrict access to a smaller group if they wish. Enable this option if you want to make sure all users can see each others』 profile pages. Profiles of institution members will always be visible to other members of the same institution.
Staff report access: If enabled, institution staff will have access to the reports page for users in their institutions. This page is normally restricted to administrators and lists extra user information including page access lists.
スタッフ統計アクセス: この設定を有効にした場合、インスティテューションスタッフがインスティテューションユーザの統計にアクセスできるようになります。通常、これは管理者およびサイトスタッフに制限されます。
Users can disable device detection: If checked, users can disable mobile device detection in their account settings. This allows them to be more flexible in what they can view and do on a mobile device such as a smartphone or tablet. This setting is part of the responsive design changes to Mahara.
 Require reason for masquerading: If checked, administrators will be required to enter a reason for masquerading as other users. This will be logged, and if the setting 「Notify users of masquerading」 is enabled, included in the notification to the user about the masquerading. This setting needs logging to be turned on.
- Notify users of masquerading: If checked, users will be notified when an administrator masqueraded as them. The notification will include who, when and - if enabled under 「Require reason for masquerading」 - why. This setting needs logging to be turned on.
8.2.1.3. 検索設定
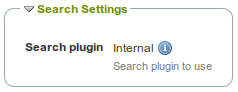
Maharaにはあなたがユーザおよびページを検索することのできる検索プラグインが同梱されます。別の検索プラグインをインストールした場合、あなたのサイトにどの検索プラグインを使用するか選択することができます。
検索設定
参考
あなたは:ref:`検索プラグイン管理 <plugin_search>`で内部検索プラグインを設定することができます。
8.2.1.4. グループ設定
Maharaは個人の作業のためのみではなくグループの共同作業にも使用することができます。グループエリアではいくつかの設定を使用できます。
グループ設定
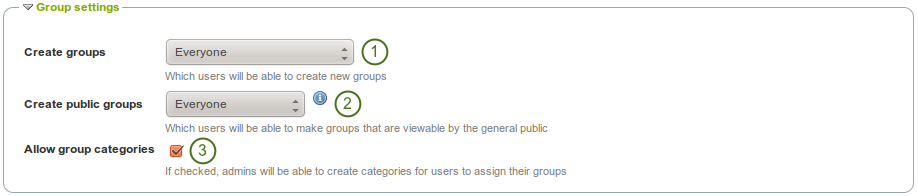
- Create groups: You decide whether administrators, administrators and staff or everyone can create groups. The default setting is the most permissive 「everyone」 because Mahara is user-centered and gives the individual users a great deal of control over what they want to do. If you choose to limit the group creation to administrators (and staff), these need to be contacted to set up groups. There is no internal group request system.
- Create public groups: Choose whether everyone or only administrators can create public groups. These are groups for which you do not need to be a member of the group or even have a login for Mahara to view the group homepage, discussion forums (and member listing if the group administrator allowed that).
- グループカテゴリを許可する: この設定を有効にした場合、サイト管理者はユーザがグループを割り当てるカテゴリを作成することができます。このカテゴリは マイグループ および グループを探す でグループをフィルタするために使用されます。
参考
グループカテゴリはサイト管理者により管理の :ref:`グループエリア <group_categories>`で管理されます。
8.2.1.5. インスティテューション設定
あなたは複数のインスティテューションでMaharaを使用することができます。また、管理目的でインスティテューションを分けることもできます。例) ユーザ管理およびパーミッションを分けてそれぞれ異なるテーマを設定します。
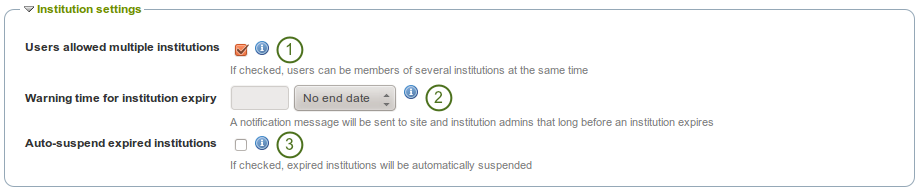
インスティテューション設定
- ユーザに複数インスティテューションを許可する: この設定を有効にした場合、ユーザは同時に複数のインスティテューションのメンバーになることができます。そのためユーザは1つのアカウントで2つまたはそれ以上のインスティテューションに属することができます。
- Warning time for institution expiry: If set, a notification will be sent to site and institution administrators this amount of time before an institution is due to expire and be suspended. This time may be specified in days, weeks, months, years or 「No end date」. If the latter option is chosen, institutions will not expire by default.
- Auto-suspend expired institutions: If set, this option will allow Mahara to automatically suspend an institution that has expired automatically. This means that users of that institution will not be able to log in until the institution has been unsuspended.
8.2.1.6. アカウント設定
アカウント設定
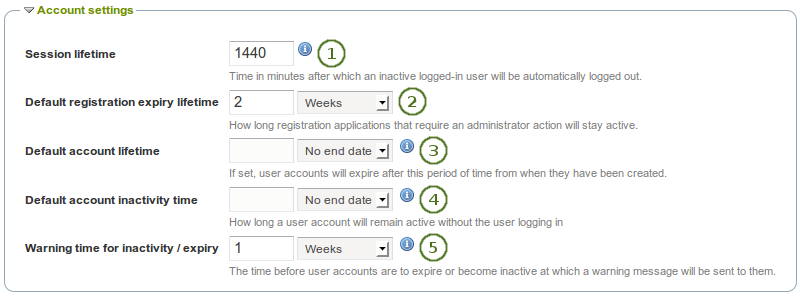
- セッションライフタイム: セキュリティ上の理由から、指定された時間を経過した時点でユーザはサイトから自動的にログアウトされます。このフィールドではこの時間を指定します。デフォルト値は1440分 (24時間) です。
- Default registration expiry lifetime: As site administrator you can decide when pending registrations that require approval expire. This time may be specified in days, weeks, months, years or 「No end date」. If the latter option is chosen, pending registrations will not expire by default. The default value is 2 weeks.
- Default account lifetime: If set, user accounts will expire after this amount of time from when they were created. When a user account is expired, the user cannot log in. This time may be specified in days, weeks, months, years or 「No end date」. If the latter option is chosen, accounts will not expire by default.
- Default account inactivity time: If set, users who do not log in for this amount of time will be considered 「inactive」 and will not be able to log in anymore. This time may be specified in days, weeks, months, years or 「No end date」. If the latter option is chosen, users are not set to 「inactive」 by default.
- Warning time for inactivity / expiry: If set, a warning message will be sent to users this amount of time before their accounts are due to expire or become inactive. This time may be specified in days, weeks, months, years or 「No end date」. If the latter is chosen, users do not receive a warning before their account expires or they are flagged as having an inactive account.
8.2.1.7. セキュリティ設定
セキュリティ設定
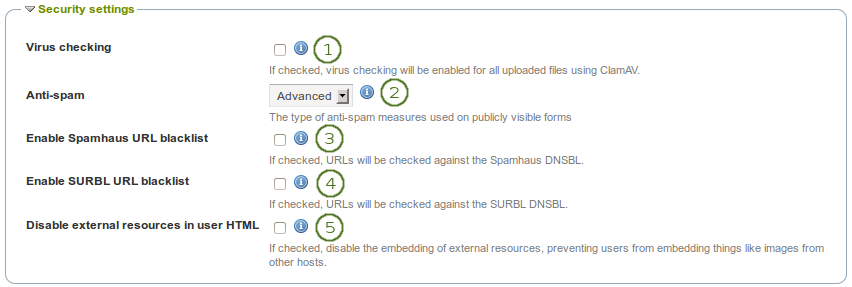
- Virus checking: If you want all files that are uploaded by users to be run through the ClamAV virus scanner, you should select the virus checking option. You have to have ClamAV installed on your server. For security reasons, the path to ClamAV on your server needs to be provided in the config.php:
$cfg->pathtoclam = 'YOUR_PATH_TO_CLAMSCAN';. - Anti-spam: There are three levels of anti-spam protection available for publicly visible forms such as the contact and registration forms. A form submission is never silently rejected. Rather, an error message is displayed asking the user to try again if the submission is classified as spam. The three choices are:
- なし: フォームでの送信はアンチスパムチェックされません。
- シンプル: 基本的なチェックが実行されます。正しくない形式のメールアドレスをフォームからの送信に含む場合、または過度のURLを含む場合に拒否されます。
- Advanced: Performs additional checks to determine whether email addresses are real or contain URLs that are blacklisted. This requires an Internet connection.
- Enable Spamhaus URL blacklist: If enabled, URLs will be checked against the Spamhaus DNSBL. The Spamhaus Project provides a URL blacklist that is free for non-commercial, low-traffic use. A professional use datafeed service is also available but not supported in Mahara. Please read the Spamhaus DNSBL usage terms before enabling this option.
- Enable SURBL URL blacklist: If enabled, URLs will be checked against the SURBL DNSBL. SURBL provides a URL blacklist that is free for organizations with fewer than 1000 users. A professional use datafeed service is also available, but not supported in Mahara. Please read the SURBL usage terms before enabling this option.
- Disable external resources in user HTML: Turning this option on will prevent users from embedding external resources such as images from remote sites into their forum posts and other HTML content. It is however a good thing to do from a security standpoint since it does neutralise a few clever phishing attacks. See the HTML Purifier documentation for more details.
8.2.1.8. プロクシ設定
プロクシ設定
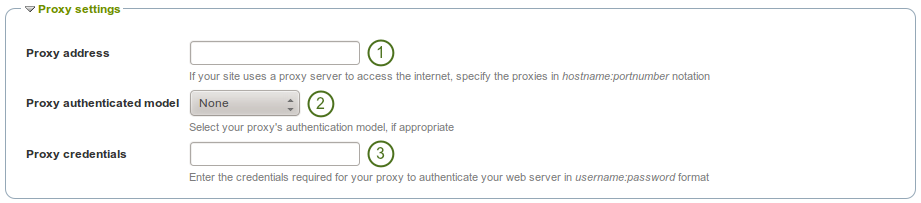
- プロクシアドレス: あなたのサイトがインターネットにアクセスするためプロクシサーバを使用している場合、「ホスト名:ポート番号」表記法で指定してください。
- プロクシ認証モデル: 適切な場合、あなたのプロクシ認証モデル (「なし」または基本[NCSA]) を選択してください。
- プロクシ証明書: あなたのプロクシがウェブサーバに認証するため必要な証明書を「ユーザ名:パスワード」の形式で指定してください。
8.2.1.9. Eメール設定
Eメール設定
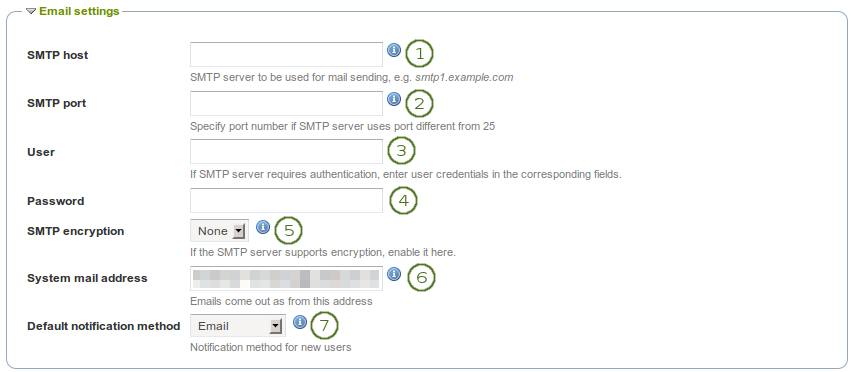
- SMTP host: If you want to force Mahara to use a specific SMTP server instead of the system one, enter its hostname here, e.g.
smtp.example.com. It is possible to specify more than one host by separating them with semicolons, e.g.smtp1.example.com;smtp2.example.com, but keep in mind that all other settings, e.g. authentication credentials and port numbers, will apply to all listed servers. It is not possible to specify different credentials for each server in this list. This feature is useful when SMTP host authentication is not required or you list different frontends for the same mail server in which case other settings will work. - SMTP port: If your SMTP server uses a port number different from 25, you may specify it here. When encryption is enabled, the default ports are 465 for SSL and 587 for TLS. You only need to specify a port number if it is different from these. Check the correct settings with your mail service provider.
- ユーザ: あなたのSMTPサーバが認証を必要とする場合、ここにあなたのユーザ名を入力してください。
- パスワード: あなたのSMTPサーバが認証を必要とする場合、ここにあなたのパスワードを入力してください。
- SMTP暗号化: あなたのSMTPサーバが暗号化をサポートしている場合、ここで有効にしてください。
- システムメールアドレス: これはMaharaが送信元となるメールアドレスです。
- デフォルト通知メソッド: サイトの新しいユーザに使用される通知すべての通知方法を選択してください。オプションは次のとおりです:
- Eメール
- メールダイジェスト
- 受信ボックス
8.2.1.10. 一般設定
一般設定
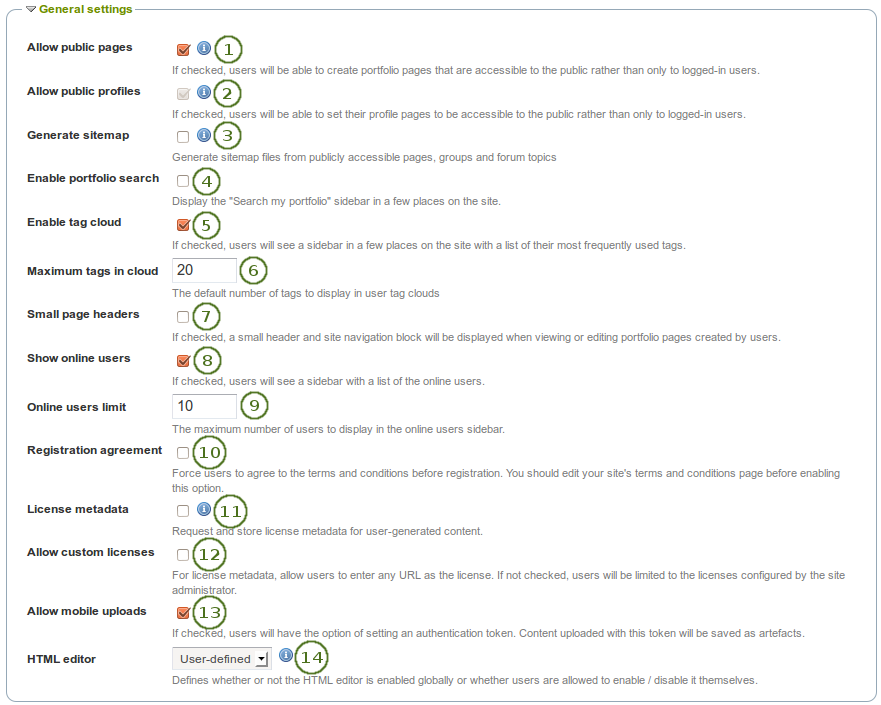
- パブリックページを許可する: この設定を有効にした場合、ログインユーザだけではなく、その他のユーザからもアクセス可能なポートフォリオページを作成することができます。
- パブリックプロファイルを許可する: この設定を有効にした場合、ユーザはログインユーザだけではなくパブリックからアクセスできるよう自分のプロファイルページを設定することができます。しかし、ログインユーザのみウォール等のインタラクティブ機能を使用することができます。オプション*パブリックページを許可する*が選択された場合、自動的に*パブリックプロファイルを許可する*も選択されます。
- サイトマップを生成する: この設定を有効にした場合、パブリックにアクセス可能なページ、グループおよびフォーラムトピックから他のサービスに送信できるサイトマップファイルが生成されます。
- ポートフォリオ検索を有効にする: この設定を有効にした場合、サイトの*コンテンツ*および*ポートフォリオ*セクションに*私のポートフォリオを検索する*サイトブロックが表示されます。
- タグクラウドを有効にする: この設定を有効にした場合、最も使用されたタグの一覧がサイトの*コンテンツ*および*ポートフォリオ*セクションに表示されます。表示されるタグ数は*クラウド内の最大タグ数*オプションで設定します。
- クラウド中の最大タグ数: ユーザのタグクラウドに表示されるタグのデフォルト数を入力してください。ユーザはこの数を:ref:`アカウント設定 <general_account_options>`で変更することができます。
- Small page headers: If checked, a small header and site navigation block are displayed when viewing or editing portfolio pages instead of the standard header. This option gives more space for the portfolio content itself. The small page header is visible at all times when you are on a portfolio page.
- オンラインユーザを表示する: この設定を有効にした場合、ユーザに対してサイドブロック上に10分内にログインしたユーザの一覧が表示されます ( ダッシュボード)。
- オンラインユーザ制限: *オンラインユーザ*サイドブロックに表示する最大ユーザ数を入力してください。
- Registration agreement: If checked, you force users to agree to the 「Terms and Conditions」 before registration. You should edit your site’s 「Terms and Conditions」 page before enabling this option. You can do so under Edit site pages.
- License metadata: If checked, users can choose under which license they want to make their content available. They can set a default license in their account settings and then decide for each artefact individually as well. This setting can be overwritten by an institution administrator in the institution settings.
- カスタムライセンスを許可する: この設定を有効にした場合、ユーザはURLとして自分のライセンスのコンテンツを入力することができます。この設定が無効にされた場合、ユーザはサイト管理者によって設定されたライセンスに制限されます。
- モバイルアップロードを許可する: この設定を有効にした場合、ユーザには アカウント設定 で認証トークンを設定するオプションが与えられます。これにより自分の モバイルデバイス からコンテンツをアップロードすることができるようになります。複数のモバイルデバイスで接続できるようにする場合、あなたは1つ以上のトークンを入力することができます。
- HTMLエディタ: デフォルトでHTMLエディタを使用するかどうか選択してください。**ユーザ定義**が設定された場合、ユーザはパーソナル設定でHTMLを使用するかどうか選択することができます。そうでない場合、指定された設定がサイト全体で使用されます。
8.2.1.11. ロギング設定
Maharaは多くのイベントを記録します。これらはデータベースにも収集されます。データベースにイベントを記録する主な理由は 管理者によるユーザのマスカレーディング による操作を高度に監査することにあります。

ロギング設定
ログイベント: あなたがデータベースに記録したいイベントを決定してください。ページの編集等、ユーザがサイトで重要な作業を実施する度にイベントが生成されます。このログはデータベース内のテーブル「event_log」に保持されます。
- なし: 何もデータベースにログインしていません。
- マスカレーディング: マスカレーディングセッションのみ記録されます。あなたが管理者マスカレーディングに関して報告したい場合、この設定を有効にしてください。
- すべて: データベースに記録できるイベントすべてが記録されます。
注釈
あなたがどのようなロギング設定を選択したとしても、すべてのイベントはアクセスログに記録されます。
Event log expiry: Decide for how long you wish to keep your database log. If you selected to log all events, the table can grow quite quickly especially on an active site. This time may be specified in days, weeks, months, years or 「No end date」. If the latter option is chosen, the event log is not deleted by default.
参考
あなたがマスカレードセッションまたはすべてのロギングを有効にした場合、:ref:`「ユーザレポート」 <user_reports>`セクションでマスカレーディングセッションのレポートを利用することができます。
テーブル「event_log」には記録できるデータが含まれています。
- usr: 画面に表示される人のユーザID
- realusr: マスカレードする管理者のユーザID
- イベント: 実行されたアクションです。例) マスカレーディングセッションの開始、アーティファクトの保存、ページまたはアーティファクトの削除、ユーザ情報の更新、ページへのブロックの配置
- data: 操作に関する追加情報 例) 更新されるブロックID
- 時間: 処理が実行された時間です。
8.2.2. サイトページを編集する
管理 → サイト設定 → サイトページを編集する
ここであなたはフッタにリンクされているサイトおよびページ近くのページコンテンツを編集することができます。
- About
- ホーム (ダッシュボード)
- ログアウトホーム
- プライバシー保護方針
- 使用条件
すべてのページにはあなたが完全に変更できるデフォルトのテキストが入力されています。すべてのページにはテキストを含む必要があります。あなたはビジュアルエディタを使用してページスタイルを変更することができます。
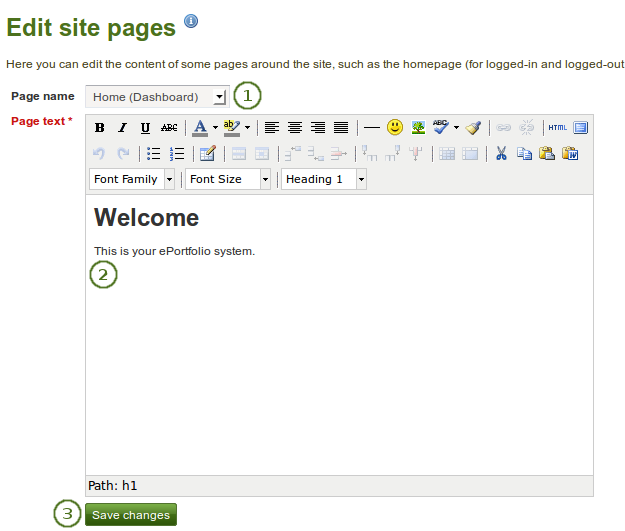
サイトページを編集する
- ページ名: あなたが編集したいページをドロップダウンメニューから選択してください。
- ページテキスト: エディタウィンドウのテキストを変更してください。あなたはこのフィールドを空白のままにすることはできません。
- *変更を保存する*ボタンをクリックしてください。
注釈
If your site has added custom pages to the menu, e.g. like MyPortfolio.school.nz where you have a number of additional informational pages, you can now edit their content from the Edit site pages screen. In order to do so, a server administrator needs to make changes on the backend.
8.2.3. メニュー
管理 → サイト設定 → メニュー
Maharaには2つのメニューがあります:
- リンクおよびリソース
- フッタ
8.2.3.1. リンクおよびリソース
The Links and resources menu appears to all users on most pages in the side bar. You can decide which links or files are available to everybody - also those without a login - and which ones only logged-in users shall see.
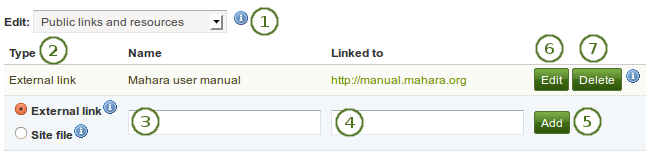
*リンクおよびリソース*メニューに外部リンクを追加する
- あなたが編集したい*リンクおよびリソース*メニューを選択してください: パブリックまたはログインユーザ
- タイプ*外部リンク*を選択してください。
- メニューに表示されるリンク名を入力してください。
http://またはhttps://を含むリンクの完全なURLを提供してください。- *追加*ボタンをクリックしてください。
- 既存のリンクを変更するには*編集*ボタンをクリックしてください。
- リンクを削除するには*削除*ボタンをクリックしてください。
あなたは :ref:サイトファイルエリア<site_files>にアップロードしたファイルにもリンクすることができます。
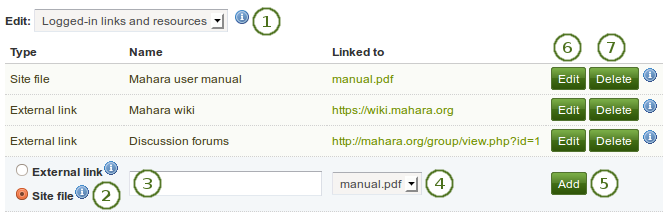
サイトファイルを*リンクおよびリソース*メニューに追加する
- あなたが編集したい*リンクおよびリソース*メニューを選択してください: パブリックまたはログインユーザ
- タイプ*サイトファイル*を選択してください。
- メニューに表示されるサイトファイル名を入力してください。
- あなたが表示したいファイルをドロップダウンメニューから選択してください。
- *追加*ボタンをクリックしてください。
- *編集*ボタンをクリックした場合、あなたは名称を変更または異なるファイルを選択することができます。
- あなたは*削除*ボタンをクリックしてメニューからファイルを削除することができます。これはファイルへの参照が削除されるのみでファイル自体が削除されることではありません。
注釈
あなたのリンクおよびリソースを特定の順番に表示したい場合、後で順番を変更することができないためリンクおよびファイルを追加する前に並べてください。
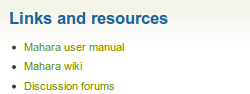
リンクおよびリソース メニュー結果
8.2.3.2. フッタメニュー
あなたはそれぞれのフッタにどのリンクを表示するかコントロールすることができます。
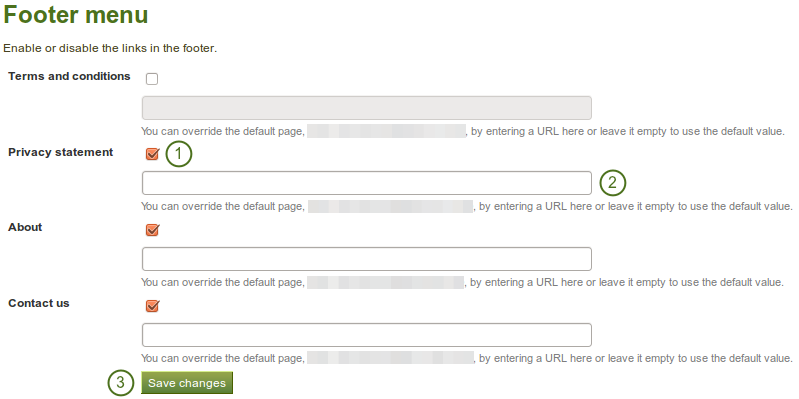
フッタメニュー
- どのサイトページをそれぞれのページのフッタに表示するか選択してください。あなたは サイトページを編集する ページで「使用条件」「プライバシー保護方針」「About」を変更することができます。
- あなたがこれらのページを既存の外部ページにリンクしたい場合、適切なテキストフィールドにURLを入力してください。
- あなたの設定を保存するには*変更を保存する*ボタンをクリックしてください。
8.2.4. ネットワーキング
管理 → サイト設定 → ネットワーキング
Mahara’s networking features allow it to communicate with other Mahara or Moodle sites. If networking is enabled, you can use it to configure single sign-on (SSO) for users who log in at either Moodle or Mahara or allow users from another Mahara instance to access yours.
Moodle 2.0以降、あなたがMoodle内で作成したコンテンツを保存するためポートフォリオ機能 <http://docs.moodle.org/22/en/Portfolios> を通して、MaharaおよびMoodleに接続することができます。
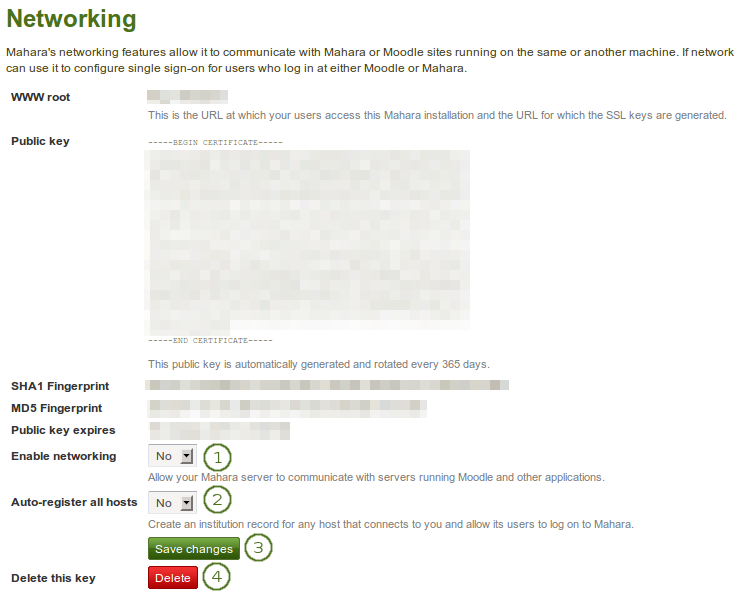
ネットワーキング概要
すべてのインスティテューションにおいてサイト全体でネットワーキングを使用するには:
- ネットワーキングを有効にする: ドロップダウンメニューから「Yes」を選択してください。
- Auto-register all hosts: If you choose 「Yes」, an institution is created for any host that connects allowing these users to log in to your Mahara site. We recommend you leave the default 「No」 because that gives you more control over which Moodle or Mahara instances can connect.
- *変更を保存する*ボタンをクリックしてください。
- このキーを削除する: あなたのMaharaサイトに新しいキーを生成したい場合、*削除*ボタンをクリックしてください。
特に*WWWルート*および*公開鍵*等、あなたは接続したいサイトに応じてその他の情報をページで提供する必要があります。
参考
`Mahoodle <https://wiki.mahara.org/index.php?title=System_Administrator%27s_Guide/Moodle%2F%2FMahara_Integration>のセットアップに関する総合手引書`はMaharaとMoodleの接続時のマニュアルとなります。
あなたが:ref:XML-RPC <mnet> 認証方法を編集する 場合、インスティテューションのMNet をセットアップしてください。
8.2.5. ライセンス
管理 → サイト設定 → ライセンス
The site administrator can allow users to add license metadata to their artefacts in the general site settings. Additionally, an institution administrator can require institution members to choose a license for any of their artefacts in the institution settings.
8.2.5.1. ライセンス一覧
Licenses that are available to all users of the site are defined on the Licenses page. Mahara comes with a number of pre-defined licenses, but the site administrator can add many more or delete any of the existing ones.
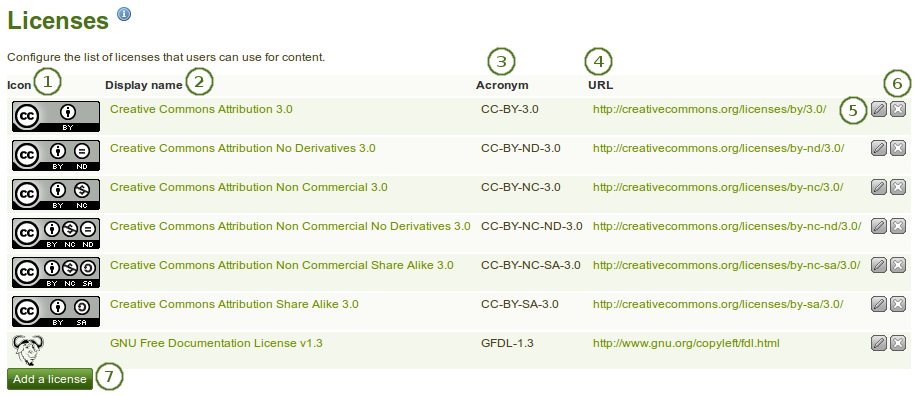
サイトで利用可能なライセンス
アイコン: すべてのライセンスはアーティファクト詳細ページに表示されるアイコンまたはライセンスロゴを持つことができます。
表示名: サイト内で表示されるそれぞれのライセンスの名称です。例) ユーザがライセンスを選択できるドロップダウンメニュー、アーティファクトページの詳細
頭辞語: ライセンスの省略名です。この頭辞語はアーティファクトの詳細ページでもユーザに表示されます。
URL: ライセンステキストのあるインターネットアドレスです。ライセンスがアーティファクト詳細ページに表示される場合、このURLにリンクされます。
注釈
ライセンスへのリンクをクリックすることによりライセンスの条件およびアーティファクトに対して何ができて何ができないかを学ぶことはユーザにとって重要なことです。
ライセンスの属性を変更するには*編集*|edit|ボタンをクリックしてください。あなたは表示名、頭字語およびライセンスアイコンを変更することができますが、URLは変更できません。URLを変更したい場合、あなたは新しいライセンスを作成する必要があります。
システムからライセンスを削除するには*削除*ボタン|delete|をクリックしてください。
ユーザが選択できるライセンスをさらに追加するには*ライセンスを追加する*ボタンをクリックしてください。
8.2.5.2. ライセンスを追加する
あなたはサイト管理者として希望する数のライセンスを追加することができます。*管理 → サイト設定 →ライセンス*にアクセスして*ライセンスを追加する*ボタンをクリックしてください。
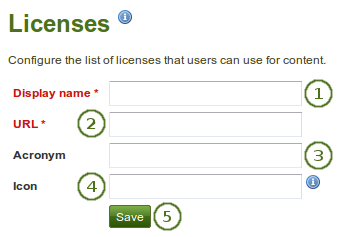
サイトに新しいライセンスを追加する
- 表示名: サイトで表示されるあなたのライセンス名を選択してください。例) アーティファクトページ詳細、ユーザおよびインスティテューション管理者がデフォルトライセンスを選択するドロップダウンメニュー
- URL: アーティファクトページ詳細にライセンスが表示される時に付加されるライセンステキストのインターネットアドレスです。ライセンステキストはこのURLにリンクされます。このフィールドは必須入力です。
- 頭字語: あなたが追加したいライセンスに一般に知られている頭字語が存在する場合、あなたはそれを追加することができます。
- アイコン: あなたが追加するライセンスの横に表示したいロゴがある場合 (例 アーティファクトの詳細ページ)、ここでリンクすることができます。
- サイトにライセンスを追加するには*保存*ボタンをクリックしてください。
8.2.5.3. ライセンスを編集する
あなたはサイト管理者としてすべてのライセンス属性を変更することができます。*管理 → サイト設定 → ライセンス*にアクセスしてあなたが変更したいライセンスの隣にある*編集*|edit|ボタンをクリックしてください。あなたはURLを除くすべてのライセンス属性を変更することができます。
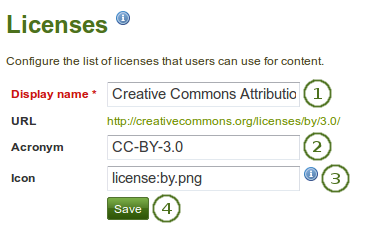
サイトのラインセンスを編集する
- 表示名: サイト全体で表示されるライセンス名を変更します。
- 頭字語: ライセンスの頭字語を変更します。
- アイコン: ライセンスに関連付けられて、サイト内でライセンス名と一緒に表示されるアイコンを変更します。
- あなたのライセンスへの変更を保持するには*保存*ボタンをクリックしてください。
8.2.6. ページ
管理 → サイト設定 → ページ
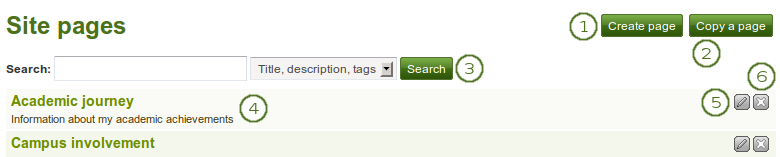
You create and copy site pages like regular portfolio pages. You do not have all blocks available. Check the blocks in various contexts for blocks that you can use in site pages.
サイトページ
- 最初から新しいページを作成するには*ページを作成する*ボタンをクリックしてください。
- あなたまたは他のユーザの既存ページを選択して新しいページのベースにするには*ページをコピーする*ボタンをクリックしてください。
- 検索: 検索キーワードを入力した後、あなたがサイト内で検索キーワードを探したいコンテクストを決定してください。*検索*ボタンをクリックすることであなたの検索を開始することができます。
- あなたにはサイトページのタイトルおよび説明が表示されます。
- 既存のサイトページを変更するには*編集*ボタン|edit|をクリックしてください。
- 既存のサイトページを削除するには*削除*ボタン|delete|をクリックしてください。
サイトページ作成を完了した場合、あなたは他の <site_share> とページを共有することができます。
注釈
例えばあなたは他のユーザと共有するための情報コンテンツを含むページを作成することができます。また、ユーザが自分のアカウントにコピーできるテンプレートを作成することもできます。
8.2.7. コレクション
管理 → サイト設定 → コレクション
あなたは通常の ポートフォリオコレクション のようにサイトコレクションを作成およびコピーすることができます。

サイトコレクション
- *新しいコレクション*ボタンをクリックして新しいコレクションを作成してください。
- *コレクションをコピーする*ボタンをクリックすることにより既存のコレクションをコピーすることができます。
- コレクションの最初のページに移動するにはコレクションタイトルをクリックしてください。
- このコレクションの説明を表示します。
- ページに直接ジャンプするにはコレクション内のページタイトルをクリックしてください。
- コレクション内ページの移動、コレクションへのページ追加またはコレクションからのページ削除するには*管理*|manage|ボタンをクリックしてください。
- コレクションのタイトルおよび説明を変更するには*編集*|edit|ボタンをクリックしてください。
- コレクションを削除するには*削除*ボタン|delete|をクリックしてください。ページは存在したままとなります。
あなたのサイトコレクションを作成した場合、他のユーザと共有することができます。
8.2.8. 共有
管理 → サイト設定 → 共有
あなたは他のページおよびコレクションのようにサイトページおよびサイトコレクションを共有することができます。
参考
標準ポートフォリオページおよびコレクションに関する詳細は:ref:`共有オプション <share>`をご覧ください。

サイトページおよびコレクションを共有する
コピーを許可したい場合、通常ページと比べて、あなたはさらにいくつかのオプションを使用することができます。
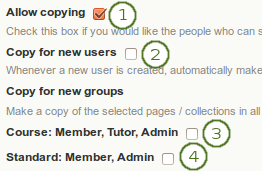
サイトページおよびコレクションのコピー
- コピーを許可する: コピーオプションを表示するにはチェックマークをチェックしてください。
- 新しいユーザにコピーする: このオプションを有効にした場合、1つのインスティテューションだけではなく、すべての新しいユーザのポートフォリオに選択されたページまたはコレクションがコピーされます。
- 新しいグループにコピーする: あなたが選択されたページまたはコレクションのコピーを受信して欲しいメンバー、チューターおよび管理者を含む**コース**グループを選択してください。
- 新しいグループにコピーする: あなたが選択されたページまたはコレクションのコピーを受信して欲しい場合、メンバーおよび管理者のいる**標準**グループを選択してください。
8.2.9. ファイル
管理 → サイト設定 → ファイル
Here you can upload files that you can include in the links and resources menu or in site pages. You can add files that are in the home directory to the menu with resources for logged-in users. Files that you save in the public folder can be used in the menu for users who are not logged-in. Additionally, users can put them into their own portfolio pages as files to download.
参考
ファイルをアップロードおよび管理する手順はあなたのパーソナル:ref:`ファイルエリア <files_area>`のファイルに非常に類似しています。

サイトファイル