11.4. Users
Administration menu → Users
In the Users menu of the administration site administrators can:
search for users
change settings for individual users
suspend and delete users
make users site staff or administrators
check the administrator notification settings
add and update users manually or by CSV
view reports
In the Users menu of the administration institution administrators can:
search for users
change settings for individual users
suspend and delete users
check the administrator notification settings for their institution’s administrators
add and update users manually or by CSV
view reports
11.4.1. User search
Administration menu → Users → User search
Notitie
Site administrators can search for any user on the entire site while institution administrators can only search among the users of their institution(s).
11.4.1.1. Standard user search
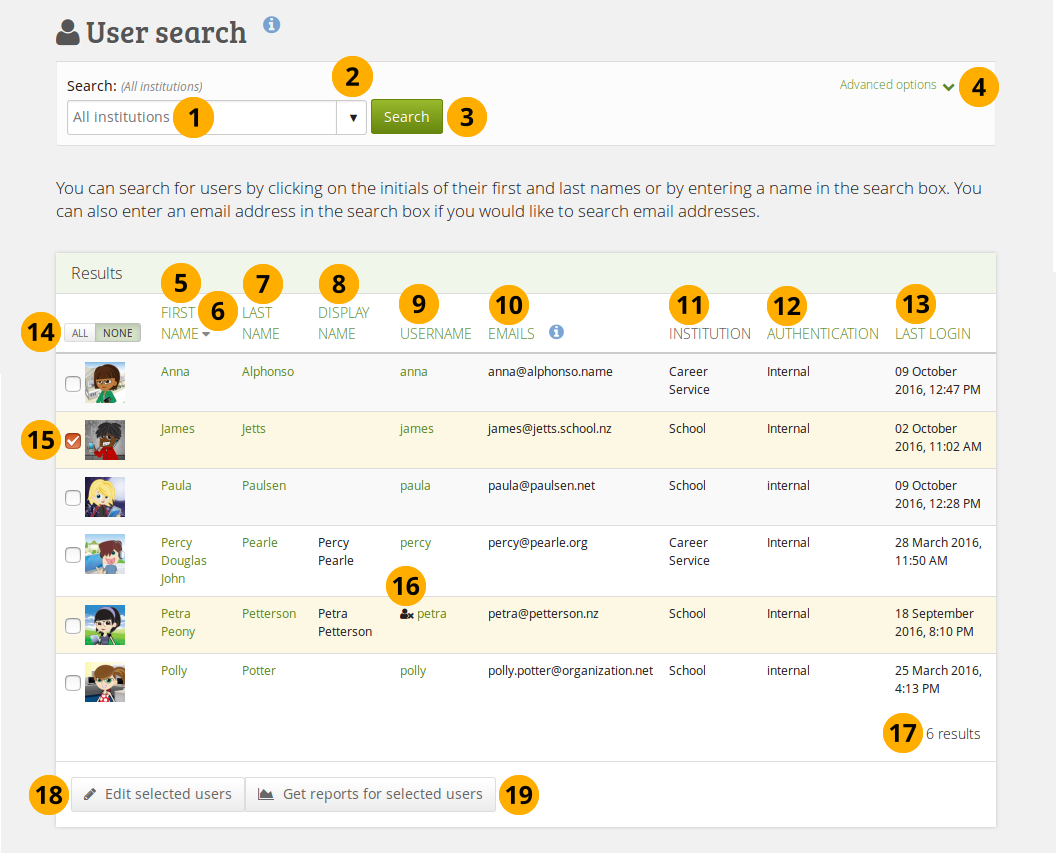
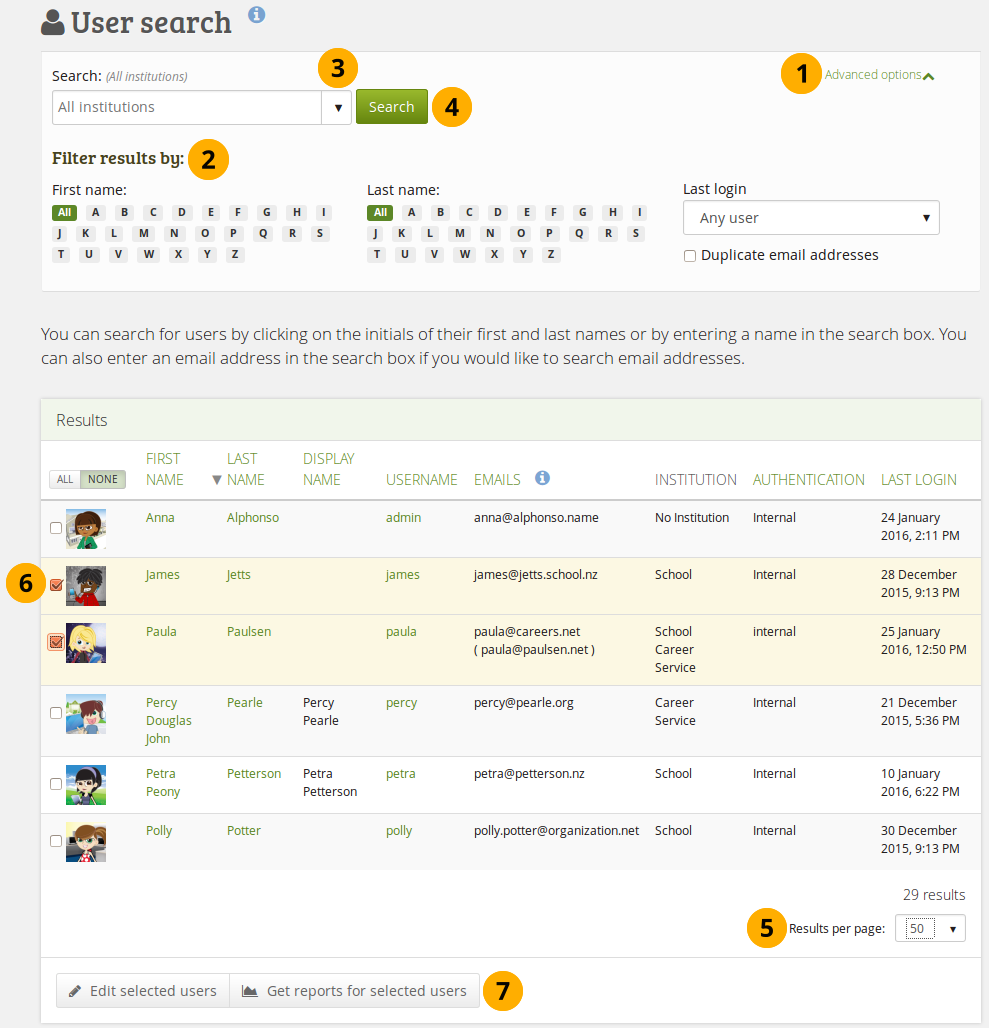
User search
Search: Enter your search term. The default text in the field shows you in which institution context you perform your search. Type the name, display name, username or email address or any partial thereof you wish to search for in the search field. If you turned on the exact search, you need to provide the correct name or email address and not a partial one.
Notitie
Both primary and secondary email addresses are searchable.
Use the drop-down arrow to choose a single institution in which to search for your user.
Click the Search button to start your search.
Click the “Advanced options” link to make filtering options visible.
First name: The first name links through to the user’s profile page.
Click the arrow to change the sort order of the column. All columns but the institution one are sortable.
Last name: The last name links through to the user’s profile page.
Display name: The display name is shown.
Username: This is the internal Mahara username. Click the username to go to this user’s account settings page.
Emails: The primary email address as well as all secondary email addresses are displayed.
Notitie
Secondary email addresses are displayed in parentheses.
Institution: The institution or institutions that a user belongs to are displayed.
Authentication: The authentication method for this user is shown.
Last login: The date and time of the last login is visible.
Click the All button to select all users and click the None button to deselect all users.
You can also tick the checkbox for an individual user to select them.
Users that are suspended or expired have the Inactive user icon next to their username.
The number of search results are available. If there are more than ten users in the search results, you have a pager available to go to more results.
Click the Edit selected users button to perform the bulk actions to
suspend users
delete users
change the authentication method of users
Click the Get reports for selected users button to
view user reports
download user account information for further actions
11.4.1.2. Advanced search options
You can combine any search and filter options. However, if you use too many, you may not yield any results.
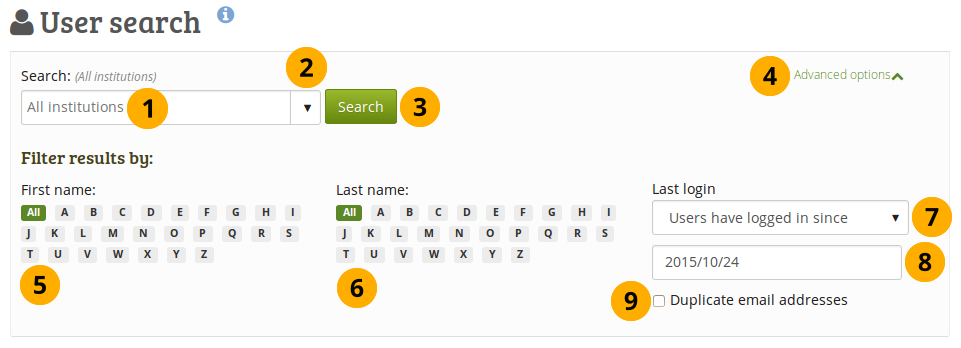
Advanced user search options
Search: You see the institution context in which your search is performed.
Use the drop-down arrow to choose a single institution in which to search for your user.
Click the Search button to filter results for this institution only.
Click the “Advanced options” link to make additional filtering options visible.
First name: Filter the users you wish to display by the initial of their first name. Click the letter of the alphabet to narrow your search.
Last name: Filter the users you wish to display by the initial of their last name. Click the letter of the alphabet to narrow your search.
Last login: You have several options:
Any user: Display any user who fits any other search / filter criteria.
Users have logged in: Display any user who has logged in at least once.
Users have never logged in: Display any user who has never logged in.
Users have logged in since: Display any user who has logged in since a specified date and time.
Users have not logged in since: Display any user who has not logged in since a specified date and time.
Choose a date and time for the login filter by either typing it in or selecting it via the calendar that pops up when you click into the field.
Duplicate email addresses: Tick this checkbox if you only want to display users whose email address is in the system twice so you can deal with them more easily.
Notitie
Normally, duplicate email addresses are not possible, but if a user imports a Leap2A file or if an external authentication method is used, duplicates can happen.
11.4.1.3. User bulk actions
You can perform a number of bulk actions for users on the Bulk actions page:
Suspend them.
Change their authentication method.
Set spam probation points.
Delete them.
11.4.1.3.1. Suspend users
You can suspend users in bulk disallowing them to log into their accounts. Their portfolios will not be available anymore to others.
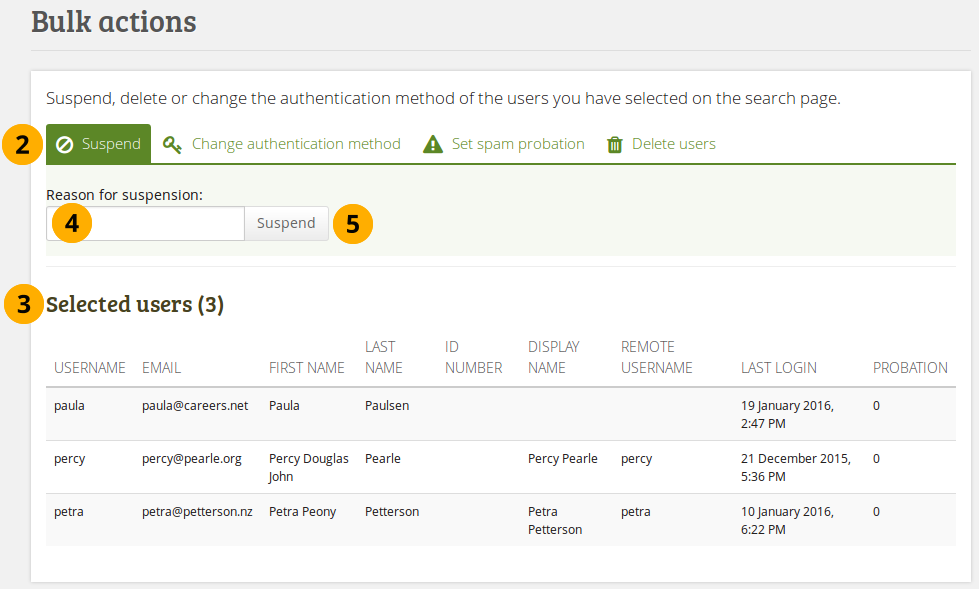
User bulk actions: Suspend users
On the User search page, select the users that you wish to suspend and click the Edit button.
Make sure that you are on the Suspend tab.
Selected users: Review the users you have selected.
Reason for suspension: Provide a reason for suspending the users listed on this page.
Click the Suspend button to prevent these users from accessing their accounts.
Notitie
If you made a mistake or want to remove a temporary suspension, you can do so under Suspended and expired users.
11.4.1.3.2. Change authentication method
You can change the authentication method for many accounts at once.
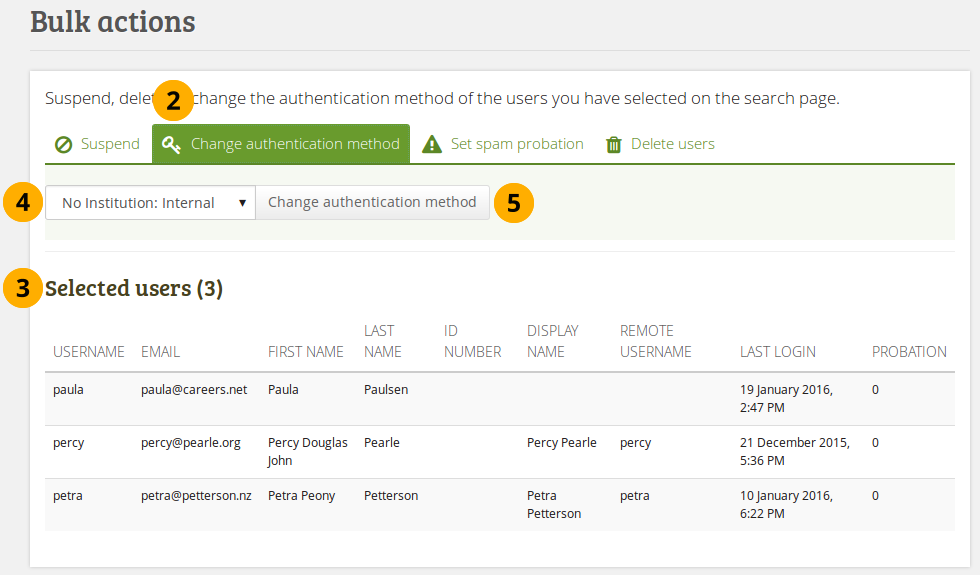
User bulk actions: Change authentication method
On the User search page, select the users for whom you wish to change the authentication method and click the Edit button.
Make sure that you are on the Change authentication method tab.
Selected users: Review the users you have selected.
Select the new authentication method from the drop-down menu. That includes choosing the correct institution and associated authentication method.
Click the Change authentication method button to make the change.
Notitie
You need to change or add a remote username for some authentication methods. You will need to do that in a separate step. For information on that, please see the instructions for changing the authentication method and remote username.
11.4.1.3.3. Set spam probation
You can change the spam probation points for many users at once.
Notitie
This feature is only available on sites that have spam probation turned on.
Newly self-registered users - no matter whether the institution requires explicit administrator confirmation or not - start out with a certain number of “probation points” on their account. While they have any probation points, they are considered a probationary user and cannot create public pages in their portfolio or post links or images to potentially public content such as comments, wall posts or forum posts.
Each time a probationary user makes a post in a forum, and the post is replied to by a non-probationary user, the probationary user loses one probation point. When the number of points reaches zero, they are no longer on probation.
Probation points have no effect on users who have staff or administrator status.
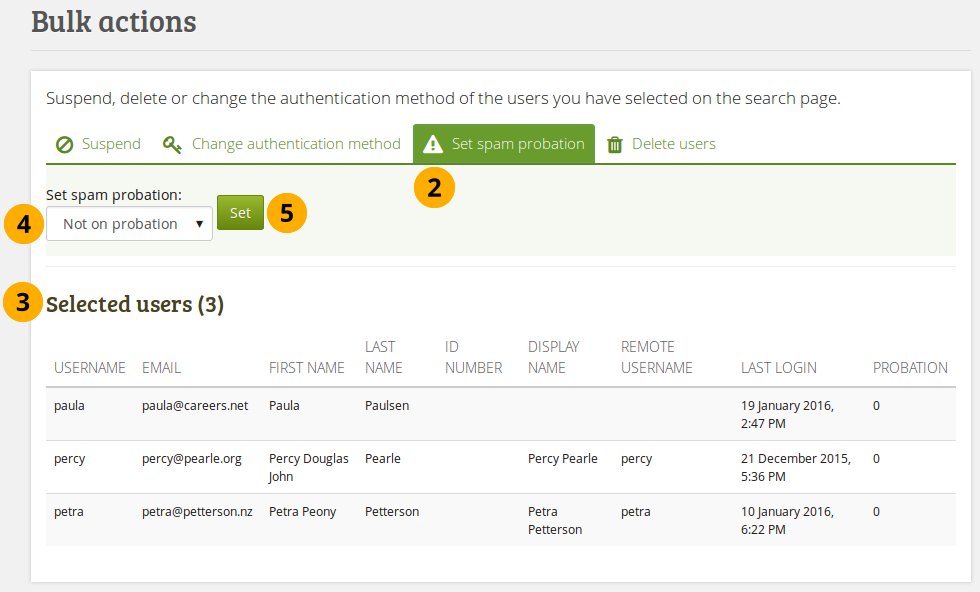
User bulk actions: Set spam probation
On the User search page, select the users for whom you wish to set probation points and click the Edit button.
Make sure that you are on the Set spam probation tab.
Selected users: Review the users you have selected.
Select the number of probation points from the drop-down menu that you wish to give the selected users.
Click the Set button to make the change.
11.4.1.3.4. Delete users
You can delete many accounts at once.
Waarschuwing
When you delete a user account, all personal data is wiped from the system. This action cannot be undone. The user’s contributions in groups, e.g. forum messages, uploaded files and pages created in a group, are still available, but are made anonymous by changing the name to “Deleted user” as author where an author is shown.
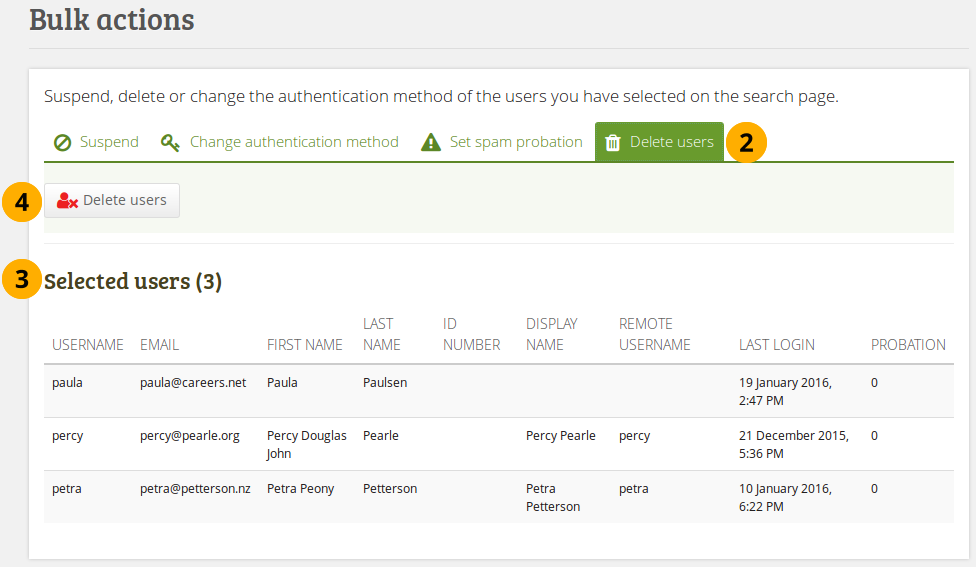
User bulk actions: Delete users
On the User search page, select the users that you wish to delete and click the Edit button.
Make sure that you are on the Delete users tab.
Selected users: Review the users you have selected.
Click the Delete button. The accounts will be deleted along with their data.
Notitie
Forum posts and comments that users have written or portfolio pages in which they were involved in groups are not deleted. However, their name is being removed.
11.4.2. User account settings
Administration menu → Users → User search → Click on a username
On the Account settings page of a user in the administration area, you can perform a number of actions to manage the user’s account. However, you cannot change personal information about this user, e.g. name or email, from this page. This can only be done in the Profile area of the user’s account or via the Add users by CSV page.
Overview of the user account settings page
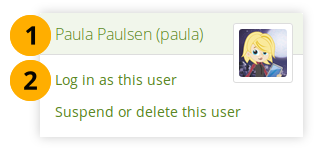
11.4.2.1. Log in as
As administrator you have the power to log in as any user that you manage and masquerade as them.
Notitie
Site administrator can log in as any user while institution administrators can only perform this action for users who are members of their institution(s).
It is a great function for troubleshooting a user account because you see everything as the user would without having to know the password.
Waarschuwing
This function can be misused by administrators because you can make changes to the user’s portfolio and artefacts as well as participate in groups while logged in as that user. Users should be aware of this function and that an administrator can enter their account.
Sites should have clear policies around the use of this function so that the privacy of users and their portfolios and collaborative work is protected. Therefore, there should also not be many users within an institution who have administrator rights.
Log in as another user
Click on the user’s name to go to this user’s profile page. You can then click the Log in as … link to become that user from that screen.
Click the Log in as link to become that user. You see a warning bar at the top of the browser window telling you that you are masquerading as that user.

Stop masquerading as another user
When you want to return to your own account again, click the Become [your name] again link at the top of the browser window.
When the site administrator enabled the logging of all or just masquerading events, administrators may be required to provide a reason for the masquerading and a notification about this may be sent to the users.

Provide a reason for masquerading as another user
Write why you are masquerading as this user. This reason may be sent to the user if the site administrator demands that.
Click the Continue button to log in as that user.
If the site administrator decided to have users notified of the masquerading, you would see the screen notice “The user has been notified of this masquerading session.”
When the site administrator decided to send notifications to users when an administrator logs into their account, the users receive this notification in their inbox. Depending on their notification settings, it can also be delivered via email.
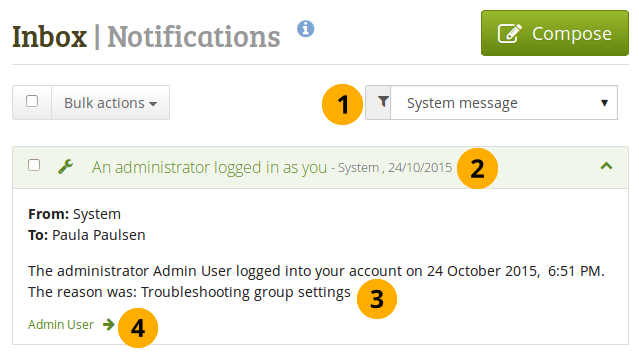
Notification a user receives when an administrator masquerades
Activity type: The masquerading notification is a system message. If you receive a lot of notifications, you can filter for just them.
Click the bar to see the full text of the message.
The system message “An administrator logged in as you” contains the name of the administrator and the time when the administrator started masquerading. If the site administrator requires a reason to be sent for the masquerading, it is displayed as well.
The name of the administrator who logged in as you is linked to the profile page for you to find out more about them or send them a message.
11.4.2.2. Suspend user
Suspend a user if they do not follow the terms and conditions of the site and behave inappropriately. Suspended users cannot log in, but all their content is still available.
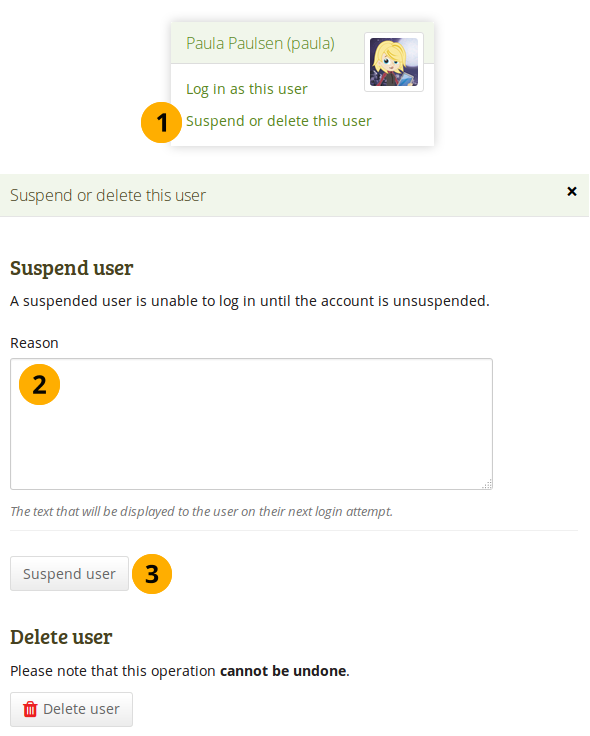
Suspend a user
Click the link Suspend or delete this user. A pop-up windows becomes visible.
Reason: Provide a reason for your suspension. This is particularly useful when you are not the only administrator and / or need to remember after some time why you suspended this user.
Click the Suspend user button to disallow the user from logging in.
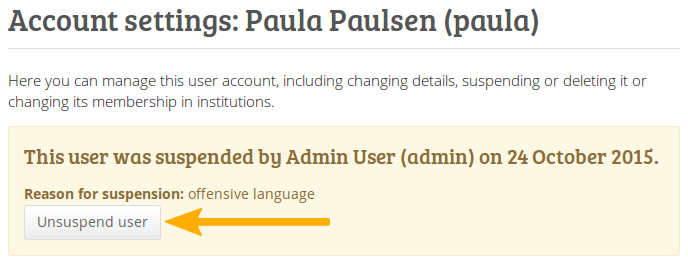
Suspension notice on the user account settings page
When a user has been suspended, the suspension message appears on the user’s account settings page stating the reason and the date for the suspension and giving the administrators the possibility to unsuspend the user by clicking the Unsuspend user button.
You can unsuspend a user from this page or together with other users on the Bulk actions page.

Suspended user tries to log in and gets suspension message
When the user tries to log in, they will see the suspension message and the reason. They can then contact an administrator via the “Contact us” form for further action.
11.4.2.3. Delete user
Users can delete their own accounts in their account settings if self-registration is allowed by their institution. Administrators can also delete user accounts at any time.
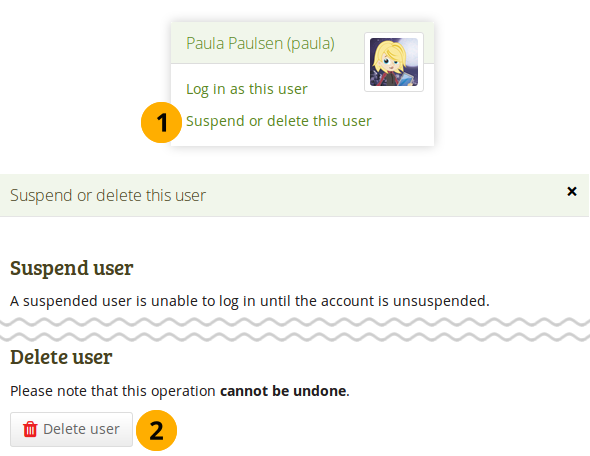
Delete a user account
Click the link Suspend or delete this user. A pop-up windows becomes visible.
Click the Delete user button to delete this user account permanently. This action cannot be undone. As this is a permanent action, you see a confirmation pop-up window that you will have to acknowledge.
Waarschuwing
When you delete a user account, all personal data is wiped from the system. This action cannot be undone. The user’s contributions in groups, e.g. forum messages, uploaded files and pages created in a group, are still available, but are made anonymous by changing the name to “Deleted user” as author where an author is shown.
Notitie
If an account was deleted by accident - either by a user or by an administrator - swift action may result in recovery of (most of) the data from a backup file. This requires access to the server’s backups and the backend of Mahara. More information is available on the wiki under Restoring a deleted user.
11.4.2.4. Change site account settings
You can view and change a number of settings for a user’s account.
Notitie
Depending on the authentication method that is associated with this user, you may not be able to edit all settings.
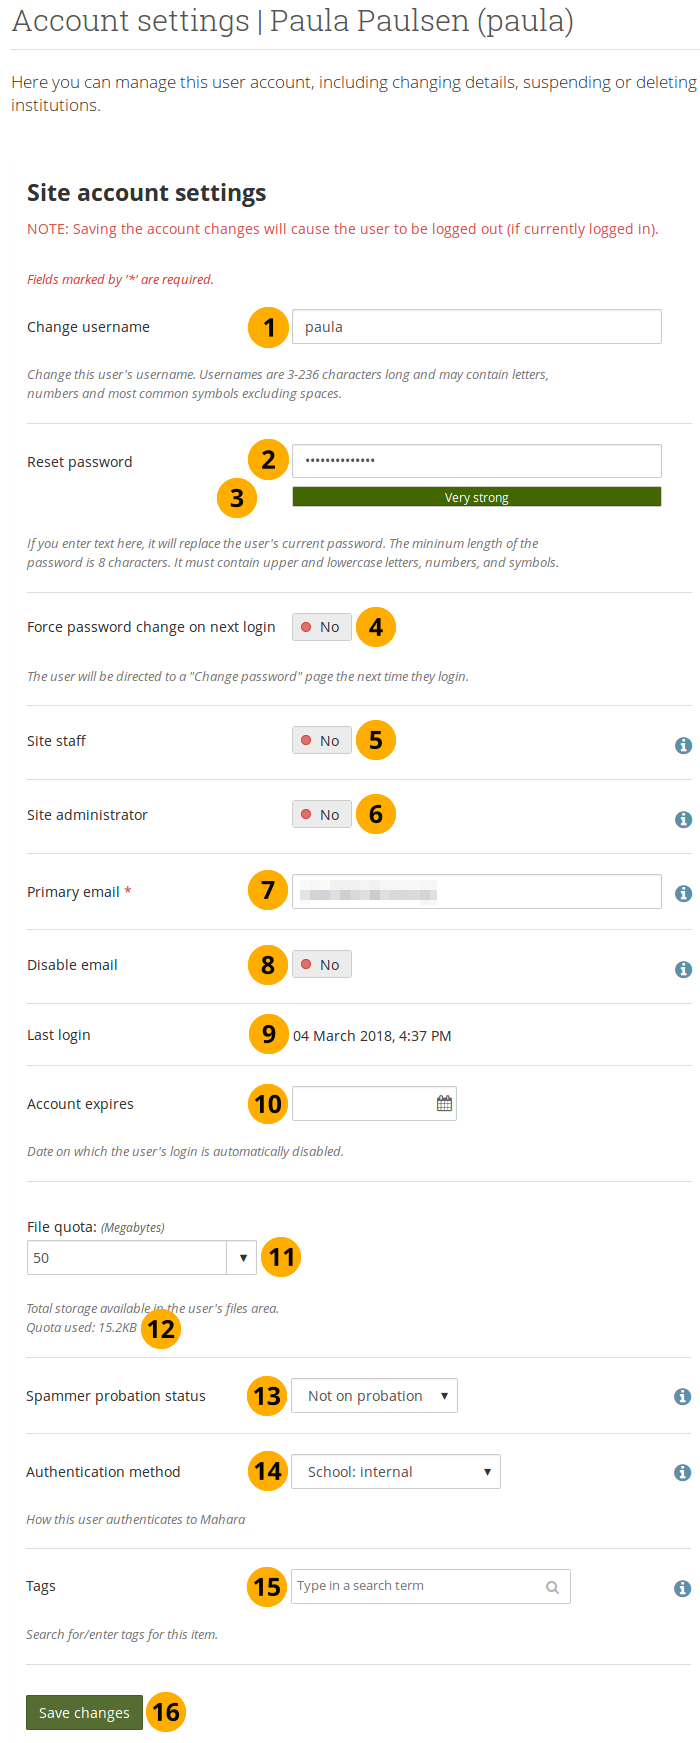
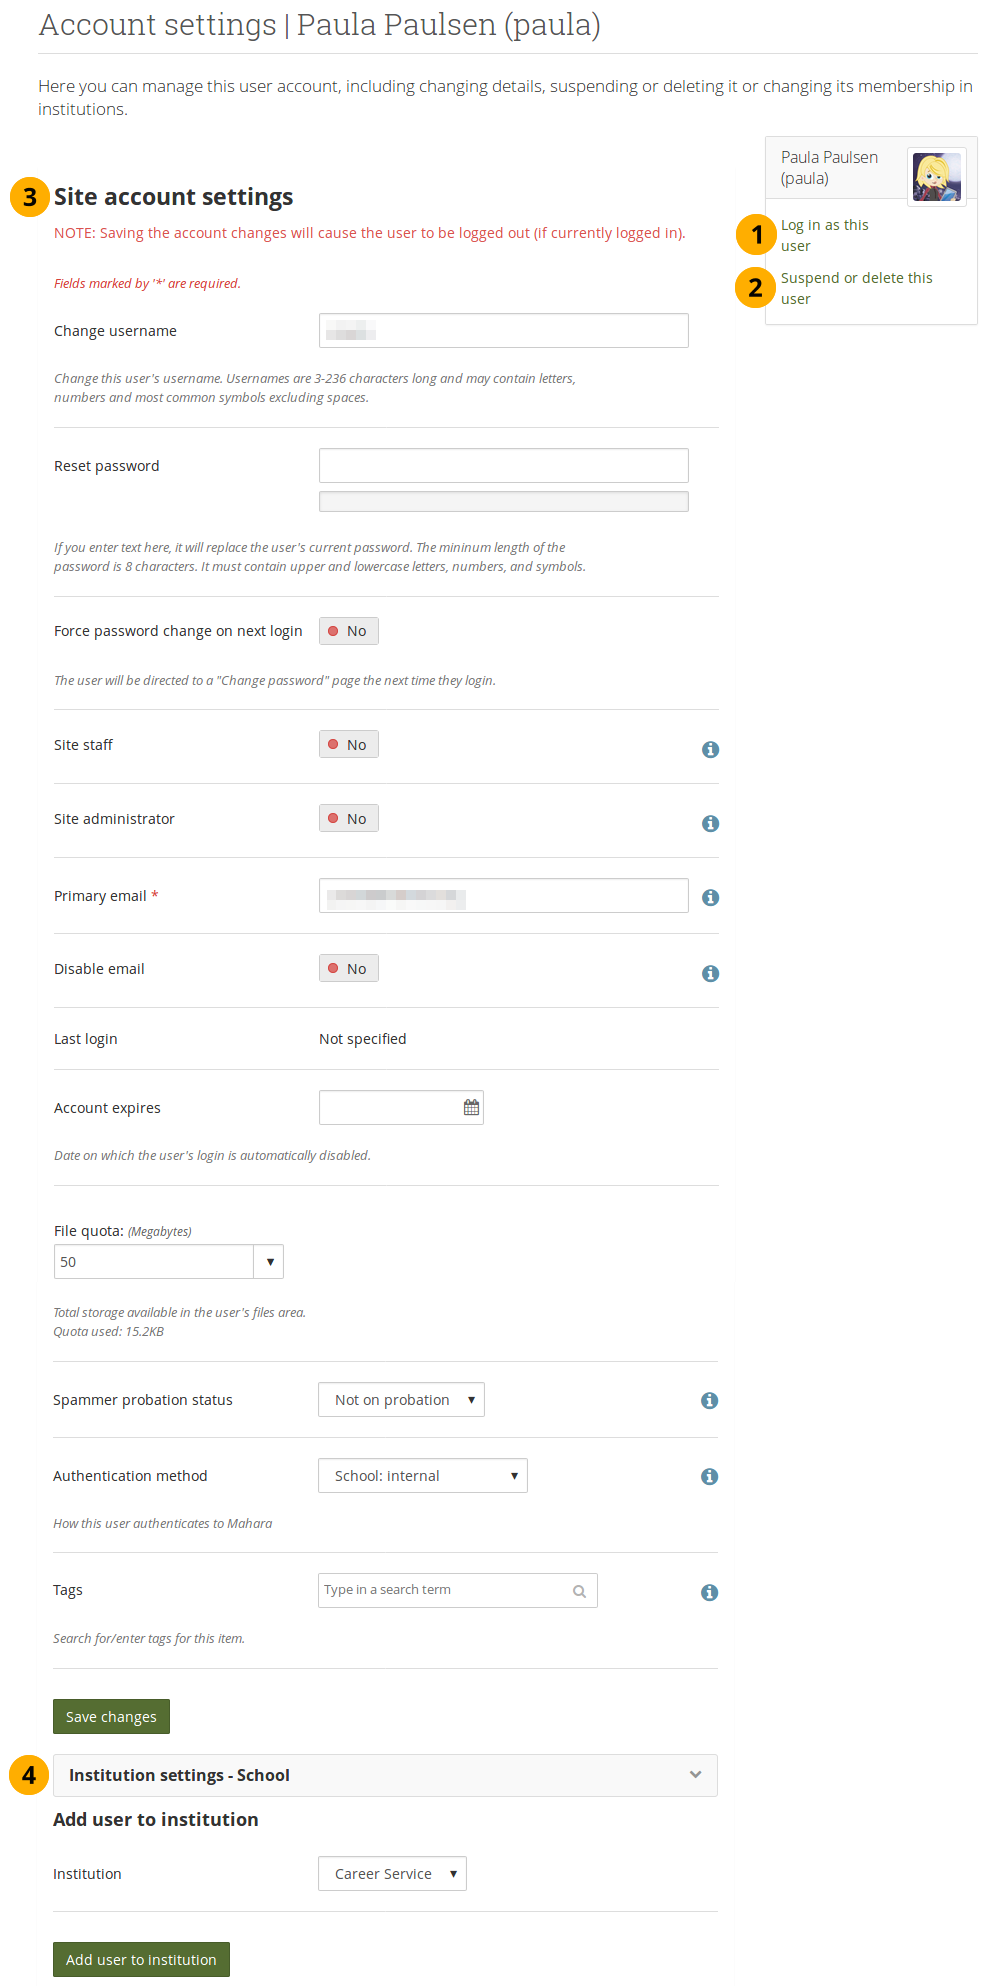
Site account settings of a user
Change username: Give the user a different username. This field is not available when the account is managed by an external authentication method.
Reset password: Change the password for this user account. This field is not available when the account is managed by an external authentication method.
The password strength indicator gives you an idea of how strong your password is in relation to the password policy.
Force password change on next login: Change the switch to “Yes” if the user shall change the password upon the next login. This option is not available when the account is managed by an external authentication method.
Site staff: Change the switch to “Yes” if the user shall become a staff member for the entire site.
Site administrator: Change the switch to “Yes” if the user shall have full administrative rights for the entire site.
Primary email: Displayed is the primary email address for this user. This email address is used for any notifications. You can change that email address here.
Notitie
The previously used email address stays in the user account as secondary email address until the user deletes it.
Disable email: Change the switch to “Yes” to disable the sending of emails for this user. If email is disabled, notifications and messages can only be viewed in the internal inbox. You can set up your Mahara site so that emails are disabled automatically if they are bounced back.
Waarschuwing
When the email address is disabled, users cannot reset their passwords themselves as no email can be sent.
Last login: The date and time when the user logged into Mahara for the last time is displayed.
Account expires: Enter a date via the calendar if you want to set an expiry date.
Notitie
The default setting is that the date is not specified. You can set an automatic account expiry date for all users in the account settings of the site configuration.
File quota: Change the storage allowance for a user’s personal files area. Institution administrators may not be able to update the quota if the site administrator disallowed that. The default value as set in the files configuration in the plugin administration.
Quota used: You can see how much this user has already used of their allocated quota.
Spammer probation status: This setting controls whether the user is considered to be on probation as a possible spammer. See the spam probation levels for more information.
Notitie
This feature is only available on sites that have spam probation turned on.
Authentication method: Choose the authentication method for this user. A site administrator can set up the authentication methods in the institution administration. Depending on the authentication method that you have chosen, you may have to provide a remote username to allow the user to log in.
Notitie
You only see the authentication methods that you are allowed to assign to the person based on their institution membership.
The field Username for external authentication is only displayed if an authentication method is chosen that requires a remote username. This allows administrators to see if a remote username has been supplied or not.
Tags: A user can be tagged by an administrator. The tag of the institution to which the user belonged prior to joining a new institution is not displayed to avoid its deletion.
Click the Save changes button when you are done editing the settings.
11.4.2.5. Change institution settings
You can view and change settings regarding a user’s membership in institutions. Depending on the site settings for institutions, a user may be added to more than one institution.

Institution settings for a user
Institution: Choose the institution to which you want to add this user from the drop-down menu.
Notitie
Only site administrators or institution administrators who have administrator permissions in more than one institution see this option.
Click the Add user to institution button to make this user a member of this institution.
Click the Institution settings bar to see more details about the user in this institution. The bar shows the name of the institution.
Membership expires: Click into the field to view the date picker and choose when you want to remove this user from this institution. The user is removed from your institution on that date, but retains their account and can still log in.
Notitie
The default setting is that the date is not specified. You can set an automatic institution membership expiry date for all users in your institution in the settings for your institution.
ID number: Provide an optional identifier for this user in this institution. This field is not editable by the user.
Institution staff: Change the switch to “Yes” if you want to give this user staff rights in this institution. This will allow the user to create controlled groups for example.
Institution admin: Change the switch to “Yes” if you want to make this user an administrator of this institution. This will allow the user to manage all users in this institution for example.
Click the Update button to save your changes.
Click the Remove user from this institution button to disassociate this user from this institution. The user’s account will not be deleted. The user will only not be associated with this institution anymore.
11.4.3. Suspended and expired users
Administration menu → Users → Suspended and expired users
A list of all suspended and expired users is available in the sub-menu Suspended and expired users. Here you can unsuspend / reactivate or delete them.
Notitie
Site administrators see all users whereas institution administrators only see users who are members of their institution(s).
11.4.3.1. Suspended users
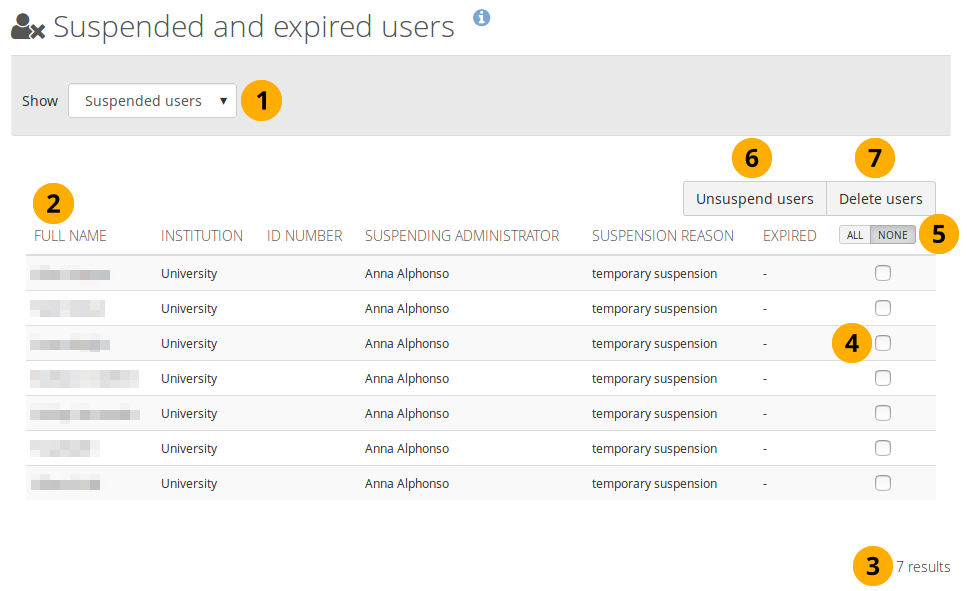
List of all suspended users
Show: Select to view suspended users.
Basic details about each account are displayed to ensure that you are looking at the correct ones. That includes displaying the suspension reason.
The total number of suspended users is shown.
Select the user(s) for which you want to perform the same action.
Click the All button if you want to select all suspended users or click the None button to reset your selection.
Click the Unsuspend users button to reinstate the accounts for all selected users.
Click the Delete users button to delete all selected users in bulk. This action cannot be undone and all personal information of these users will be deleted (see delete user).
Waarschuwing
When you delete a user account, all personal data is wiped from the system. This action cannot be undone. The user’s contributions in groups, e.g. forum messages, uploaded files and pages created in a group, are still available, but are made anonymous by changing the name to “Deleted user” as author where an author is shown.
11.4.3.2. Expired users
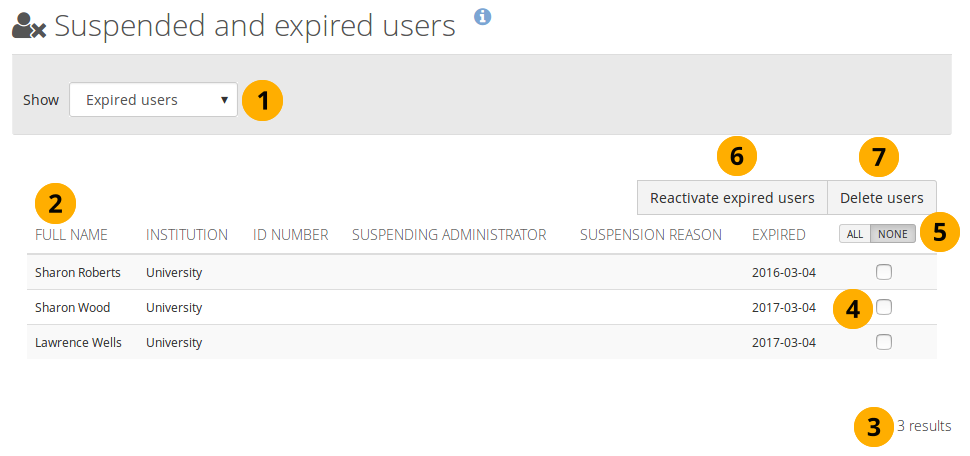
List of all expired users
Show: Select to view expired users.
Basic details about each account are displayed to ensure that you are looking at the correct ones. That includes the dates on which the accounts were expired.
The total number of expired users is shown.
Select the user(s) for which you want to perform the same action.
Click the All button if you want to select all expired users or click the None button to reset your selection.
Click the Reactivate expired users button if you want to allow these users access to their accounts again.
Click the Delete users button to delete all selected users in bulk. This action cannot be undone and all personal information of these users will be deleted (see delete user).
Waarschuwing
When you delete a user account, all personal data is wiped from the system. This action cannot be undone. The user’s contributions in groups, e.g. forum messages, uploaded files and pages created in a group, are still available, but are made anonymous by changing the name to “Deleted user” as author where an author is shown.
11.4.4. Site staff
Administration menu → Users → Site staff
Notitie
Site staff is only accessible by site administrators.
On this page you can choose which users receive site staff rights. Potential staff members - any user on the site - are listed on the left while existing site staff members are listed on the right.
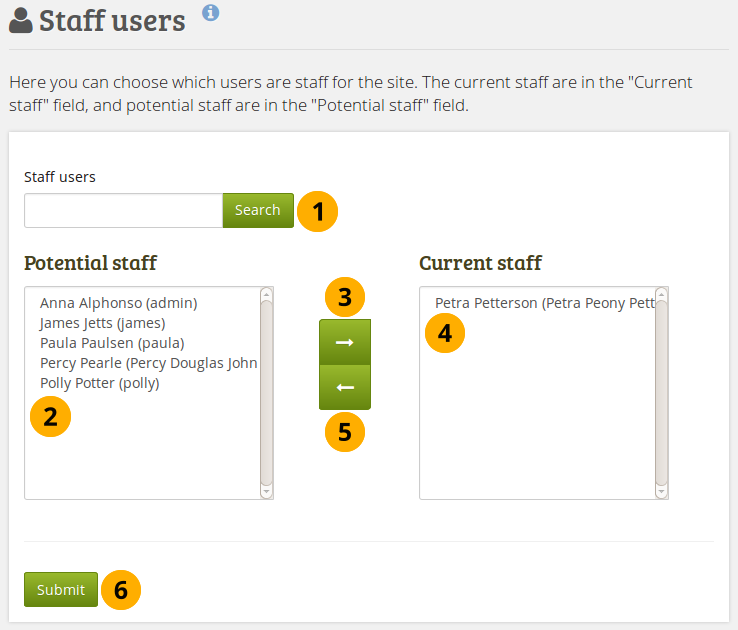
Give site staff rights
Search: If you have too many users on your site and you cannot see the users you want, you can search for them here.
Potential staff: Select the users you wish to make site staff. You can select multiple users at once using
CtrlandShiftclick.Add the potential staff members to the right-hand side - Current staff - by clicking the right-arrow button .
Current staff: If you want to remove an existing or accidentally added site staff member, you can remove the user from the list on the right-hand side by clicking on the user.
Then click the left-arrow button , and the user is removed from the list.
When you have chosen all members you wish to make site staff, click the Submit button.
Notitie
You can also double-click a name and it will be moved to the other side.
11.4.5. Site administrators
Administration menu → Users → Site administrators
Notitie
Site administrators is only accessible by site administrators.
Site administrators have powerful permissions. They can make far-reaching changes and also log in as other users. Be careful whom you give these rights. One site administrator is needed for each site. The total number of site administrators should be kept small.
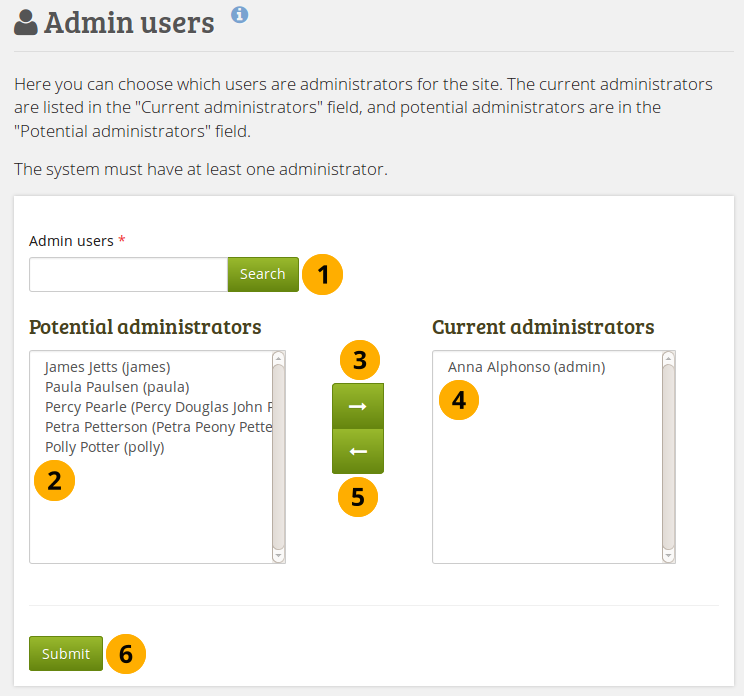
Give site administrator rights
Search: If you have too many users on your site and you cannot see the users you want, you can search for them here.
Potential administrators: Select the users you wish to make site administrators. You can select multiple users at once using
CtrlandShiftclick.Add the potential site administrator to the right-hand side - Current administrators - by clicking the right-arrow button .
Current administrators: If you want to remove an existing or accidentally added site administrator, you can remove the user from the list on the right-hand side by clicking on the user.
Then click the left-arrow button , and the user is removed from the list.
When you have chosen all members you wish to make site administrators, click the Submit button.
Notitie
You can also double-click a name and it will be moved to the other side.
11.4.6. Export queue
Administration menu → Users → Export queue
This feature is experimental.
The export queue is available for the following exports:
When group administrators or tutors release portfolios in groups that allow the archiving of submitted pages, these submissions will be placed into the export queue and only released once the export completed successfully.
If the site administrator enabled the feature to queue Leap2A exports, Leap2A exports that users initiate via Main menu → Manage → Export are also queued, and once completed, the users receive a notification.
Zie ook
The export queue requires that cron runs.
Export queue for Leap2A exports
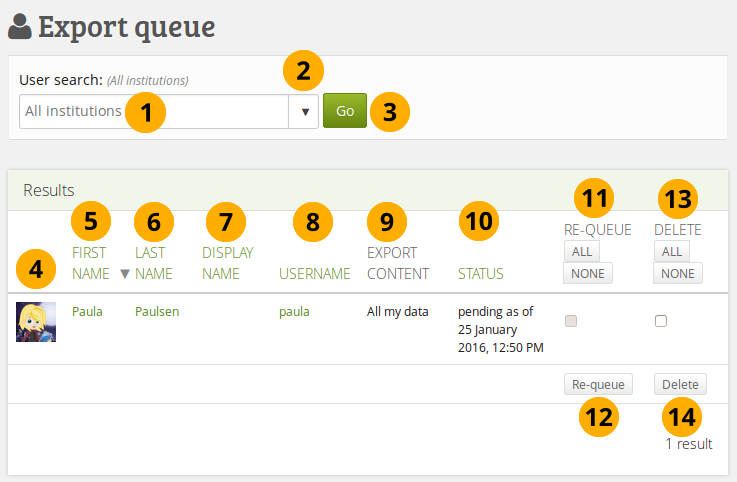
Search: Enter your search term. The default text in the field shows you in which institution context you perform your search. Type the name, display name or username or email address or any partial thereof you wish to search for in the search field. If you turned on the exact search, you need to provide the correct name or email address and not a partial one.
Use the drop-down arrow to choose a single institution in which to search for your user.
Click the Go button to start your search.
In the results table you see the profile picture of the user.
First name: Displays the first name of the user. This is the default column for sorting results.
Notitie
Click on the other headings of the table that are links to sort the table differently.
Last name: Displays the last name of the user.
Display name: Shows the display name of the user.
Username: Clicking on the username, you are taken to the user’s administration settings page instead of their profile page as you would with the other names.
Export content: Brief description of what is being exported.
Status: Displays the status of the export. Only pending and failed exports are shown.
Export: Tick the checkboxes in this column if you wish to re-run an export that has failed. You can select all checkboxes by clicking the All button or remove all checkboxes by clicking the None button.
Click the Re-queue button to re-run all selected failed exports.
Delete: Tick the checkboxes in this column if you wish to delete any pending or failed exports. You can select all checkboxes by clicking the All button or remove all checkboxes by clicking the None button.
Click the Delete button to delete all selected pending or failed exports.
11.4.7. Add user
Administration menu → Users → Add user
You can add users to your site (site administrator) or your institution (institution administrator) by creating accounts for them manually one by one.
Add a user manually
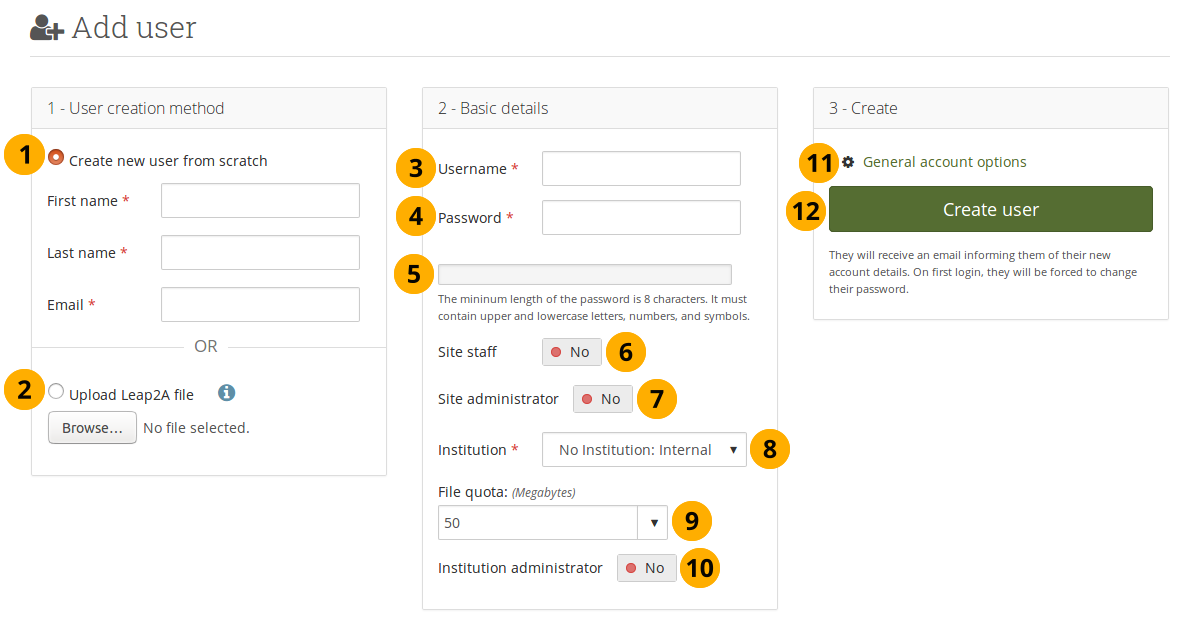
Click the Create new user from scratch radio button if you want to create an empty account. Provide the first name, last name and email address for this user.
Click the Upload Leap2A file radio button if you want to import a user from another Mahara instance or a system that supports the Leap2A standard. Such a user could have exported their portfolio from another Mahara instance.
Username: Give the new user a username. It may contain letters, numbers and most common symbols. It must be from 3 to 236 characters in length. Spaces are not allowed.
Password: Choose a password for the account. The password must be at least six characters long.
The password strength indicator gives you an idea of how strong your password is in relation to the password policy.
Site staff: Switch to “Yes” if the new user should have site staff rights. Only site administrators see this option.
Site administrator: Switch to “Yes” if the new user should have site administrator rights. Only site administrators see this option.
Institution: Choose the institution of which the user should be a member. You also select the authentication method directly here.
Notitie
If an authentication method requires the use of a remote username, you can enter that on the next screen in the account settings.
File quota: Review the allocated file quota. You may change it here for this user if you are allowed to.
Institution administrator: Switch to “Yes” if the new user should have institution administrator rights in the chosen institution.
General account options: Click this link to see default account options that you may choose to change while creating this user. These are the general account options a user can change on the Settings page.
Notitie
You can only define the default account settings for a user account, but not force the user to keep them forever. You could only do that by customising the system on the code level.
Click the Create user button.
The user will receive an email with the account details.
11.4.8. Add and update users by CSV
Administration menu → Users → Add users by CSV
You can use this function to upload new users in bulk via a CSV file (comma-separated file) and to update existing users. The first row of your CSV file should specify the format of your data. For example, it should look like this:
username,password,email,firstname,lastname,studentid
For new users, this row must include:
username
password
email
firstname
lastname
Notitie
Mahara also accepts CSV files that have a semicolon as separator instead of a comma.
If you want to update existing users, you do not need to set a password and can leave that field off entirely.
Notitie
You can mix new and existing accounts in your CSV file. When you add a new user, the password field must be present. If you do not wish the password to be changed for existing accounts, leave that field empty for these accounts.
If your site or institution has locked fields or fields that are mandatory, then you do not have to include them as fields in your CSV upload.
Here is the full list of additional fields that you can add in your CSV file upload.
address - Street address
blogaddress - URL to the blog
businessnumber - Work phone number
city - City
country - Country
 expiry - Sets the date on which a person’s login is disabled automatically. This needs to be a valide date in the future, e.g.
2019-03-25
25 Mar 2019
+3 months
faxnumber - Fax number
homenumber - Home phone number
industry - Industry is displayed in the profile
introduction - Introduction is displayed in the profile
mobilenumber - Mobile phone number
occupation - Occupation is displayed in the profile
officialwebsite - Official website
personalwebsite - Personal website
preferredname - Display name
remoteuser - Remote username for external authentication
studentid - Student ID is displayed in the profile
town - Town
Your CSV file could look for example like the following:
username,email,firstname,lastname,studentid,preferredname,remoteuser, password"percy","percy@pearle.net","Percy","Pearle","","","percy.pearle","mahara1""petra","petra@petterson.net","Petra","Petterson","","","petra.petterson","mahara1""polly","polly@potter.net","Polly","Potter","","","polly.potter","mahara1""admin","admin@mahara.school","Admin","User","","","","mahara1""jamesj","james@jetts.com","James","Jetts","","","","mahara1"When you have created your CSV file, you are ready to upload it.
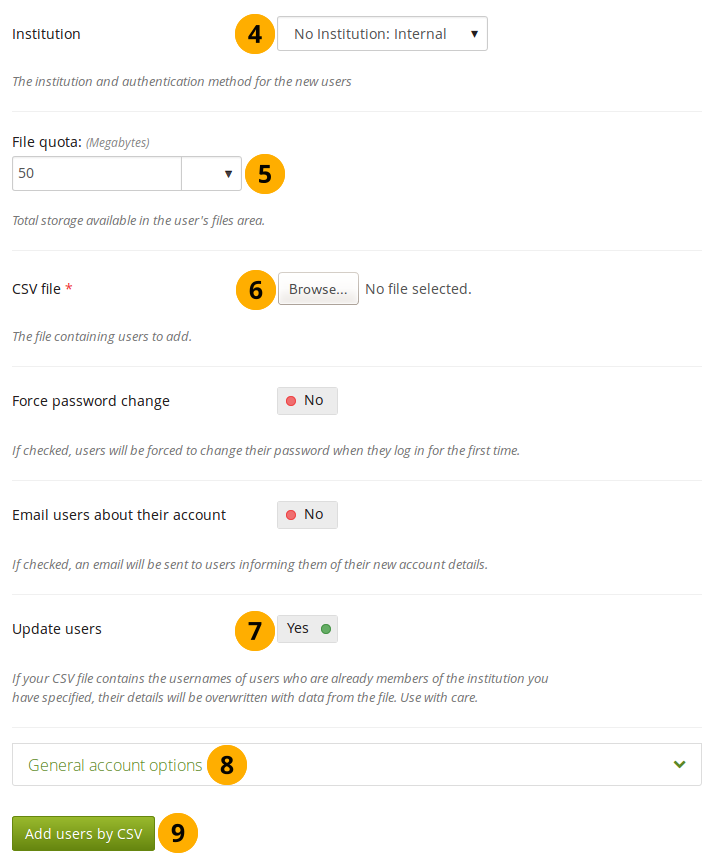
Add users by CSV file
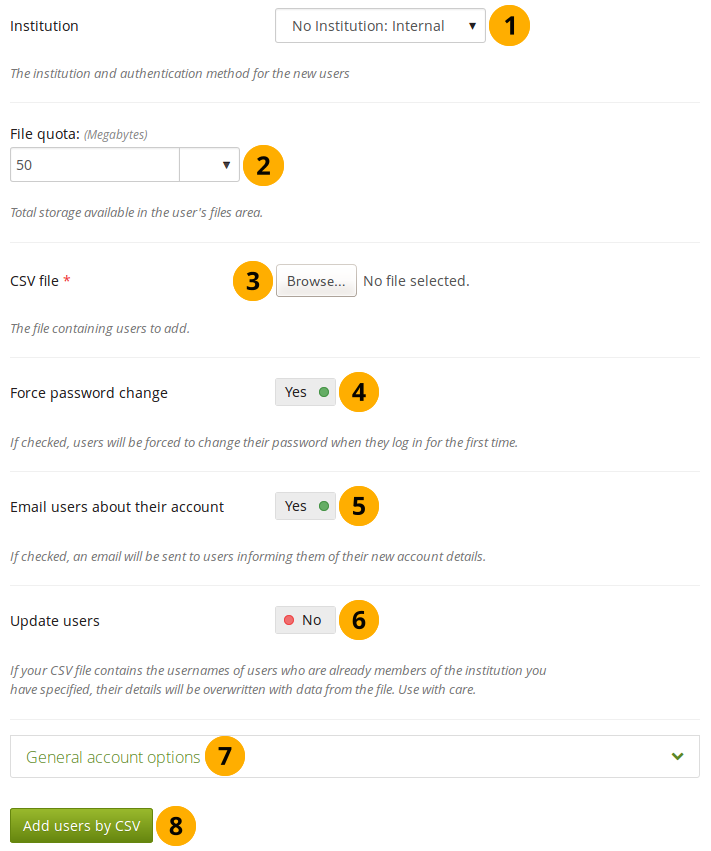
Institution: Choose the institution and the authentication method for the user accounts that you upload and / or change.
File quota: If you wish, you can set a different file quota for all accounts in the CSV file. Institution administrators can only do so if the site administrator allowed it.
CVS file: You must upload a CSV file by clicking the Browse button and then selecting it from the files area on your computer.
Force password change: If you select this option, users need to change their password before they can log in for the first time.
Email users about their account: Change the switch to “Yes” and users will receive an email with their account information. This is in particular good for internal accounts.
Notitie
For user accounts that are managed by an external authentication method such as Moodle or LDAP, do not select this option because the users already know their login information.
Update users: Change the switch to “Yes” if your CSV file contains changes for existing users.
Notitie
When you add a new email address for a user to update the account settings, this new email address becomes the primary email address.
The previously used email address stays in the user account as secondary email address until the user deletes it.
General account options: Expand this menu to see default account options that you may choose to change while creating or updating users. These are the general account options a user can change on the Settings page.
Click the Add users by CSV button to upload and / or change users.
Notitie
Depending on your server settings and / or the size of your installation, you may not be able to upload all user accounts at once. You may wish to upload them in bunches of 100 instead.
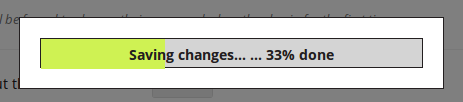
A progress bar shows the percentage of the completed upload of your users.
11.4.9. Change the authentication method and remote username in bulk
After you have successfully invited or added new members into your institution, you can change their authentication method. That can be useful if the authentication method differs from the one in the previous institution and you want to link the new accounts to a remote username using:
LDAP directory
Moodle accounts via MNet
Single sign-on through an IdP provider
Notitie
The change in the authentication method for existing accounts should be done before users try to log in with their new credentials to avoid the creation of a second account for these users.
You can change the authentication method for multiple users at once to save you time manually updating each user. Changing the authentication method usually also entails changing the remote username (a.k.a. username for external authentication). Therefore, these two are dealt with together to describe the work flow better.
Find users in an institution to change their remote username
Go to Administration menu → Users → User search.
Click the Advanced options link to show filter options.
Filter for users by specific characteristics, e.g. if you only wish to display users who have not logged in yet.
Search: Enter your search term. The default text in the field shows you in which institution context you perform your search. Type the name, display name, username or email address or any partial thereof you wish to search for in the search field. If you turned on the exact search, you need to provide the correct name or email address and not a partial one.
Use the drop-down arrow to choose a single institution in which to search for your user.
Click the Search button to start your search.
Change the Results per page if you wish to see more than 10 users per page.
Select the users whose authentication method and remote username you want to change by either putting a check mark in the checkboxes or clicking on All to select all users on that page.
Click the Get reports button to proceed to the next step. You are taken to the User details report page.
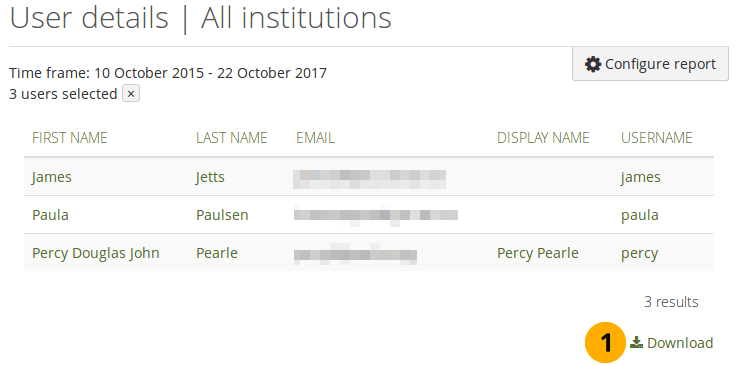
User details reports page

Update the CSV file with remote username and password
Update user accounts in bulk
Click the Download button so that you get a CSV file which contains all necessary information for you to change the users’ remote username in bulk. This is necessary if their internal Mahara username is not the same as the one they use to authenticate on your system that is linked to Mahara or if they already have a remote username that would be incorrect for your institution.
Notitie
You do not need to see the column “Remote username” for the data to be in the CSV download. If you wish to see it on screen, click the Configure report button and select the “Remote username” column.
Open the CSV file in your preferred spreadsheet software. In the column remoteuser, add or change the username that your users have when authenticating in your regular system that you have connected to Mahara. You may also change other fields, e.g. their name, email address etc. If you want to add a new user directly in this CSV file, you can do so as well.
Notitie
You must provide a password for a new user. All other users do not need to have a value in the password field. If you only want to update existing users, you can leave the password field entirely off.
You must remove the column “lastlogin”. Mahara will produce an error if you leave it in the file.
Go to Administration menu → Users → Add users by CSV.
Institution: Choose the correct institution and authentication method for which you want to update your users. This allows you to switch all users in the CSV file from one authentication method to another.
File quota: Choose a different file quota here if you want to update it for the users you upload.
CSV file: Choose the CSV file from your computer that you had updated.
Update users: Switch this option to “Yes” because you want to update existing user accounts.
Notitie
Switch the options Force password change and Email users about their account to “No”. When you add a remote username, your users do not need to know their internal Mahara password as they cannot use it anyway.
General account options: You can make changes to the default account options for all the users, e.g. give them multiple journals by default, change their interface language etc.
Click the Add users by CSV button to start the user update. This process may take a little while depending on how many users you are changing.
You receive a report on the page upon the successful completion of the upgrade. If the upgrade fails, error messages help you to resolve the problem. No users are updated until all errors are resolved.
Notitie
If you intend to update more than 100 users at the same time, you may run into problems, and the server may reject your CSV file as the update process is a very memory intense one. If that is the case, you would have to split your CSV file into smaller ones with fewer users in them.
You can check that the accounts had their remote usernames added:
Go to Administration menu → Users → User search.
Select the institution in which the members are whom you want to check.
Click the Search button to limit your user results to this institution.
Select the users for whom you want to check the remote usernames.
Click the Get reports button to proceed to the next step. You are taken to the User reports page.
You see the remote username in the last column.
Zie ook
If you only want to change the authentication method of certain users but do not have to worry about a remote username or updating any other information, you can change the authentication method directly on the bulk actions screen.