8.2. Configure site
Site administration → Configure site
In Configure site you can:
- set general parameters for your Mahara site
- edit site pages
- determine the display of certain menu items
- allow networking with Moodle
- create and share pages
- upload files
8.2.1. Site options
Site administration → Configure site → Site options
In Site options you can set some global options that will apply by default throughout the entire site.
Note
One or more fields may be disabled if overridden by a setting in your config.php file.
When you are done editing one or more settings, click the Update site options button at the bottom of the page.
8.2.1.1. Site settings
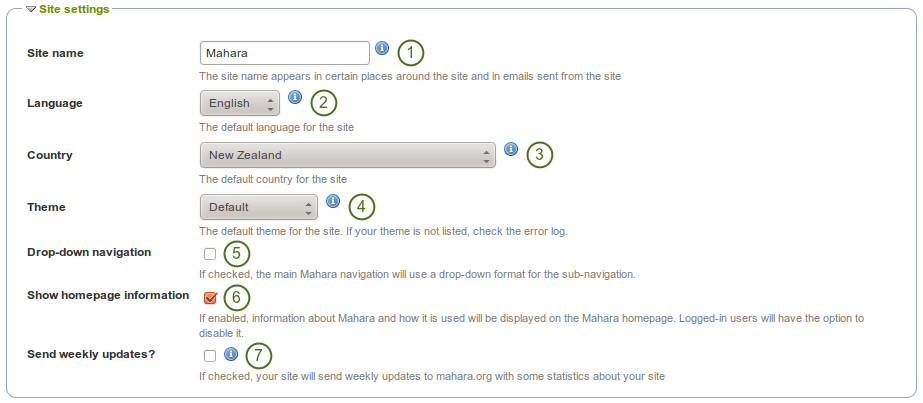
Site settings
- Site name: Choose a name for your Mahara instance. It appears in certain places around the site, e.g. in the title bar of the browser, and in emails sent from the site. Therefore, it should not be too long.
- Language: Set the default language for your site. If you have multiple language packs installed, you see a drop-down menu. Otherwise, the standard language, English, is displayed.
- Country: The country selected is the default for country selections throughout your Mahara installation, e.g. in contact information.
- Theme: Mahara comes with a number of themes that you can use. Choose one from the drop-down menu to make it the default theme for your site. If you have institutions set up, they can choose their own theme. You can search for community-contributed themes on the Mahara wiki.
 Drop-down navigation: If selected, the main Mahara navigation uses a drop-down menu for its sub navigation.
- Show homepage information: If enabled, information about Mahara and how it is used is displayed on the homepage for logged-out and the Dashboard for logged-in users. Logged-in users can disable this. See also Quick links.
- Send weekly updates?: If checked, your site sends weekly updates to mahara.org with some statistics about your site. See also Register your Mahara site.
Note
You can install more language packs. There is a complete list of them as well as more information about the language packs on the wiki.
8.2.1.2. User settings
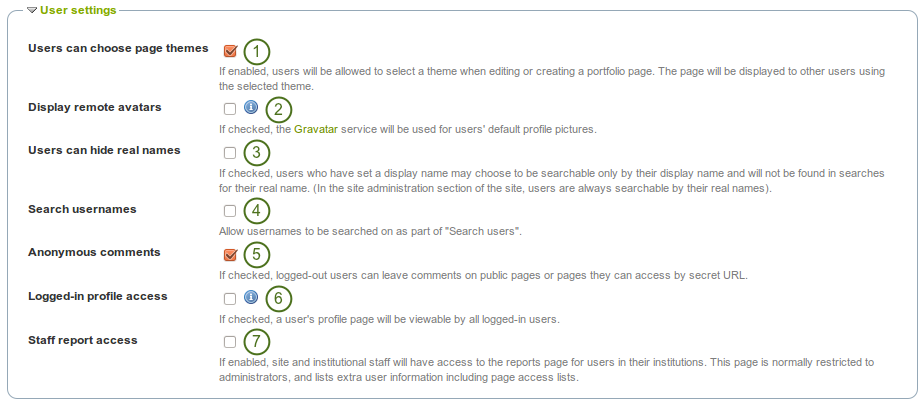
User settings
- Users can choose page themes: If this setting is enabled, users can select a theme for their portfolio page. The page is displayed with this theme to other users. Thus, the institution or site theme can be overwritten.
- Display remote avatars: If checked, users’ default profile pictures will be their Gravatar pictures (remote avatar). Users will need an account with Gravatar for this to work.
- Users can hide real names: If checked, users who have set a display name may choose to be searchable only by their display name, and will not be found in searches by their real name. In the site administration section of the site, users are always searchable by their real names. An administrator (site and institution) always sees the display name, first and last name and username.
- Search usernames: If checked, usernames can be searched on as part of “Search users” on the dashboard and via Find friends.
- Anonymous comments: If checked, logged-out users / users without a login can leave comments on public pages or pages they can access via a secret URL.
- Logged-in profile access: If this option is unchecked, profile pages are initially viewable by all logged-in users, but the owner is allowed to restrict access to a smaller group if they wish. Enable this option if you want to make sure all users can see each others’ profile pages. Profiles of institution members will always be visible to other members of the same institution.
- Staff report access: If enabled, institution staff will have access to the reports page for users in their institutions. This page is normally restricted to administrators and lists extra user information including page access lists.
Note
If you use your own avatar server to provide profile pictures for your users, you can use that instead of Gravatar for the default profile pictures. In order to do so, you need to add $cfg→remoteavatarbaseurl = 'http://example.com/avatar/'; (with the correct URL to your service) to your config.php.
8.2.1.3. Search settings
Mahara comes with a search plugin that allows you to search for users and pages. If you install another search plugin, you will be able to select which one to use for your site.
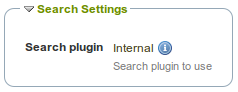
Search settings
Note
The internal search plugin can be configured in the Plugin administration.
8.2.1.4. Group settings
Mahara cannot only be used for individual work but also to work collaboratively in groups. Some settings are available in that area.

Group settings
- Create groups: You decide whether administrators, administrators and staff or everyone can create groups. The default setting is the most permissive “everyone” because Mahara is user-centered and gives the individual users a great deal of control over what they want to do. If you choose to limit the group creation to administrators (and staff), these need to be contacted to set up groups. There is no internal group request system.
- Create public groups: Choose whether everyone or only administrators can create public groups. These are groups for which you do not need to be a member of the group or even have a login to Mahara to view the group homepage, discussion forums (and member listing if the group administrator allowed that).
- Allow group categories: If checked, administrators can create categories for users to assign to their groups. These categories can be used to filter groups in My groups and Find groups.
8.2.1.5. Institution settings
You can use Mahara with multiple institutions and separate them for administrative purposes, e.g. user management and permissions, and to give them a different theme.
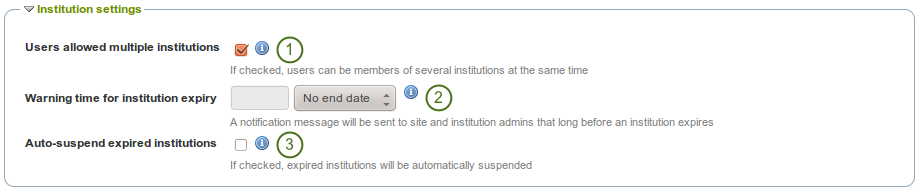
Institution settings
- Users allowed multiple institutions: If checked, users can be members of several institutions at the same time.
- Advantage: A user who belongs to two or more institutions only needs one account.
- Disadvantage: If one or more institutions use custom themes, the user cannot choose which one is displayed for him.
- Warning time for institution expiry: If set, a notification will be sent to site and institution admins this amount of time before an institution is due to expire and be suspended. This time may be specified in days, weeks, months, years or “No end date”. If the latter option is chosen, institutions will not expire by default.
- Auto-suspend expired institutions: If set, this option will allow Mahara to automatically suspend an institution that has expired automatically. This means that users of that institution will not be able to log in until the institution has been unsuspended.
8.2.1.6. Account settings
Account settings
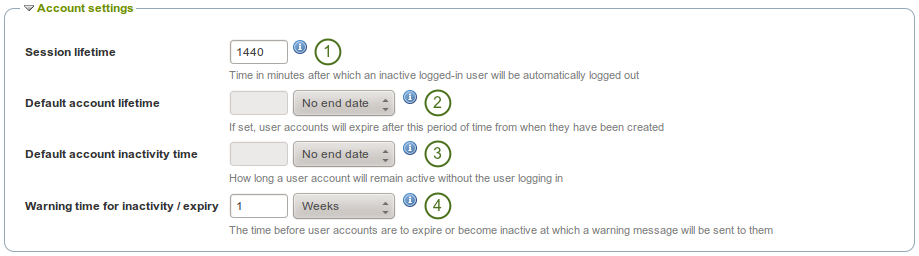
- Session lifetime: For security reasons, after a specified period of inactivity, a user will be logged off the site automatically. This field specifies this time in minutes. The default value is 1440 minutes (24 hours).
- Default account lifetime: If set, user accounts will expire after this amount of time from when they were created. When a user account is expired, the user cannot log in. This time may be specified in days, weeks, months, years or “No end date”. If the latter option is chosen, accounts will not expire by default.
- Default account inactivity time: If set, users who do not log in for this amount of time will be considered “inactive” and will not be able to log in anymore. This time may be specified in days, weeks, months, years or “No end date”. If the latter option is chosen, users are not set to “inactive” by default.
- Warning time for inactivity / expiry: If set, a warning message will be sent to users this amount of time before their accounts are due to expire or become inactive. This time may be specified in days, weeks, months, years or “No end date”. If the latter is chosen, users do not receive a warning before their account expires or they are flagged as having an inactive account.
8.2.1.7. Security settings
Security settings
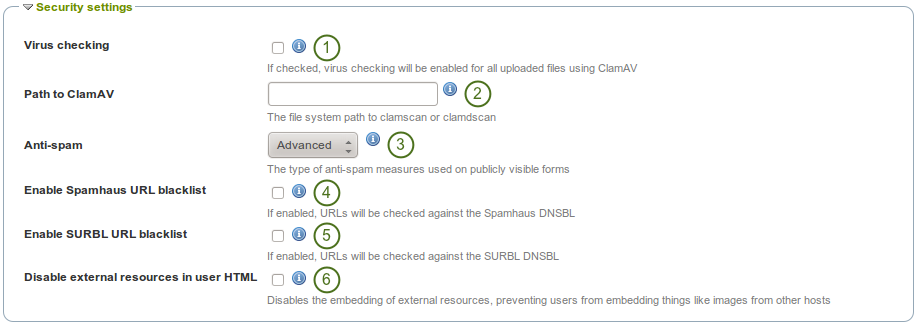
- Virus checking: If you want all files uploaded by users to be run through the ClamAV virus scanner, you should select the virus checking option. You have to have ClamAV installed on your server.
- Path to ClamAV: The file system path to clamscan or clamdscan for virus checking. It is assumed that a failure of ClamAV to run will mean that a file should be treated as a virus, and a quarantine directory will be automatically set up by your Mahara installation.
- Anti-spam: There are three levels of anti-spam protection available for publicly visible forms, such as the contact and registration forms. A form submission is never silently rejected. Rather, an error message is displayed asking the user to try again if the submission is classified as spam. The three choices are:
- None: No anti-spam checks are performed on form submissions.
- Simple: Some basic checks are performed. Form submissions with email addresses that are not well-formed or that have an excessive number of URLs are rejected.
- Advanced: Performs additional checks to determine whether email addresses are real or contain URLs that are blacklisted. This requires an Internet connection.
- Enable Spamhaus URL blacklist: If enabled, URLs will be checked against the Spamhaus DNSBL. The Spamhaus Project provides a URL blacklist that is free for non-commercial, low-traffic use. A professional use datafeed service is also available but not supported in Mahara. Please read the Spamhaus DNSBL usage terms before enabling this option.
- Enable SURBL URL blacklist: If enabled, URLs will be checked against the SURBL DNSBL. SURBL provides a URL blacklist that is free for organizations with fewer than 1000 users. A professional use datafeed service is also available, but not supported in Mahara. Please read the SURBL usage terms before enabling this option.
- Disable external resources in user HTML: Turning this option on will prevent users from embedding external resources such as images from remote sites into their forum posts and other HTML content. It is however a good thing to do from a security standpoint since it does neutralise a few clever phishing attacks. See the HTML Purifier documentation for more details.
8.2.1.8. Proxy settings
Proxy settings
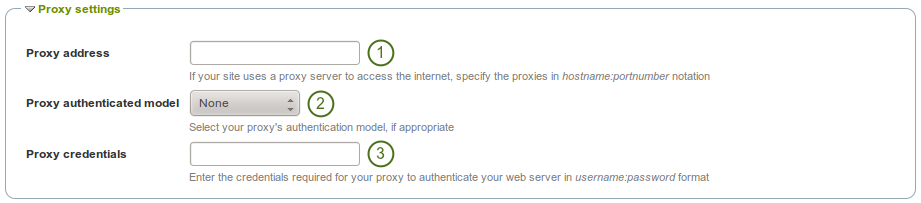
- Proxy address: If your site uses a proxy server to access the Internet, specify the proxies in
hostname:portnumbernotation. - Proxy authentication model: Select your proxy’s authentication model (none or basic [NCSA]), if appropriate.
- Proxy credentials: Enter the credentials required for your proxy to authenticate your web server in
username:passwordformat.
8.2.1.9. Email settings
Email settings
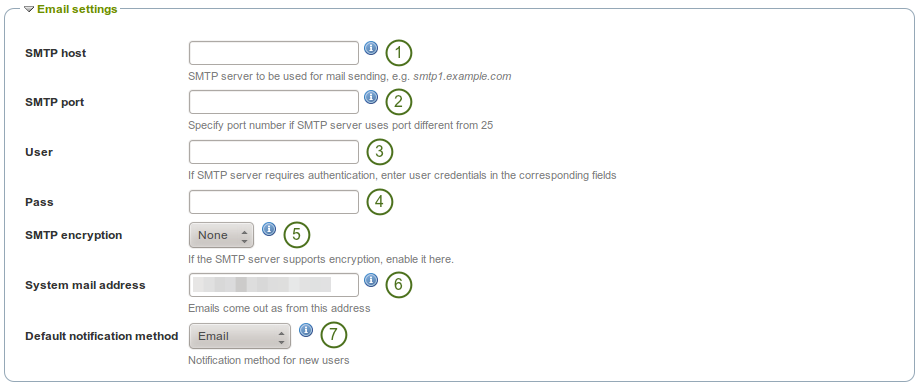
- SMTP host: If you want to force Mahara to use a specific SMTP server instead of the system one, enter its hostname here, e.g.
smtp.example.com. It is possible to specify more than one host by separating them with semicolons, e.g.smtp1.example.com;smtp2.example.com, but keep in mind that all other settings, e.g. authentication credentials and port numbers, will apply to all listed servers. It is not possible to specify different credentials for each server in this list. This feature is useful when SMTP host authentication is not required or you list different frontends for the same mail server in which case other settings will work. - SMTP port: If your SMTP server uses a port number different from 25, you may specify it here. When encryption is enabled, the default ports are 465 for SSL and 587 for TLS. You only need to specify a port number if it is different from these. Check the correct settings with your mail service provider.
- User: If your SMTP server requires authentication, enter your username here.
- Password: If your SMTP server requires authentication, enter your password here.
- SMTP encryption: If your SMTP server supports encryption, enable it here.
- System mail address: This email address is the address that emails are sent from Mahara.
- Default notification method: Choose the notification method that is used for all notifications of new users on the site. The options are:
- Email digest
- Inbox
8.2.1.10. General settings
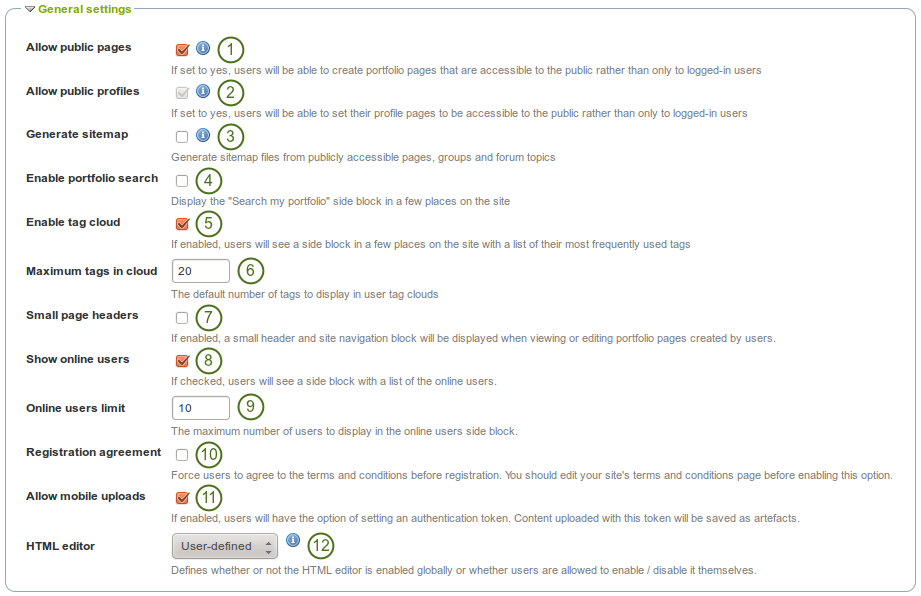
General settings
- Allow public pages: If checked, users can create portfolio pages that are accessible to the public rather than only to logged-in users.
- Allow public profiles: If checked, users can set their profile pages to be accessible to the public rather than only to logged-in users. However, only logged-in users can use interactive features such as the wall. If the option “Allow public pages” is chosen, “Allow public profiles” is automatically selected.
- Generate sitemap: If checked, sitemap files from publicly accessible pages, groups and forum topics are generated that can be sent to another service.
- Enable portfolio search: If checked, the “Search my portfolio” side block is displayed in the Content and Portfolio sections of the site.
- Enable tag cloud: If checked, users see a side block in the Content and Portfolio sections of the site with a list of their most frequently used tags. The number of tags displayed is defined by the option “Maximum tags in cloud”.
- Maximum tags in cloud: Enter the default number of tags to display in user tag clouds. Users can change this number in their account settings.
- Small page headers: If checked, a small header and site navigation block are displayed when viewing or editing portfolio pages instead of the standard header. This option gives more space for the portfolio content itself.
- Show online users: If checked, users see a side block with a list of the users who have been logged-in in the last 10 minutes (cf. the dashboard).
- Online users limit: Enter the maximum number of users to display in the Online users side block.
- Registration agreement: If checked, you force users to agree to the “Terms and Conditions” before registration. You should edit your site’s “Terms and Conditions” page before enabling this option. You can do so under Edit site pages.
- Allow mobile uploads: If checked, users have the option of setting an authentication token in their account settings. That allows them to upload content from their mobile devices.
- HTML editor: Choose whether the HTML editor is used by default or not. If set to User-defined, users will be allowed to choose whether to use the HTML editor in their personal settings or not. Otherwise the specified setting will be used site-wide.
8.2.2. Edit site pages
Here you can edit the content of some pages around the site and the pages linked to in the footer:
- About
- Home (Dashboard)
- Logged-out home
- Privacy statement
- Terms and conditions
All pages come with default text that you can change entirely. Every page must contain some text. You can use the visual editor to style your page.
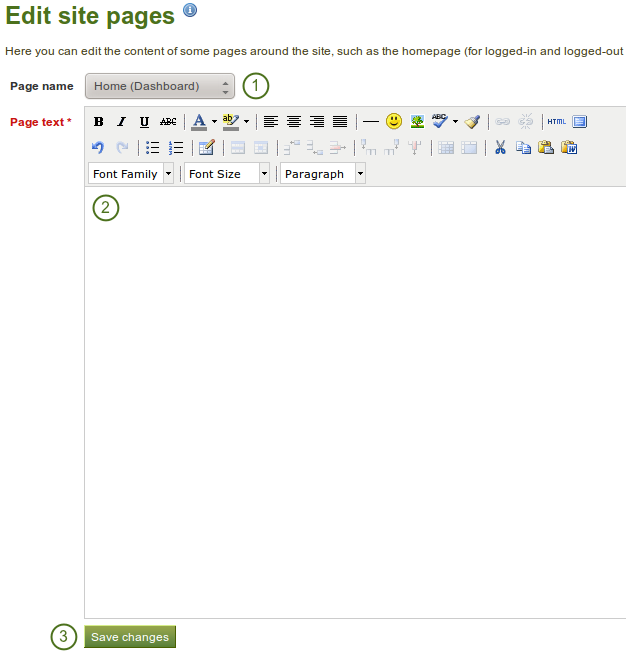
Edit site pages
- Page name: Choose the page you want to edit from the drop-down menu.
- Page text: Change the text in the editor window. You cannot leave this field empty.
- Click the Save changes button.
8.2.3. Menus
There are two menus in Mahara:
- Links and resources
- Footer
8.2.3.1. Links and resources
The Links and resources menu appears to all users on most pages in the side bar. You can decide which links or files are available to everybody - also those without a login - and which ones only logged-in users shall see.
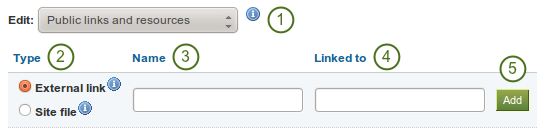
Add external links to the Links and resources menu
- Choose which Links and resources menu you want to edit: the public or the logged-in users one.
- Choose the type External link.
- Give your link a name that will appear in the menu.
- Provide the full URL to the link including
http://orhttps://. - Click the Add button.
Once you have added links and files to your menus, you can edit or delete them.
You can also link to files that you have uploaded to the site files area.
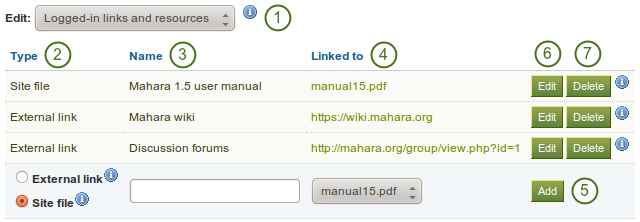
Add a site file to the Links and resources menu
- Choose which Links and resources menu you want to edit: the public or the logged-in users one.
- Choose the type Site file.
- Give your site file a name that will appear in the menu.
- Choose the file you want to display from the drop-down menu.
- Click the Add button.
- You can make changes to the name or choose a different file when you click on the Edit button.
- You can remove the file from the menu by clicking the Delete button. This will only delete the reference to the file in the menu but not the file itself.
Note
If you wish to display your links and resources in a specific order, map that order out before you add the links and files because you cannot change the order afterwards.
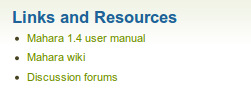
Links and resources menu result
8.2.3.2. Footer menu
You have control over which links are displayed in the footer on each page.
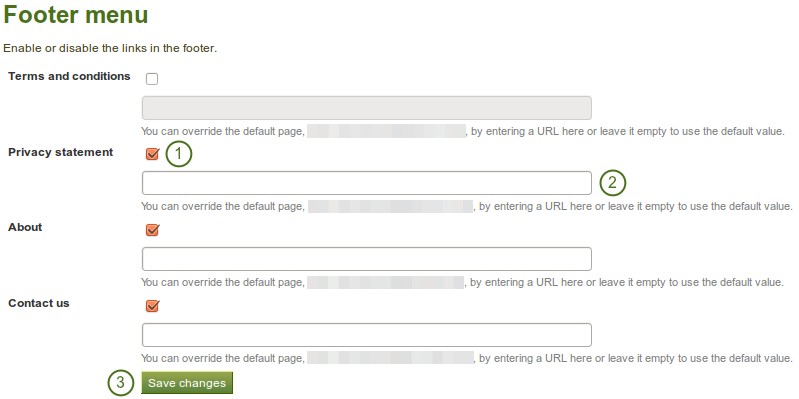
Footer menu
- Select which site pages shall appear in the footer on each page. You can change the text of “Terms and conditions”, “Privacy statement” and “About” in Edit site pages.
- If you want to link any of these pages to an existing external page, provide the URL in the respective text field.
- Click the Save changes button to save your settings.
8.2.4. Networking
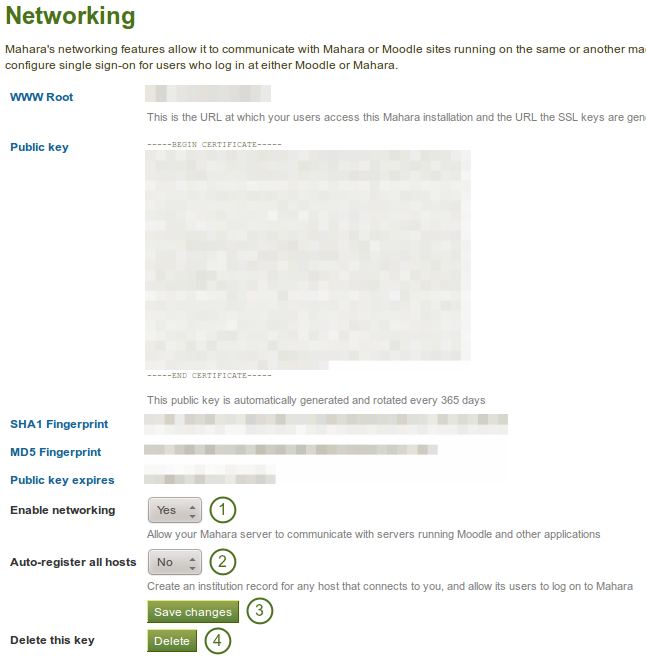
Mahara’s networking features allow it to communicate with Mahara or Moodle sites. If networking is enabled, you can use it to configure single sign-on (SSO) for users who log in at either Moodle or Mahara or allow users from another Mahara instance to access yours.
From Moodle 2.0 on you can connect Mahara and Moodle to save certain content you created in Moodle through the portfolio feature.
Networking overview
In order to use networking site-wide with any institution, you need to:
- Enable networking: Choose “Yes” from the drop-down menu.
- Auto-register all hosts: If you choose “Yes”, an institution is created for any host that connects allowing these users to log in to your Mahara site. We recommend you leave the default “No” because that gives you more control over which Moodle or Mahara instances can connect.
- Click the Save changes button.
- Delete this key: Click the Delete button if you want to generate a new key for your Mahara site.
Depending on which site you wish to connect, you may need to provide some of the other information on the page, in particular the WWW root and the public key.
See also
The comprehensive guide for setting up a Mahoodle can be consulted when connecting Mahara and Moodle.
You set up MNet for an institution when you edit the authentication method XML-RPC.
8.2.5. Pages
You create and copy site pages like regular portfolio pages. You do not have all blocks available. Check the blocks in various contexts for blocks that you can use in site pages.

Site pages
Once you are done creating your site pages, you can share them with others on Mahara.
8.2.6. Share
You share site pages like any other page.
See also
Refer to the share options for regular portfolio pages for further information.

Share site pages
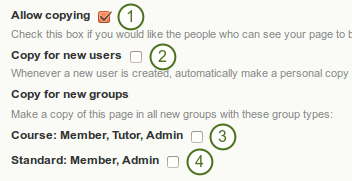
When you want to allow copying, you have a few more options available than on regular pages.
Copying site pages
- Allow copying: Place a check mark here to see the following copying options.
- Copy for new users: All new users on the site - and not just in one institution - receive a copy of the selected page(s) into their portfolios.
- Copy for new groups: Select the course groups that have members, tutors and administrators if you want them to receive a copy of the selected page(s)
- Copy for new groups: Select the standard groups that have members and administrators if you want them to receive a copy of the selected page(s)
8.2.7. Files
Here you can upload files that you can include in the links and resources menu or in site pages. You can add files that are in the home directory to the menu with resources for logged-in users. Files that you save in the public folder can be used in the menu for users who are not logged-in.
See also
The process of uploading and managing files is very similar to files in your personal files area.

Site files