8.5. Institutions
Site administration → Institutions
You can use Mahara as multi-tenanted instance. That means that several different institutions can share one Mahara installation. All users from these different institutions can:
- share portfolio pages with each other
- give feedback on each other’s pages
- work collaboratively in groups across institution boundaries
In Site administration you can set up as many institutions as you wish. Institution administrators can only administer their users and their institutions but not make any changes to site settings.
You can also use the possibility to set up institutions for different parts of your organisation to use different themes, have different default settings and / or authentication methods.
8.5.1. Overview
Site administration → Institutions → Institutions
You see an overview of all institutions that exist on this Mahara installation.
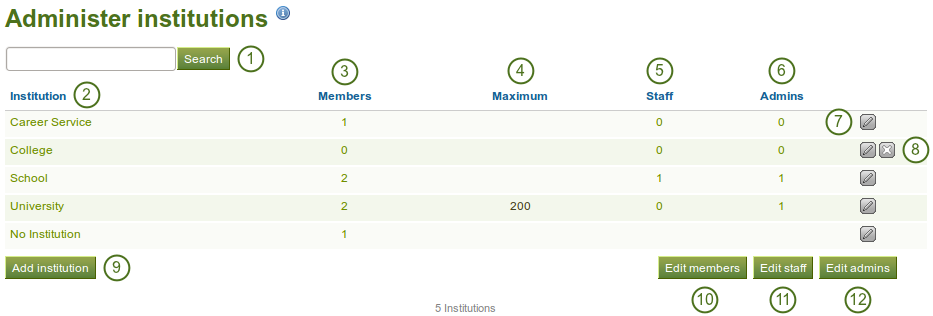
Overview page for institutions
- Search: Search for a particular institution by its name and then click on the Search button.
- Institution: Institutions are listed alphabetically.
- Members: Number of registered members in this institution
- Maximum: Maximum allowed members in this institution
- Staff: Number of institution members with staff rights
- Admins: Number of institution members with institution administrator rights
- Click the Edit button
 to change institution settings.
 - Click the Delete button
 to delete an institution. You can only delete an institution when there are no members in it.
 - Click the Add institution button when you want to create a new institution.
- Click the Edit members button when you want to add or remove members from an institution.
- Click the Edit staff button when you want to add or revoke staff rights for an institution member.
- Click the Edit admins button when you want to add or revoke institution administrator rights for an institution member.
Note
The institution “No institution” is the default “institution”. It cannot be deleted as it is the standard Mahara site.
8.5.2. Add an institution
When you want to add an institution by clicking on the Add button on Site administration → Institutions → Institutions, you need to fill in basic information. You can change all the settings except the Institution name later on.

Add a new institution
- Institution name: This field is required. It is the unique identifier of this institution in the database. It must only be one word without numbers and symbols.
- Institution display name: This field is required. It is the name that all users see throughout the site to identify this institution.
- Institution expiry date: Set the expiry date for this institution by selecting the year, month and day from the drop-down menus when taking the check mark off the “Not specified” check box. Institutions do not expire by default.
- If you specify an expiry date for this institution, once the warning time for institution expiry has been reached, site and institution administrators will be emailed about this institution’s impending expiry.
- If the auto-suspend expired institutions option is set, then once the expiry date has been reached, this institution will be automatically suspended, and users of this institution will no longer be able to log in.
- The warning time for institution expiry and the auto-suspend expired institutions options can be found in the institution settings under Site administration → Configure site → Site options.
- Registration allowed: Check this box when you want to allow self-registration of new users. As institution administrators, you will be asked to confirm that users can join your institution. If you decline, their new account will be associated with “No institution” unless you have the Confirm registration option clicked. When you do not allow registration, nobody can register a new account, ask to join your institution or leave it without your permission.
 Confirm registration: Check this box if you want to control that no new accounts are created unless the administrator approves the registration. You receive a notification about pending registrations when a new user wants to register.
- Default membership period: You can set how long users will remain associated with this institution per default. Choose an option from the drop-down menu and then specify the number of days, weeks, months or years. After this length of time, the users will be removed from the institution. Users will receive an email before this time reminding them that they will be removed soon. However, that does not mean that they will lose their account. They will still have that and be associated with “No institution”.
- Logo: You can upload an image that will be displayed to your institution’s members in place of the standard header logo.
- Theme: Use the drop-down menu to choose the theme that you wish to use for this institution. All pages in that institution will receive that theme. When users from other institutions view portfolio pages that were created in this institution, they will see this institution’s theme on these pages. If Site default is selected, when a site administrator changes the site default theme, the theme for the users of this institution will change, too. You can install more themes in the theme folder on the server. Check out the community-contributed themes. If users are allowed to have page themes, these pages are not affected by theme changes. Mahara has a configurable theme.
- Show online users: If the site admin allowed the “Online users” side block, you can decide which group of users you want to have displayed for this institution:
- None: The side block is not displayed to institution members.
- Institution online: Only institution members are displayed in the side block.
- All: All users on the site are displayed in the side block
- Default quota: You can set the amount of file quota new users registering with this institution shall have.
- Update user quota: If you check this box, the default quota you choose above will be applied to all existing institution members.
- Allow institution public pages: Put a check mark into this box if you want to allow users belonging to this institution to create portfolio pages that are accessible to the public rather than only to logged-in users. If you allow public pages, users can also create secret URLs for their pages. Otherwise they cannot.
- Maximum user accounts allowed: Specify the maximum number of accounts that can be created in this institution. If you leave this field blank, there is no limit to the number of accounts.
- Locked fields: Put a check mark into each check box for which users are not allowed to change the value. Disabled check boxes are for profile fields which are locked in the institution settings for “No institution”. These profile fields are locked at the site level and cannot be unlocked for individual institutions.
- Click the Submit button to save your changes and create this institution.
- Click the Cancel button to abort the creation of this institution.
Note
Locking profile fields such as first name, last name and display name can be beneficial for institutions that wish to always identify their users by their real names and not allow users to choose nick names.
8.5.2.1. Change the institution logo
You can upload a logo to any theme replacing the standard logo that comes with the theme. For best results, this image should have the same dimensions as the site logo in your institution’s theme. As each theme can have a different header height, no exact dimensions can be provided.
Note
Of the standard themes, only the “Primary School” theme requires a set height for its logo. The other themes are more flexible.
Upload a logo
- Logo: Upload the logo that you want to use on your institution theme from your computer.
- Once you have submitted your changes, the logo will be replaced in the header and it also appears in the settings to show what you have uploaded.
- Delete logo: If you want to revert back to the standard logo, check this box and click the Submit button at the bottom of the page.
8.5.2.2. Use the configurable theme
If you do not want to use one of the built-in themes of Mahara or one of the community-contributed themes, you can either build your theme from scratch or use the configurable theme in conjunction with the logo upload.
You can use the “configurable theme” directly from the institution settings page.
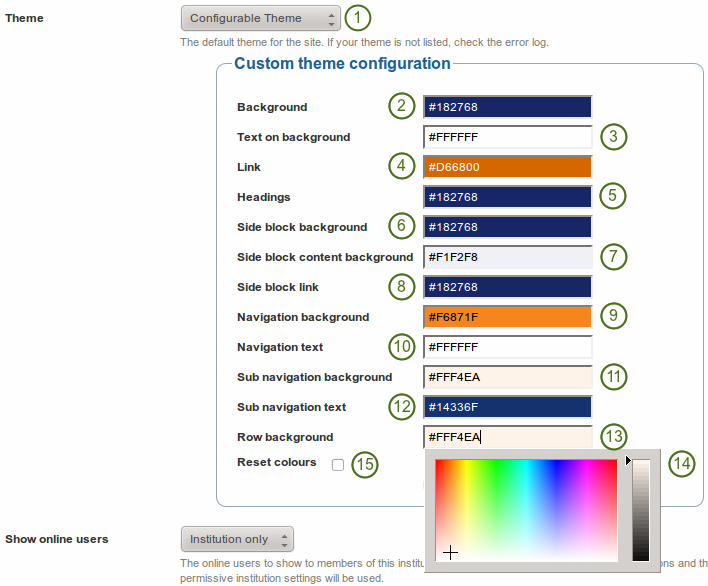
Options for the configurable theme
In order to change any of the colours, either provide the hexadecimal color code or choose the colour from the colour picker that becomes available as soon as you click on one of the colors.
- Theme: Choose the “Configurable Theme” from the drop-down menu and the “Custom theme configuration” options become visible.
- Background: Background colour for the entire site, esp. visible in the header and footer.
- Text on background: The text that is displayed on the background colour, e.g. in the header and footer.
- Link: The link colour on any pages unless it is in the side block or navigation.
- Headings: The heading colour for all headings except in the side block.
- Side block background: The background colour of any side block. It should form a good contrast to the heading colour of the side block as that is always white.
- Side block content background: The color of the inside of a side block.
- Side block link: The color of a link inside a side block.
- Navigation background: The colour of the top navigation bar.
- Navigation text: The colour of the text / links in the main navigation bar.
- Sub navigation background: The colour of the secondary navigation and the highlighted section in the main navigation bar.
- Sub navigation text: The colour of the text / links in the secondary navigation and the highlighted section in the main navigation bar.
- Row background: The colour of the background anywhere rows appear.
- Colour picker: Either type in the hexadecimal color code directly into the colour field or use the cross and arrow from the color picker to decide on your new color.
- Reset colours: If you want to go back to a blank slate of the configurable theme, place a check mark in this box to get back to the original colours of the configurable theme.
- Click the Submit button at the bottom of the page to make your changes.
Note
If you do not see the theme changes immediately when you are logged in as institution member, you may have to clear your browser cache.
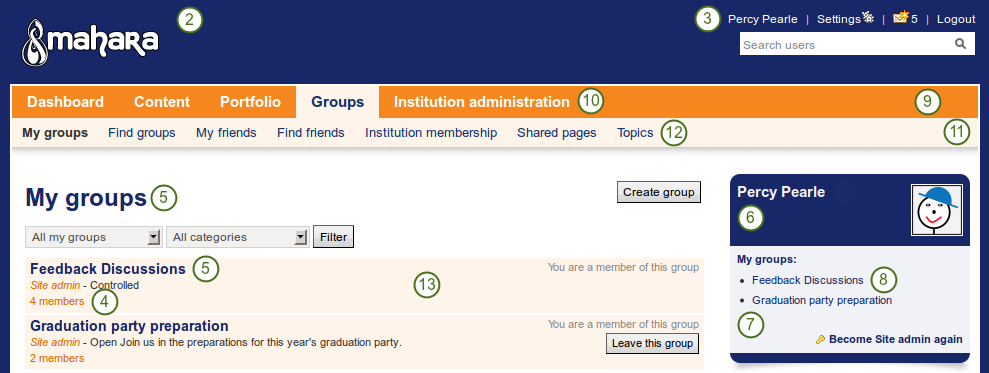
Example of the configurable theme
The numbers on the example page refer to the configurable theme options above.
8.5.3. Edit an institution
Site administration → Institutions → Click the Edit button next to an institution
Once you have created your institution, you can edit its settings, suspend or delete the institution. You will have to choose at least one authentication method for this institution so that user accounts can be created.
Note
Only site administrators can add, edit and delete authentication methods for an institution and suspend it. An institution can only be deleted if there are no members in it.
You can add multiple authentication methods to your institution and thus allow various entry points for your users. You should set up at least one authentication method. Otherwise, nobody can log in to this institution.
Before you can use the IMAP, LDAP, SAML or XML-RPC authentication methods, you must install their extensions on your server.
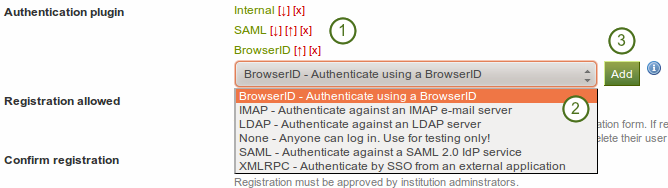
Plugins available for authentication in an institution
- Once your institution is created, the settings include an additional option, Authentication plugin. You see all authentication methods that are already in use for this institution listed.
- From the drop-down menu choose one of the authentication methods that are available:
- BrowserID: user accounts are authenticated against a BrowserID.
- IMAP: user accounts are authenticated against an IMAP server. This is the least maintained authentication plugin and rarely used.
- internal: user accounts are created by Mahara and the passwords and logins are kept in an internal database. This is the default authentication method for a new institution.
- LDAP: user accounts are authenticated against an LDAP server.
- none: Anyone can log in by picking a username and password. This should only be used for testing.
- SAML: a SAML 2.0 Identity Provider Service is needed that has the user accounts.
- XML-RPC: This is the authentication method used for MNet to connect Mahara with Moodle or another Mahara.
- Click the Add button to see the configuration screen for an external authentication method before it is added.
Warning
Be careful when choosing the “None” authentication method. This allows anyone to log in. It should only be used for testing purposes.
8.5.3.1. BrowserID authentication
BrowserID is a project of Mozilla’s Identity Team. It allows people to have one login across multiple sites without having to divulge the password to these sites. All they need to log in to a BrowserID-enabled site is their email address.
Note
BrowserID has been renamed to Persona by Mozilla since it was introduced to Mahara. The protocol still works.
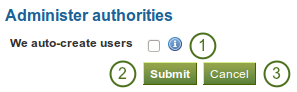
Configure BrowserID
- We auto-create users: Place a check mark in this box if you wish to allow new users to register for your institution automatically using their BrowserID.
- Click the Submit button to enable this authentication method.
- Click the Cancel button to abort your changes.
Warning
The normal registration work flow and the potential confirmation of accounts does not come into play when you allow the auto-creation of accounts as this is an external authentication that is then considered to be trusted. We recommend you do not use the auto-creation of accounts unless you a sure that only trusted people can register. Otherwise, anybody with a BrowserID could register with your site. This option could be used when your site is only available in an intranet.
If you want to use BrowserID authentication but do not allow the auto-creation of accounts, you need to create the user accounts manually or create accounts via CSV in the BrowserID authentication method. You need to register the users with the email address they use for BrowserID. The users can then log in with their BrowserID and do not have to worry about their internal username and password as their account will be associated with their BrowserID.
8.5.3.2. IMAP authentication
You can use this authentication method to receive the login information for your users from your IMAP server.
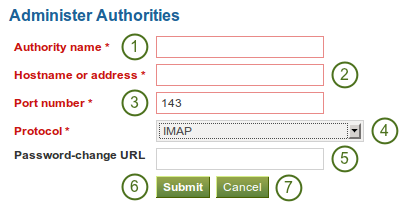
Set up IMAP authentication
- Authority name: Enter a descriptive name to help you identify this authority. Preferably, choose a short name. This field is required.
- Hostname or address: Specify the hostname in URL form. This field is required.
- Port number: Specify the port under which your IMAP server can be reached. The default is 143. This field is required.
- Protocol: Select the IMAP protocol you are using by selecting it from the drop-down menu. This setting is required:
- IMAP
- IMAP / SSL
- IMAP / SSL (self-signed certificate)
- IMAP / TLS
- Password-change URL: If your users can only change their password in one central space, provide the URL here.
- Click the Submit button to save your changes.
- Click the Cancel button to abort your changes.
8.5.3.3. LDAP authentication
Use this authentication method to authenticate against an LDAP server so that your users can log in with their usual login and password.
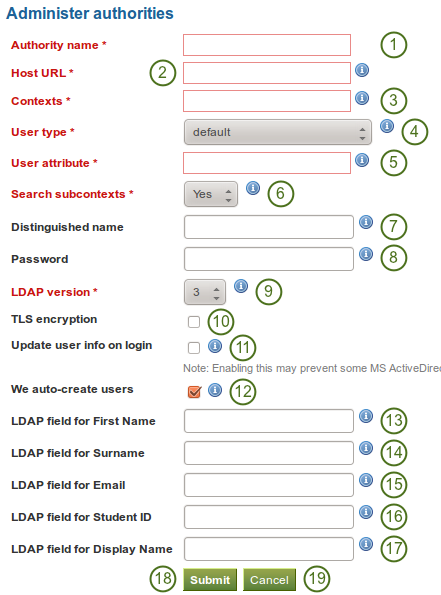
Set up LDAP authentication
- Authority name: Enter a descriptive name to help you identify this authority. Preferably, choose a short name. This field is required.
- Host URL: Specify hosts in URL form, e.g.
ldap://ldap.example.com. Separate multiple servers with ; for failover support. This field is required. - Contexts: List the contexts where users are located. Separate different contexts with ;, e.g.
ou=users,o=org;ou=other,o=org. This field is required. - User type: Select from the drop-down menu how users are stored in the LDAP directory. This field is required. You can choose between:
- Novell Edirectory
- posixAccount (rfc2307)
- posixAccount (rfc2307bis)
- sambaSamAccount (v. 3.0.7)
- MS Active Directory
- default
- User attribute: Enter the attribute used to search for users. It is often
cn. This field is required. - Search subcontexts: Select “Yes” if you want to search for the users also in subcontexts. This setting is required.
- Distinguished name: If you want to use bind-user to search users, specify it here. It should look something like
cn=ldapuser,ou=public,o=org. Leave this blank for anonymous bind. - Password: Enter the password for the “distinguished name”.
- LDAP version: Choose the LDAP version you are using from the drop-down menu. This setting is required.
- TLS encryption: Check this box if you use this encryption mechanism.
- Update user info on login: Check this box to update the first name, last name and email address with the corresponding LDAP values at each login. Enabling this option may prevent some MS ActiveDirectory sites / users from subsequent Mahara logins.
- We auto-create users: Check this box to create user accounts on Mahara automatically when a user authenticates successfully but does not yet have an account.
- LDAP field for First Name: Enter the name of the field in the LDAP record that contains the user’s first name.
- LDAP field for Surname: Enter the name of the field in the LDAP record that contains the user’s last name.
- LDAP field for Email: Enter the name of the field in the LDAP record that contains the user’s email address.
- LDAP field for Student ID: Enter the name of the field in the LDAP record that contains the user’s student ID.
- LDAP field for Display Name: Enter the name of the field in the LDAP record that contains the user’s display name.
- Click the Submit button to save your changes.
- Click the Cancel button to abort your changes.
8.5.3.4. SAML authentication
Choose this authentication method for your institution when you have a SAML 2.0 Identity Provider Service set up for your organisation that allows you to use the same login for multiple applications.

SAML 2.0 authentication
- Institution attribute (contains “…”): Enter the attribute that will be passed from the Identity Provider (IdP) that shows which institution the user belongs to. These usually directly correlate to LDAP attributes (the signin service of the IdP), e.g. eduPersonOrgDN. This field is required.
- Institution value to check against attribute: Enter the value that will be checked against the institution attribute value as passed from the IdP. If the institution regex check box “Do partial string match with institution shortname” is selected, this value can be a regular expression that will be used to check against the institution attribute value. This field is required.
- Do partial string match with institution shortname: Check this check box to treat the value in “Institution value to check against attribute” like a regular expression.
- User attribute: Enter the name of the attribute passed by the IdP that contains the username. This field is required.
- Match username attribute to remote username: This box is selected by default and needs to stay selected. It matches the user attribute value to the remote username field assigned to a given user (not the internal Mahara username). Only if you have the experimental feature of “usersuniquebyusername” turned on can you deselect this check box. We do not recommend this unless you are very experienced and have control over all applications in question.
- Allow users to link own account: Check this box if you want to allow users to link their own internal Mahara account to the authenticated SAML account. This depends on the “Match username attribute to remote username” option being enabled. If this setting is turned on when users try to log in via SSO and their username as well as the email for example match an internal username, they can link their accounts. That would allow them to log in either via the SSO login or via the regular login box into the same account and avoid account duplication.
- Update user details on login: Check this box to update the first name, last name and email address with the corresponding IdP values passed through at each login.
- We auto-create users: This is unselected by default and needs to stay unchecked if the option “Match username attribute to remote username” is enabled. Check this box to create user accounts on Mahara automatically when a user authenticates successfully but does not yet have an account. Only if you have the experimental feature of “usersuniquebyusername” turned on can you select this check box. We do not recommend this unless you are very experienced and have control over all applications in question.
- SSO field for First Name: Enter the name of the attribute passed by the IdP that contains the user’s first name.
- SSO field for Surname: Enter the name of the attribute passed by the IdP that contains the user’s last name.
- SSO field for Email: Enter the name of the attribute passed by the IdP that contains the user’s email address.
- Click the Submit button to save your changes.
- Click the Cancel button to abort your changes.
Warning
By default, SAML authentication instances have the “Match username attribute to remote username” setting selected. If that setting were unchecked, someone with control over any SAML identity provider could gain control over any user account on that Mahara site by setting the username attribute accordingly. In other words, administrators of one institution could control users in other institutions. You would only be able to deselect this setting if you set the “usersuniquebyusername” variable to “true” in config.php. However, you should not do that on a Mahara instance to which multiple SAML providers connect and you are not in control of all usernames that are created.
See also
If you deselect “Match username attribute to remote username”, you get an error message which talks about a config setting for “usersuniquebyusername”. Please refer to the experimental feature of the “usersuniquebyusername” variable for more information.
8.5.3.5. MNet / XML-RPC authentication
Use the XML-RPC authentication for connecting a Mahara instance to a Moodle or other Mahara installation for sharing login information. With Moodle 2 that does not only mean that you can log in to Mahara via Moodle, but also that you can transfer certain activities into your Mahara portfolio from Moodle.
A Moodle site can only be connected to Mahara once no matter how many institutions you have set up. Every XML-RPC authentication instance in Mahara must have its own unique remote wwwroot, and must be associated with a single institution.
Note
You must have networking enabled in order to use this authentication method.
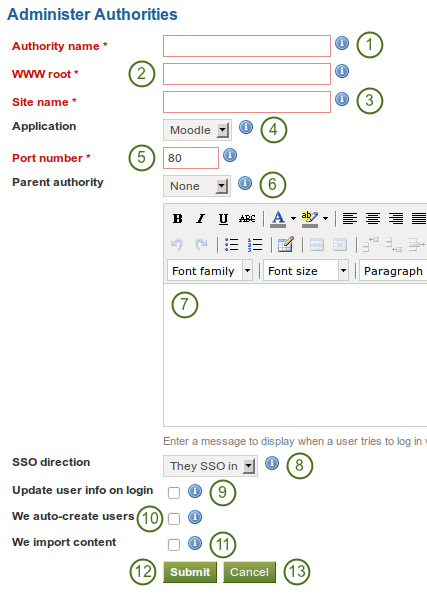
Set up MNet authentication
- Authority name: Enter a descriptive name to help you identify this authority. Preferably, choose a short name. This field is required.
- WWW root: Enter the web address of the root of the remote application, e.g.
http://example.com. This field is required. - Site name: Enter the name to present to your users to identify the remote site. If you enable SSO, they may click on this name to start a session at the remote site. This field is required.
- Application: Choose the application on the other end. You can choose between “Mahara” and “Moodle”.
- Port number: Enter the port number that the remote application is listening at. You probably will not need to change this unless you are connecting to a
httpsservice or your remote application is running on a non-standard port. This field is required. - Parent authority: If you set a parent authority from the already existing authentication methods, users will be able to log in using that authority as well as MNet. For example, you could set up SAML authentication and have that be the parent of this MNet authority. That means that users will be able to log in by clicking on the SSO login link using their SSO credentials as well as via MNet from their Moodle. You do not have to set a parent authority. If you do not, users using MNet will only be able to access Mahara via MNet, i.e. log in to Moodle or the other Mahara first.
- Wrong login box message: Enter a message to display when a user tries to log in via Mahara’s login form but is not allowed to if you have not set up a parent authority.
- SSO direction: Choose your SSO direction from the drop-down menu:
- They SSO in: Enable this option to allow users from the remote site to roam to your Mahara site without having to enter their username and password.
- We SSO out: Enable this option to allow your users to roam from Mahara to the remote site without having to enter their username and password there.
- Update user info on login: Enable this option to bring over user data from the remote site upon login and update your Mahara user record with any changes. The following fields, when filled in on Moodle, are filled in Mahara:
- first name (always carried over)
- last name (always carried over)
- email address (always carried over)
- profile picture
- description (introduction on Mahara)
- city
- country
- language
- HTML editor setting
- We auto-create users: Check this box to create user accounts on Mahara automatically when a user authenticates successfully but does not yet have an account.
- We import content: Not all network-enabled applications support this, but if they do, e.g. Moodle 2.x, this will allow users of the remote site to import content to Mahara. It depends on the option “They SSO in” from “SSO direction” and it is sensible to also have “We auto-create users” set.
- Click the Submit button to save your changes.
- Click the Cancel button to abort your changes.
Note
If you choose a Parent authority, ensure that all the users are associated with this authentication method instead of the MNet one. Otherwise, they will not be able to log in via the other authentication method. If the remote username for MNet and the other authentication method is already the same, you just need to change the authentication method. If they are not yet the same, you need to go update the user details together with changing their authentication method.
See also
Refer to the comprehensive guide about setting up Mahoodle, the combination of Mahara and Moodle, for step-by-step instructions on how to set everything up on the Moodle side and on Mahara. The guide explains the steps for both Moodle 1.9 and Moodle 2.x.
8.5.3.6. Order of authentication methods
If you have set up multiple authentication methods in one institution, you can decide on the order in which they are checked.

Order of authentication methods
- Use the up arrow and down arrow to move a specific authentication method up or down in the list.
- Delete a particular authentication method by clicking on the Delete link [x].
Note
You cannot delete an authentication method when there are still users who require it to log in. Before deleting an authentication method, you have to move the users to another authentication method.
8.5.4. Members
Site administration → Institutions → Members
You can add and remove members from one institution in bulk. As site administrator, you can always add members to an institution. As institution administrator, you can only invite users to become members.
You can filter users to display fewer and add to or remove them more easily from your institution:
- People who have requested institution membership
- People who have not requested institution membership
- People who have left a given institution
- People who are already institution members
- People who have been invited
Note
You can also double-click a name and it will be moved to the other side. This goes for all functionalities that are similar to this one here.
8.5.4.1. People who have requested institution membership
If your institution allows self-registration, users who are not already members of your institution can request to join it.
See also
You can check your settings on self-registration:
- when you are an institution admin: Institution administration → Manage institutions → Settings → Registration allowed
- when you are a site admin: Site administration → Institutions → click the Edit button next to the institution you want to check → Registration allowed
Users can ask to join an institution on their institution membership page.
Institution administrators receive notifications about membership requests. Site administrators only receive notifications about users wanting to join “No Institution”.
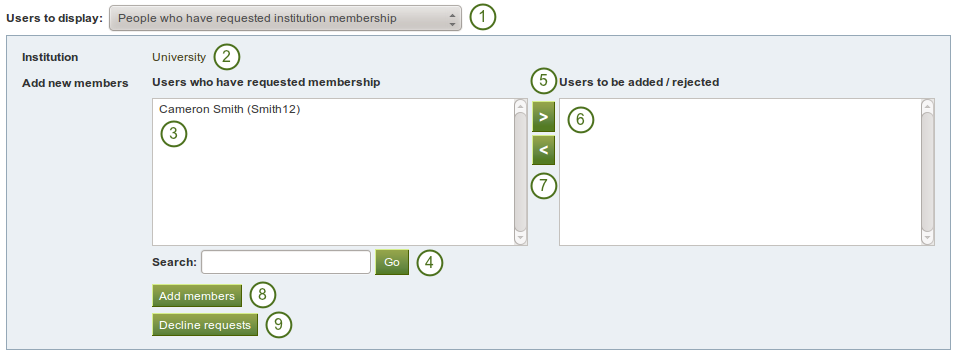
Deal with an institution membership request
- Users to display: Choose People who have requested institution membership.
- Institution: Choose from the drop-down menu to which institution you wish to add users. If there is only one institution, its name will be displayed without the drop-down menu.
- Users who have requested membership: Select the users you wish to add to the institution.
- Search: You can also search for users in the search box if there are too many names listed.
- Add the users by clicking on the right-arrow button
 .
. - Users to be added / rejected: If you put users into the box for users to be added / rejected by accident, you can remove them from that list by clicking on them.
- Then click on the left-arrow button
 , and they are removed from the list.
 - When you have all the members you wish to add to the institution, click the Add members button.
- Alternatively, if you wish to decline users membership, you can select them and then send a general denial by clicking on the Decline requests button.
8.5.4.2. People who have not requested membership yet
An admin can also take the initiative and invite or add users to an institution.
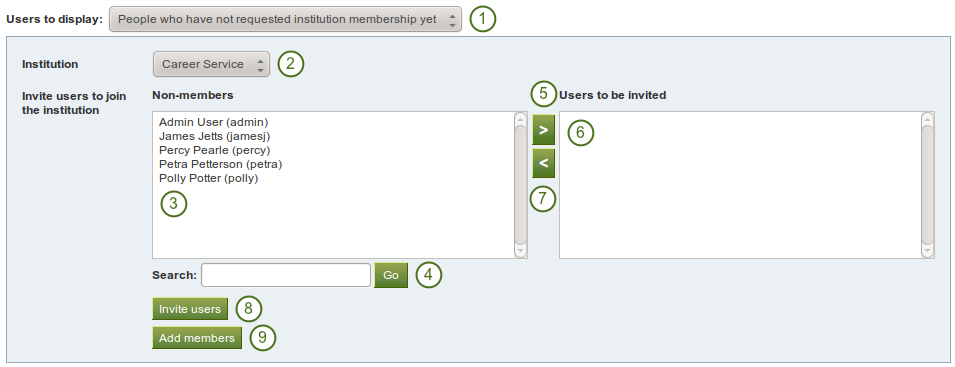
Invite or add users to become institution members
- Users to display: Choose People who have not requested membership yet.
- Institution: Choose from the drop-down menu to which institution you wish to invite users. If there is only one institution, its name will be displayed without the drop-down menu.
- Non-members: Select the users you wish to invite to the institution.
- Search: You can also search for users in the search box if there are too many names listed.
- Add the users to the list Users to be invited by clicking on the right-arrow button .
- If you put a person into the box for users to be invited by accident, you can remove them from that list by clicking on them.
- Then click on the left-arrow button , and they are removed from the list.
- When you have all the members you wish to invite / add to the institution, click the Invite users button. The users receive a notification and can accept or decline the institution membership invitation.
- Alternatively, you can click the Add members button as site admin and add users directly to the institution without asking them first.
8.5.4.3. People who have left a given institution
A site admin can filter users by the previous institution to which they were attached in order to find them more quickly.
Note
This is only of importance for a multi-tenanted Mahara instance with at least 2 institutions.
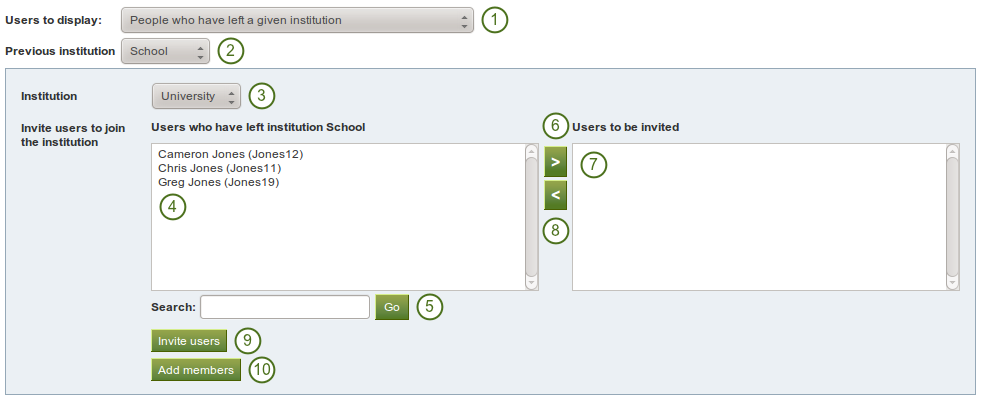
Invite or add users to become institution members when they had left a institution
- Users to display: Choose People who have left a given institution. “Left” is interpreted loosely, it also means when an institution administrator removed them from his institution.
- Previous institution: Choose the institution from which you want to add users. The users must have left it first to be listed here.
- Institution: Choose from the drop-down menu to which institution you wish to invite users. If there is only one other institution, its name will be displayed without the drop-down menu.
- Users who have left institution [name of the institution]: Select the users you wish to invite or add to the other institution.
- Search: You can also search for users in the search box if there are too many names listed.
- Add the users to the list Users to be invited by clicking on the right-arrow button .
- If you put a person into the box for users to be invited by accident, you can remove them from that list by clicking on them.
- Then click on the left-arrow button , and they are removed from the list.
- When you have all the members you wish to invite to this institution, click the Invite users button. The users receive a notification and can accept or decline the institution membership invitation.
- Alternatively, you can click the Add members button as site admin and add users directly to the institution without asking them first.
8.5.4.4. People who are already institution members
You can remove users from an institution, e.g. if they are no longer students at a school or university, but should still have an account on Mahara or when they are just switching institutions on the same Mahara instance.
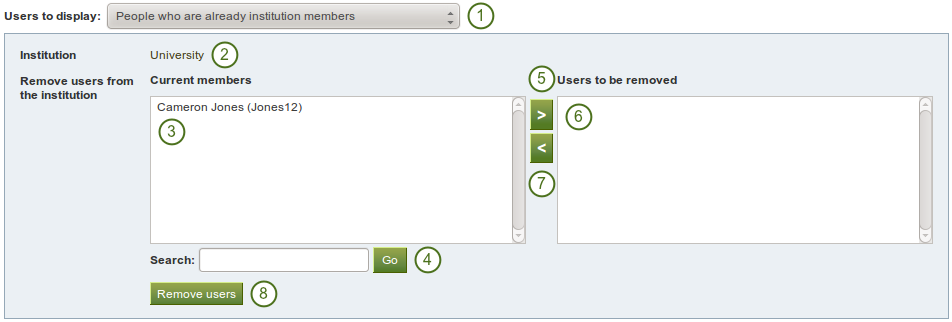
Remove users from an institution
- Users to display: Choose People who are already institution members.
- Institution: Choose from the drop-down menu which institution’s members you wish to display. If there is only one institution, its name will be displayed without the drop-down menu.
- Current members: Select the users you wish to remove from the institution.
- Search: You can also search for users in the search box if there are too many names listed.
- Add the users to the list Users to be removed by clicking on the right-arrow button .
- If you put a person into the box for users to be removed by accident, you can remove them from that list by clicking on them.
- Then click on the left-arrow button , and they are removed from the list.
- When you have all the members you wish to remove from your institution, click the Remove users button.
8.5.4.5. People who have been invited
A site admin can uninvite users from an institution.
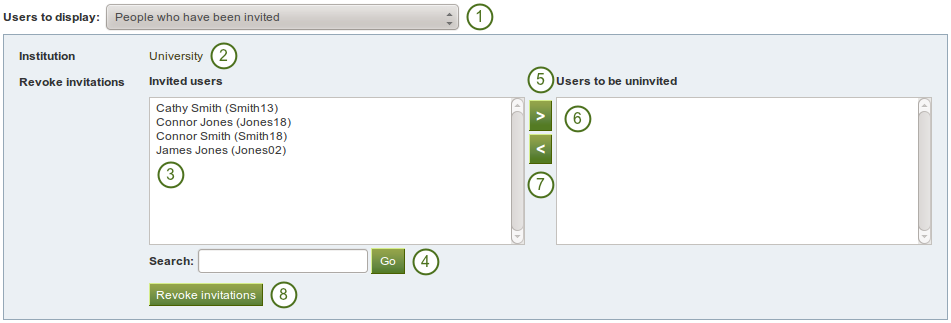
Uninvite users from joining your institution
- Users to display: Choose People who have been invited.
- Institution: Choose from the drop-down menu which institution’s members you wish to display. If there is only one institution, its name will be displayed without the drop-down menu.
- Invited users: Select the users you wish to univite from joining the institution.
- Search: You can also search for users in the search box if there are too many names listed.
- Add the users to the list Users to be uninvited by clicking on the right-arrow button .
- If you put a person into the box for users to be uninvited by accident, you can remove them from that list by clicking on them.
- Then click on the left-arrow button , and they are removed from the list.
- When you have all the users you wish to uninvite from the institution, click the Revoke invitations button.
8.5.5. Institution staff
You can give users staff rights in an institution in which they are members. The staff role will allow them to create course groups for example. This page allows you to do that in bulk for many users at once.
See also
You can also give staff rights on the user account settings page.
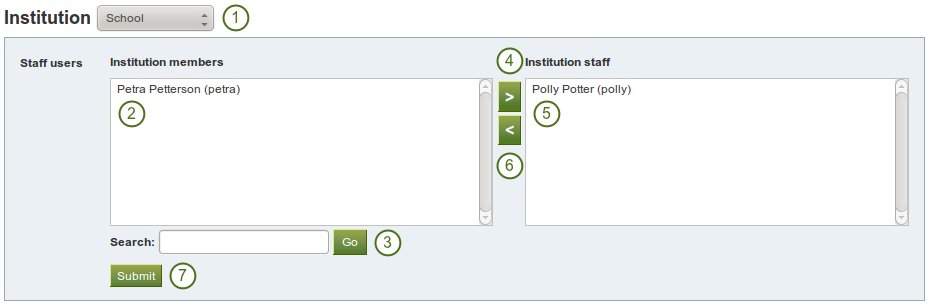
Give users institution staff rights.
- Institution: Choose the institution from the drop-down menu for which want to give staff rights to members.
- Institution members: Select the institution members who shall get staff rights.
- Search: You can also search for users in the search box if there are too many names listed.
- Add the users to the list Institution Staff by clicking on the right-arrow button .
- If you put a user into the institution staff list by accident or want to remove existing staff members and return them to normal membership status, select them.
- Then click on the left-arrow button , and they are removed from the list.
- When you have all the members you wish to have as staff in the institution, click the Submit button.
8.5.6. Institution administrators
You can give users admin rights in an institution in which they are members. The administrator role will allow them to manage users in their own institution. This page allows you to do that in bulk for many users at once.
See also
You can also give admin rights on the user account settings page.
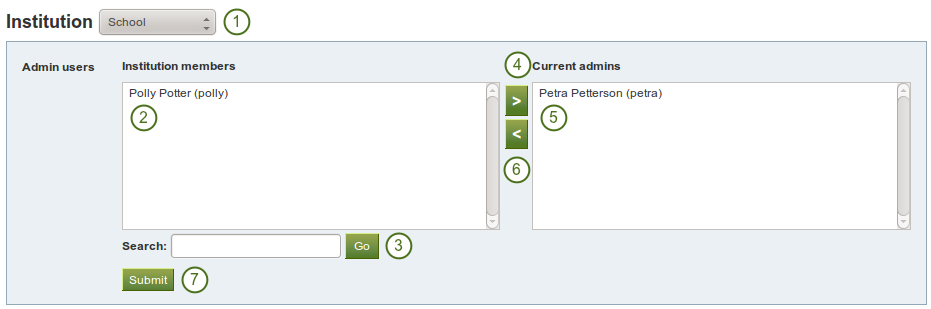
Give users institution admin rights.
- Institution: Choose the institution from the drop-down menu for which want to give admin rights to members.
- Institution members: Select the institution members who shall get admin rights.
- Search: You can also search for users in the search box if there are too many names listed.
- Add the users to the list Current admins by clicking on the right-arrow button .
- If you put a user into the institution admin list by accident or want to remove existing admin members and return them to normal membership status, select them.
- Then click on the left-arrow button , and they are removed from the list.
- When you have all the members you wish to have as admins in the institution, click the Submit button.
8.5.7. Institution pages
Site administration → Institutions → Pages
You can create pages for your entire institution. Although you could always create pages under a regular user account that other users could copy into their own portfolio, the advantage of institution pages is that new members in the institution can receive a copy upon joining the institution.

Create institution pages
- Institution: Click on the institution in the drop-down menu for which you want to create or edit institution pages.
- Search: If you have a lot of institution pages, you can search for a particular one by searching for it. You can search in the title, description and tags or only in tags.
- Click the Create page button to start a new institution page.
- Click the Copy page button to start a new page from a copy of an already existing one. This does not have to be an institution page but can be any page that you are allowed to copy.
- View an institution page that you have already created.
- Click the Edit button to change an existing institution page.
- click the Delete button to delete an institution page.
Note
Creating and editing an institution page is very similar to creating and editing a portfolio page. However, not all blocks are available when editing an institution page in the page editor due to the different context. Please refer to the overview of blocks for a list of all the blocks that you can use in an institution page.
8.5.8. Share institution pages
Site administration → Institutions → Share
You can see a list of all institution pages for a specific institution.

Share institution pages
- Institution: Select the institution from the drop-down menu for which you want to see the institution pages.
- Pages: All institution pages for that institution are listed here.
- Access list: View the access permissions for the pages.
- Click on the Edit access button
 to change the permissions of who can view and copy a page.
 - Click the Secret URL edit button to define a secret URL for a page.
Sharing an institution page is very similar to sharing a portfolio page. The only difference is that you can allow new institution members to receive a copy of an institution page immediately upon joining the institution.
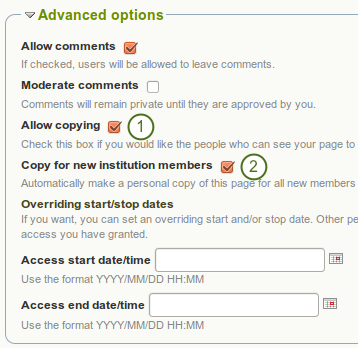
Setting for copying an institution page for new institution members
- When you clicked on the Edit access button on the Share page for institution pages, click on the check box Allow copying under Advanced options.
- Once you have put a check mark into that box, the line Copy for new institution members will appear and you can place a check mark into that box if you wish all new institution members to receive that page automatically.
- Click the Save button at the bottom of the page to save your changes.
8.5.9. Files
Site administration → Institutions → Files
The files area in an institution holds all files that are uploaded by institution administrators as institution files. The uploading process works like the one in the personal files area.
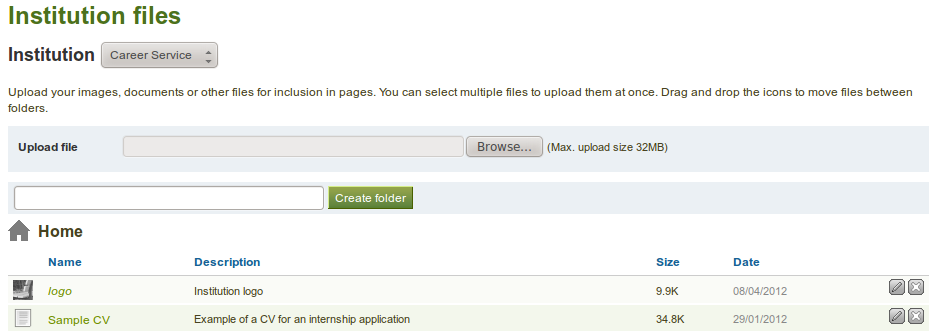
Institution files area
8.5.10. Pending registrations
Site administration → Institutions → Pending registrations
When you turn on Confirm registration for an institution in the institution settings, no user account in this institution is created without the administrator knowing it. If a user is rejected, no account is created. If the option Confirm registration is not turned on, a user account is created in the “No institution” institution but not in the actual institution.
Below follows the process for self-registration with Confirm registration turned on.
8.5.10.1. Self-register for the site
When users try to self-register for your institution, they must provide certain details.
Note
The fields for email, first and last name can appear in a different order if you have chosen to the advanced spam protection settings.
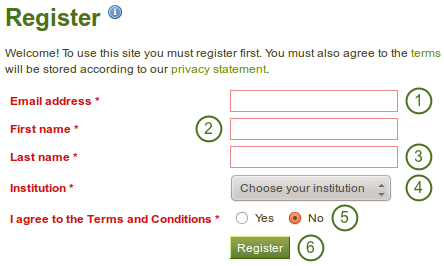
User self-registration for an institution
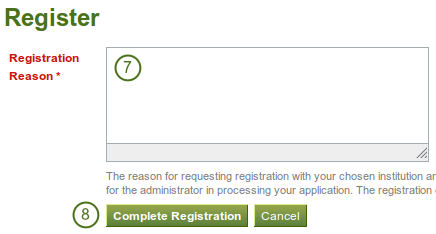
Provide a registration reason
- Email address: Provide your email address.
- First name: Type your first name.
- Last name: Provide your last name.
- Institution: Select the institution for which you want to register.
- If the site administrator requires users who self-register to agree to the terms and conditions, the “Registration agreement” of the site, you must read through them below and then make your choice.
- Click the Register button to be taken to the registration reason.
- Registration reason: You must provide a reason why you want to join this institution.
- Click the Complete registration button to receive an email to verify your email address. Or click the Cancel button to abort your registration.
- You will receive an email which includes a link to confirm your email address. You must click that link within 24 hours. If you do not, you will have to start the registration process again from the beginning.
- The administrators of that institution and the site administrator receive a notification about the pending registration.
8.5.10.2. Review pending registrations
As site administrator, you can view pending registrations for all institutions on the Pending registrations page in Site administration → Institutions → Pending registrations.
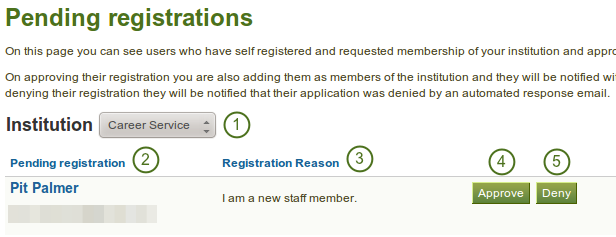
Pending registrations page in the Site administration
- Institution: Choose the institution for which you want to view the pending registrations.
- Pending registration: You see a list of all registration requests that include the names of the requesters and their email addresses.
- Registration reason: The reason for registration is displayed.
- Click the Approve button when you want to approve this registration request. You will have to confirm your approval on the next page. The person self-registering receives an email with a link to complete the registration process.
- Click the Deny button when you do not want this person to register for your institution and receive an account.
When you deny a person access to your institution, you can also provide a reason.
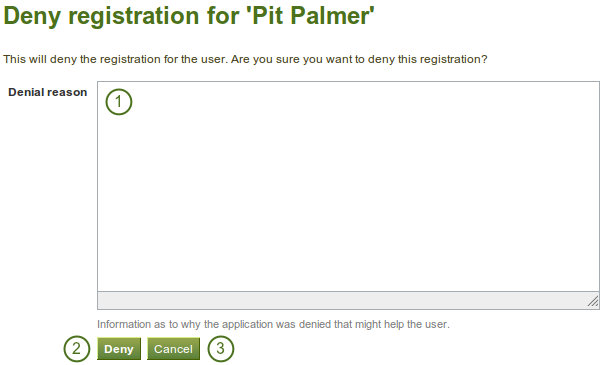
Reason for denying institution membership for a self-registering user
- Write your reason for denying institution membership that might help the person to know why you do not want to give them access.
- Click the Deny button to send a notification to the person’s email address with the reason for the denial.
- Click the Cancel button to be taken back to the page with all pending registrations.
8.5.10.3. Complete self-registration
When users are accepted as members in an institution via this process, they must still complete the registration process. This is necessary to provide information in all required fields besides a password and a username.

Complete the self-registration for an institution
- New username: Choose your new username. A default username is suggested, but you can provide a different one. If your suggested username is already taken, the system will let you know after you submit your information.
- New password: Choose a password for your account. This field is required.
- Confirm password: Re-type the new password. this field is required.
- Click the Submit button to complete your registration. You will be taken to your Dashboard.