3.4. 日誌
The Journal is a tool with which you can record your thoughts and experiences online. By adding your journal or individual posts of it to a page you can allow other users to place feedback and comments on it. Thus, you can create a dialogue with your audience.
デフォルトでは、すべてのユーザは1つの日誌を利用することができます。
ちなみに
If you wish to use more journals, e.g. to put your writing into categories so that you can make all posts from one category available in a page without having to select each journal entry, you can go to your Settings and select Enable multiple journals.
3.4.1. あなたの日誌設定を変更する
あなたのデフォルト日誌のタイトル (複数日誌を有効にしている場合、他のすべてのデフォルトタイトル) を変更すること、またタグと同様に説明を追加することができます。
- あなたの日誌の 設定 ボタンをクリックしてください。
- タイトルを変更します。
- あなたの日誌の説明を追加してください。必要に応じて、フォーマットすることができます。
- Add tags to your journal for easier searching later on. Tags that you have already used elsewhere are available to you under Show my tags.
- 設定を保存する をクリックしてください。
3.4.2. 日誌エントリを追加する
ページに置くまで、あなたが作成した日誌エントリすべてはプライベートとなります。次の3つのステップで日誌/日誌エントリを公開します:
- あなたのエントリを執筆して保存してください。
- In a page, you choose either the block for making the entire journal visible or just one post from a journal.
- You give those who shall see that page access to it.
When you are ready to post your journal entry:
- In your journal, click on New Entry.
- Provide a title for your journal entry.
- You must also write something in the Body. The visual editor helps you format your journal entry.
- Add tags to your entry to find it more easily later on. You can choose from tags that you have already used and / or enter new ones. Separate each tag with a comma. You may also choose tags from the ones that you have created previously.
- Add an attachment or more to your journal entry, e.g. pdf files associated with it or images. You can add files either from your files area or upload new ones directly onto your journal entry.
- Mark your entry as draft if you have not yet finished it. This is especially helpful if you have published your journal in a page, but do not want anybody to read this particular entry (yet). It is always visible to you, but not others.
- Allow comments if you want to receive them on the journal entry.
- Save your entry.
3.4.3. 日誌エントリの添付としてファイルを追加する
- ファイルを追加する ボタンをクリックして、あなたが添付したいファイルを ファイル エリアより 選択 してください。
- 代わりに、あなたは追加ファイルを アップロード することができます。
- あなたが添付したくないファイルを添付した場合、削除 することができます。
- 作業を完了した後、あなたは 閉じる ボタンをクリックすることができます。
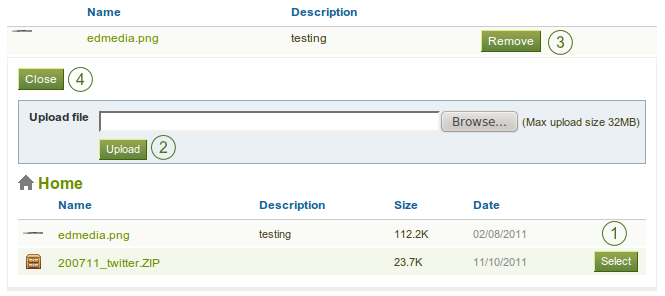
日誌エントリの添付
3.4.4. 日誌エントリにイメージを追加する
あなたは2つの方法で日誌エントリにイメージを追加することができます:
- オンライン上の他の場所で利用可能なイメージにリンクします。
- あなたがMaharaに保存しているイメージを使用します。
3.4.4.1. オンラインイメージにリンクする
あなたがオンラインで自由にアクセスできるイメージをこの日誌エントリに追加することができます。あなたのポートフォリオでこのイメージを使用できるパーミッションがあることを確認してください。
- ビジュアルエディタに移動して、イメージ ボタンをクリックしてください
 。
。 - Paste or type the image URL into the Image URL field. It must start with http:// or https://.
- Provide a brief description for your image.
- Select the alignment to the text for your image.
- Change the dimensions of your image if they are too large. If the image is recognised correctly, you have the image’s dimensions displayed.
- Add a border to your image if you wish to do so.
- Add more space around the image by adding a number in Vertical space and / or Horizontal space.
- Click the Insert button.
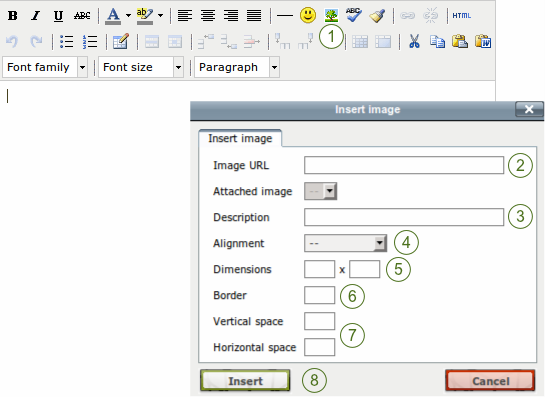
日誌記事内で外部イメージにリンクする
注釈
The dimensions are given in pixel. The first value is for the width and the second one for the height. Only change one of the dimensions and delete the value from the second to retain the original proportions of the image.
If you are not happy with how the image looks in your journal entry, select it (it will get little square handles) and click on the Image button again to make adjustments.
3.4.4.2. Maharaからイメージを追加する
- Attach the image to your journal entry.
- ビジュアルエディタに移動して、イメージ ボタンをクリックしてください 。
- Choose the image from the drop-down list Attached image.
- Provide a description for your image.
- Select the alignment to the text for your image.
- Change the dimensions of your image if they are too large. IF the image is recognised correctly, you have the image’s dimensions displayed.
- Add a border to your image if you wish to do so.
- Add more space around the image by adding a number in Vertical space and / or Horizontal space.
- Click on the Insert button.
If you are not happy with the alignment or the dimensions of the image in your journal entry, select it and click on the Image button again to make adjustments.