9.5. インスティテューション
管理 → インスティテューション
あなたはMaharaを マルチテナント インスタンスとして使用することができます。これは1つのMaharaインストレーションにいくつかの異なるインスティテューションが存在できることを意味します。これらの異なるインスティテューションのユーザすべては次のことができます:
- お互いにポートフォリオページを共有する
- それぞれのページにフィードバックを投稿する
- インスティテューションの境界を横断してグループで共同作業をする
管理 あなたは好きなだけ多くのインスティテューションをセットアップすることができます。インスティテューション管理者は自分のユーザおよびインスティテューションのみ管理することができます。サイト設定を変更することはできません。
異なるテーマ、異なるデフォルト設定および認証方法を使用するため、あなたの組織の異なる一部としてインスティテューションをセットアップすることもできます。
9.5.1. 概要
管理 → インスティテューション → インスティテューション (サイト管理者)
管理 → インスティテューション → 設定 (インスティテューション 管理者)
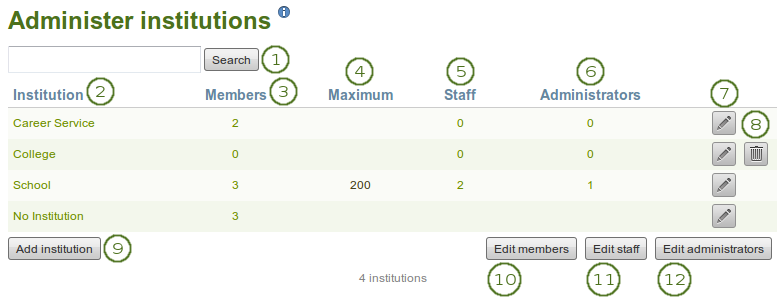
あなたにはこのMaharaインストレーションに存在するインスティテューションすべての概要が表示されます (サイト管理者)。またはインスティテューション管理者としてアクセスできるインスティテューションの概要が表示されます。
注釈
1つのインスティテューションのみ管理するインスティテューション管理者にはこのページは表示されませんが、自分のインスティテューション設定のみ表示されます。
- 検索: 名称を入力して、検索 ボタンをクリックすることにより、特定のインスティテューションを検索します。
- インスティテューション: インスティテューションはアルファベット順に一覧表示されます。あなたがインスティテューション名をクリックした場合、コンタクトページに移動します。
- メンバー: このインスティテューションの登録メンバー数です。
- 最大: このインスティテューションで許可される最大メンバー数です。
- スタッフ: スタッフ権限のあるインスティテューションメンバー数です。
- 管理者:インスティテューション管理者権限のあるインスティテューションメンバー数です。
- インスティテューション設定を変更するには*編集*ボタン|edit|をクリックしてください。
- インスティテューションを削除するには*削除*ボタン|delete|をクリックしてください。あなたはメンバーのいないインスティテューションのみ削除することができます。
- あなたが新しいインスティテューションを作成したい場合、インスティテューションを作成する ボタンをクリックしてください。このボタンはサイト管理者のみに表示されます。
- あなたがインスティテューションにメンバーを追加または削除したい場合、メンバーを編集する ボタンをクリックしてください。
- インスティテューションメンバーのスタッフ権限を付与または取り消したい場合、スタッフを編集する ボタンをクリックしてください。
- あなたがインスティテューションメンバーにインスティテューション管理者権限を追加または取り消したい場合、管理者を編集する ボタンをクリックしてください。
注釈
インスティテューション「インスティテューションなし」はデフォルトの「インスティテューション」です。Maharaサイト標準のため削除することはできません。
9.5.2. インスティテューションを追加する
注釈
サイト管理者のみインスティテューションを追加することができます。しかし、インスティテューションが存在する場合、インスティテューション管理者は多くの設定を変更することができます。
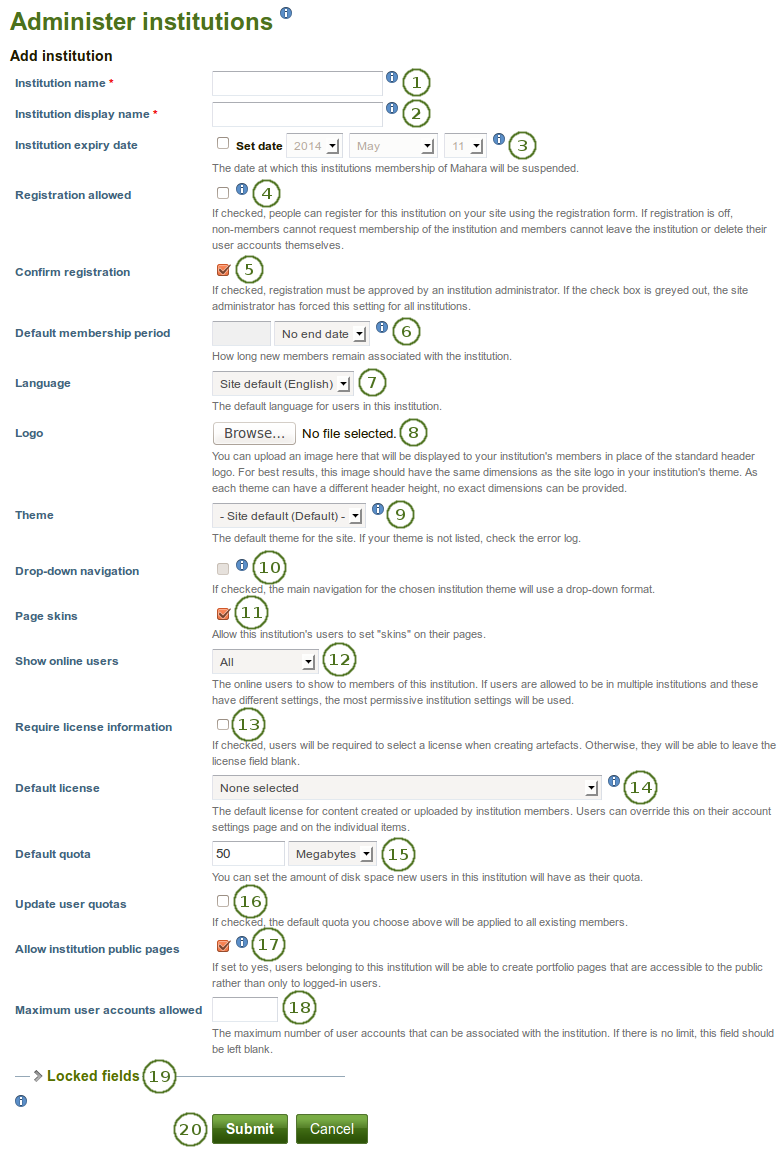
管理 → インスティテューション → インスティテューション の 追加 ボタンをクリックしてインスティテューションを追加したい場合、あなたは新しいインスティテューションに関して基本的な情報を提供する必要があります。インスティテューション名*を*除いて、あなたは後ですべての設定を変更することができます。
インスティテューション名: これは必須フィールドです。このインスティテューションのデータベース内のユニークな識別子です。数字および記号を含まない1つの単語にしてください。
インスティテューション表示名: このフィールドは必須入力です。サイトをとおして、すべてのユーザがこのインスティテューションを識別するための名称です。
Institution expiry date: Tick the Set date checkbox if you want to give this institutuion a specific expiry date. You can then select the year, month and day from the drop-down menus. Institutions do not expire by default.
- あなたがこのインスティテューションの有効期限を設定した場合、インスティテューションの有効期限の警告時間に達した時点でインスティテューション管理者にこのインスティテューションの有効期限が近付いている旨の通知が送信されます。
- If the auto-suspend expired institutions option is set, then once the expiry date has been reached, this institution will be automatically suspended, and users of this institution will no longer be able to log in.
- The warning time for institution expiry and the auto-suspend expired institutions options can be found in the institution settings under Administration → Configure site → Site options.
Registration allowed: Check this box when you want to allow self-registration of new users. As institution administrators, you will be asked to confirm that users can join your institution. If you decline, their new account will be associated with 「No institution」 unless you have the Confirm registration option clicked. When you do not allow registration, nobody can register a new account, ask to join your institution or leave it without your permission.
登録を確認する: あなたが管理者の登録承認なしに新しいアカウントを作成しないようコントロールしたい場合、このチェックボックスをチェックしてください。新しいユーザが登録された場合、あなたには 登録保留 通知が送信されます。
Default membership period: You can set how long users will remain associated with this institution per default. Choose an option from the drop-down menu and then specify the number of days, weeks, months or years. After this length of time, the users will be removed from the institution. Users will receive a notification before this time reminding them that they will be removed soon. However, that does not mean that they will lose their account. They will still have that and be associated with 「No institution」.
言語: :index:`あなたのインスティテューションのデフォルトで使用する言語 <single: デフォルトインスティテューション言語>`をドロップダウンメニューから選択してください 。
注釈
これはデフォルト設定です。あなたのインスティテューション内のユーザは:ref:`アカウント設定 <general_account_options>`で自分の言語を選択することができます。
ロゴ: あなたは標準ヘッダロゴの代わりにインスティテューションメンバーに表示される イメージをアップロード することができます。
Theme: Use the drop-down menu to choose the theme that you wish to use for this institution. All pages in that institution will receive that theme. When users from other institutions view portfolio pages that were created in this institution, they will see this institution’s theme on these pages. If Site default is selected, when a site administrator changes the site default theme, the theme for the users of this institution will change, too. You can install more themes in the theme folder on the server. Check out the community-contributed themes. If users are allowed to have page themes, these pages are not affected by theme changes. Mahara also has a configurable theme which allows you to create a theme on the fly.
ドロップダウンナビゲーション: :index:`あなたのインスティテューションでタブナビゲーションの代わりドロップダウンナビゲーションを使用したい場合、`このチェックボックスをチェック<single: インスティテューション設定ドロップダウンナビゲーション>`してください。
ページスキン: :index:あなたのインスティテューションメンバーが ページスキン を使用できるようにしたい場合、このチェックボックスをチェックしてください <single: インスティテューションスキン設定>。
注釈
この機能はあなたのMaharaの config.php ファイルに次のパラメータが追加された場合のみ使用できます: $cfg->skins = true;
Show online users: If the site administrator allowed the 「Online users」 side block, you can decide which group of users you want to have displayed for this institution:
- なし: サイドブロックはインスティテューションメンバーに表示されません。
- インスティテューションオンライン: インスティテューションメンバーのみがサイドブロック内に表示されます。
- すべて: サイトのユーザすべてがサイドブロックに表示されます。
Require license information: If you check this box, your institution members will need to choose a license for each artefact they upload or create. They can set a default license in their account settings. You only see this option if the site administrator turned License metadata in the general site settings.
Default license: You can choose a default license for your institution members』 content. They can overwrite this default license in their account settings. You only see this option if the site administrator turned License metadata on in the general site settings. If the site administrator allowed custom licenses, you can enter one using the drop-down menu option 「Other license (enter URL)」. This license can then also be used by your institution members.
注釈
どのデフォルトラインセンスを選択すれば良いか分からない場合、あなたの組織の弁護士または著作権弁護士に相談してください。
デフォルトクオータ: あなたはこのインスティテューションの新しい登録ユーザのファイルクオータ合計を設定することができます。
ユーザクオータを更新する: この設定を有効にした場合、あなたが上で選択したデフォルトクオータが既存のインスティテューションすべてのメンバーに適用されます。
Allow institution public pages: Put a check mark into this box if you want to allow users belonging to this institution to create portfolio pages that are accessible to the public rather than only to logged-in users. If you allow public pages, users can also create secret URLs for their pages. Otherwise they cannot.
許可される最大ユーザアカウント: このインスティテューションに関して、作成できる最大ユーザアカウント数を指定してください。このフィールドを空白にした場合、アカウント数に制限はありません。
注釈
 When the maximum number of accounts has been reached and another user tries to register for the institution, the site administrator as well as the institution administrator for that institution receive a notification. That allows them to take further steps.
Locked fields: Put a check mark into each checkbox for which users are not allowed to change the value. Disabled checkboxes are for profile fields which are locked in the institution settings for 「No institution」. These profile fields are locked at the site level and cannot be unlocked for individual institutions.
注釈
氏名および表示名のようなプロファイルフィールドをロックすることにより、インスティテューションが実名でユーザを特定してニックネームを許可したくない場合に有効です。
あなたの変更を保存して、このインスティテューションを作成するには 送信 ボタンをクリックしてください。このインスティテューションの作成を中止するには キャンセル ボタンをクリックしてください。
9.5.2.1. インスティテューションロゴを変更する
You can upload a logo to any theme replacing the standard logo that comes with the theme. For best results, this image should have the same dimensions as the site logo in your institution’s theme. As each theme can have a different header height, no exact dimensions can be provided.
注釈
標準テーマでは「Primary School」テーマのみロゴの高さを設定する必要があります。他のテーマはさらに柔軟です。
- ロゴ: あなたのコンピュータからインスティテューションテーマで使用したいロゴをアップロードしてください。
- あなたが変更を送信した後、ヘッダのロゴが置換されます。また、あなたがアップロードしたロゴを表示するため、設定にも表示されます。
- ロゴを削除する: あなたが標準ロゴに戻したい場合、このチェックボックスをチェックして、ページ最下部の 送信 ボタンをクリックしてください。
注釈
There is a special logo that can be picked up by Facebook in order not to display a random image from the site. This logo must be placed into the theme folder. Mahara’s Raw theme has the Mahara logo, but it could be changed to a different one in another theme. For more information see the tracker item.
9.5.2.2. 設定可能なテーマを使用する
If you do not want to use one of the built-in themes of Mahara or one of the community-contributed themes, you can either build your theme from scratch or use the configurable theme in conjunction with the logo upload.
注釈
The configurable theme is only a display theme. That means that users of the institution in which it is in use see the theme applied to the site and their pages. However, when users from another institution browse the portfolio pages of users from this institution, they do not see the configurable theme, but their own theme.
あなたは直接 インスティテューション ページから設定可能なテーマを変更することができます。
In order to change any of the colours, either provide the hexadecimal color code or choose the colour from the colour picker that becomes available as soon as you click in one of the colour fields.
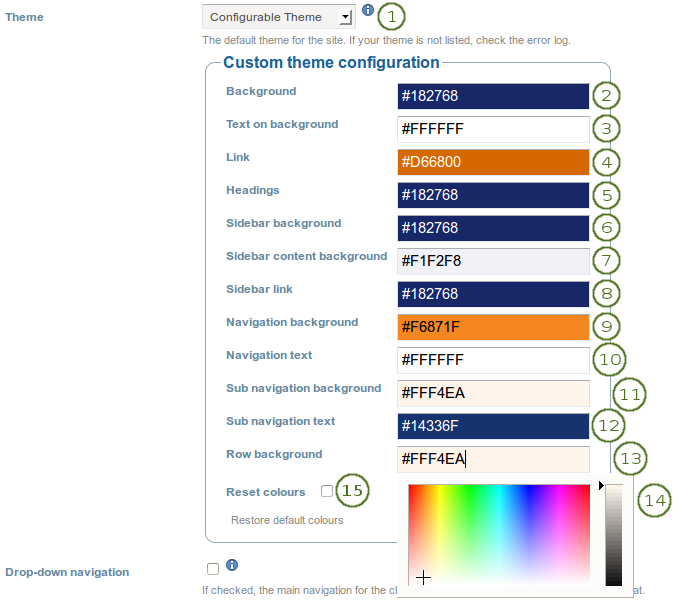
- テーマ: ドロップダウンメニューから「設定可能なテーマ」を選択することにより、「カスタムテーマ設定」オプションが表示されます。
- 背景: サイト全体の背景色です。例) ヘッダおよびフッタに表示されます。
- 背景テキスト: 背景色に表示されるテキストです。例) ヘッダおよびフッタ
- リンク: サイドバーまたはナビゲーション以外のページ上のリンク色です。
- ヘッディング: サイドバーを除くすべてのヘッディングのヘッディング色です。
- サイドバー背景: サイドバーの背景色です。常に白色であるため、サイドバーのヘッディング色との良いコントラストにしてください。
- サイドバーコンテンツ背景色: サイドバー内部の色です。
- サイドバーリンク: サイドバー内のリンク色です。
- ナビゲーション背景: トップナビゲーションバーの色です。
- ナビゲーションテキスト: メインナビゲーションバーのテキストおよびリンク色です。
- サブナビゲーション背景: 2番目のナビゲーションおよびメインナビゲーションバーのハイライトセクションの色です。
- サブナビゲーションテキスト: 2番目のナビゲーションおよびメインナビゲーションバーのハイライトセクションのテキストおよびリンク色です。
- 行背景色: 行が表示される場所での背景色です。
- カラーピッカ: あなたの新しい色を決定するため、16進の色コードを直接カラーフィールドに入力するか、プラスおよび矢印を使用してカラーピッカから色を選択してください。
- 色をリセットする: あなたが設定可能テーマを白紙状態にしたい場合、このチェックボックスをチェックして設定可能テーマのオリジナル色に戻してください。
- あなたの変更を適用するにはページ最下部の 送信 ボタンをクリックしてください。
注釈
インスティテューションメンバーとしてのログイン時にテーマの変更をすぐに確認できない場合、あなたはブラウザのキャッシュをクリアする必要があります。
上の設定可能なテーマオプションが参照するサンプルページ数です。
9.5.3. インスティテューションを編集する
管理 → インスティテューション → インスティテューション → インスティテューションの横にある 編集 ボタンをクリックしてください。
Once you have created your institution, you can edit its settings, suspend or delete the institution. You will have to choose at least one authentication method for this institution so that user accounts can be created.
注釈
サイト管理者はインスティテューションの認証方法を追加、編集および削除すること、またインスティテューションを利用停止することのみできます。メンバーが存在しない場合のみインスティテューションを削除することができます。
あなたのインスティテューションに複数の認証方法を追加することができます。これによりユーザは様々なエントリポイントを許可されることになります。あなたは少なくとも1つの認証方法をセットアップする必要があります。そうでない場合、このインスティテューションに誰もログインできないようになります。
あなたがIMAP、LDAP、SAMLまたはXML-RPC認証方法を使用するにはサーバにこれらの拡張モジュールをインストールする必要があります。
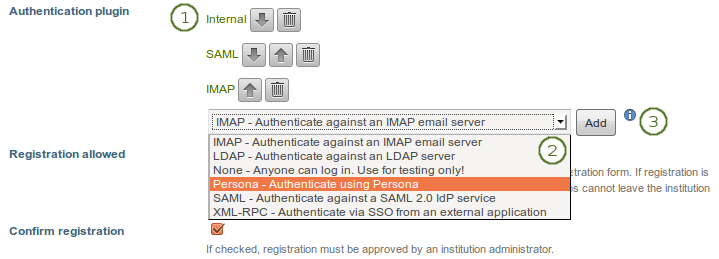
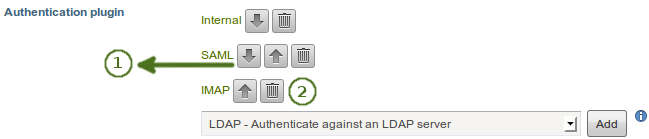
- あなたのインスティテューション作成後、設定には追加オプション 認証プラグイン が含まれます。あなたにはこのインスティテューションですでに使用されている認証方法が一覧表示されます。
- 利用可能な認証方法をドロップダウンメニューから選択してください:
- IMAP: ユーザアカウントは ref:`IMAPサーバ <imap>`によって認証されます。これは最もメンテナンスされていない認証プラグインであり、使用されることも稀です。
- 内部: ユーザアカウントは Maharaによって作成されます。パスワードおよびユーザ名は内部データベースに保持されます。これは新しいインスティテューションのデフォルト認証方法です。
- LDAP: ユーザアカウントは :ref:`LDAPサーバ<ldap>`に対して認証されます。
- なし: 誰でもユーザ名およびパスワードを選択してログインすることができます。これはテストのみに使用してください。
- ペルソナ: ユーザアカウントは ペルソナ に対して認証されます。
- SAML: ユーザアカウントが登録されている SAML 2.0アイデンティティプロバイダが必要です。
- XML-RPC: これは:ref:`MaharaからMoodleまたは他のMaharaに接続するために使用される<mnet>`認証方法です。
- 追加する前に外部認証方法の設定画面を表示するには 追加 ボタンをクリックしてください。
警告
「なし」認証方法を選択する場合には注意してください。これは誰でもログインできるようになります。テストの目的のみで使用してください。
9.5.3.1. IMAP認証
あなたのユーザのログイン情報をIMAPサーバより取得する場合、この認証方法を使用することができます。
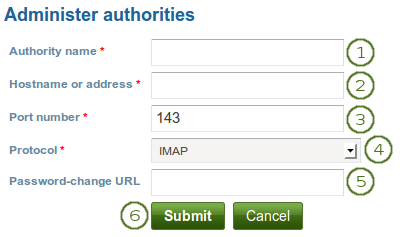
- Authority name: Enter a descriptive name to help you identify this authority. Preferably, choose a short name. This field is required.
- ホスト名またはアドレス: URLの形でホスト名を指定してください。このフィールドは必須入力です。
- ポートナンバー: あなたのIMAPサーバが到達することのできるポートナンバーを指定してください。デフォルトは143です。このフィールドは必須入力です。
- プロトコル:あなたが使用しているIMAPプロトコルをドロップダウンメニューから選択してください。この設定は必須入力です:
- IMAP
- IMAP / SSL
- IMAP / SSL (自己署名証明書)
- IMAP / TLS
- パスワード変更URL: あなたのユーザが集約された1箇所でのみパスワードを変更できる場合、ここにURLを入力してください。
- この認証方法を有効にするには 送信 ボタンをクリックしてください。あなたの変更を中止するには キャンセル ボタンをクリックしてください。
9.5.3.2. LDAP認証
あなたのユーザが通常使用しているログイン名およびパスワードでログインできるようこの認証方法をLDAPサーバでの認証に使用します。
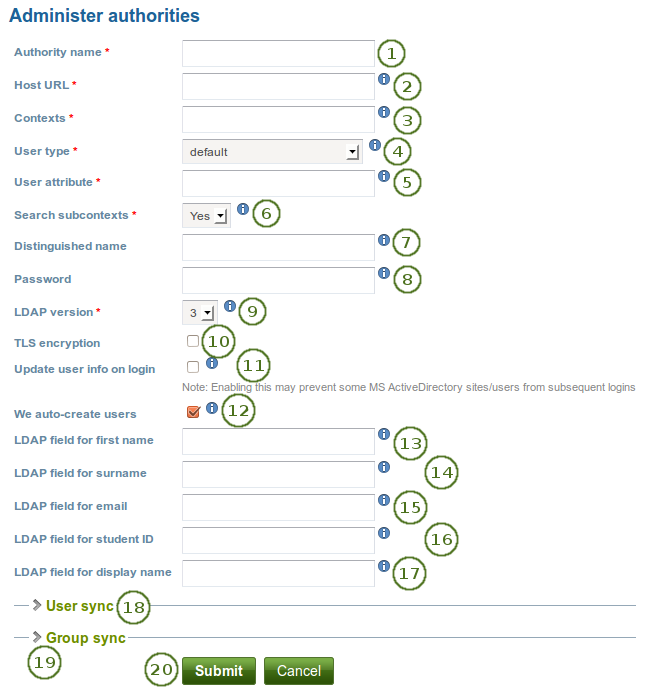
- Authority name: Enter a descriptive name to help you identify this authority. Preferably, choose a short name. This field is required.
- ホストURL: URLフォームでホストを指定してください。例)
ldap://ldap.example.com フェイルオーバーをサポートするには複数のサーバを ; で分離してください。このフィールドは必須入力です。
- コンテクスト: ユーザが配置されるコンテクスト一覧です。異なるコンテクストは ; で分離してください。例)
ou=users,o=org;ou=other,o=org このフィールドは必須入力です。
- ユーザタイプ: ユーザをどのようにLDAPディレクトリに保存するかドロップダウンメニューから選択してください。このフィールドは必須入力です。あなたは次から選択することができます:
- Novell Edirectory
- posixAccount (rfc2307)
- posixAccount (rfc2307bis)
- sambaSamAccount (v. 3.0.7)
- MS Active Directory
- デフォルト
- ユーザ属性: ユーザ検索時に使用する属性を入力してください。通常、「cn」です。このフィールドは必須入力です。
- サブコンテクストを検索する: あなたがサブコンテクスト内でもユーザを検索したい場合、「Yes」を選択してください。
- Distinguished name: If you want to use bind-user to search users, specify it here. It should look something like
cn=ldapuser,ou=public,o=org. Leave this blank for anonymous bind.
- パスワード: 「識別名 (DN:Distinguished Name)」のパスワードを入力してください。
- LDAPバージョン: あなたが使用するLDAPバージョンをドロップダウンメニューから選択してください。これは必須フィールドです。
- TLS暗号化: あなたがこの暗号化機能を使用したい場合、このチェックボックスをチェックしてください。
- Update user info on login: Check this box to update the first name, last name and email address with the corresponding LDAP values at each login. Enabling this option may prevent some MS ActiveDirectory sites / users from subsequent Mahara logins.
- こちらでユーザを自動作成する: ユーザが認証に成功したにも関わらずアカウントがまだ作成されていない場合、Maharaに自動的にアカウントを作成させるにはこのチェックボックスをチェックしてください。
- 名のLDAPフィールド: ユーザの名を含むLDAPレコードのフィールド名を入力してください。
- 姓のLDAPフィールド: ユーザの姓を含むLDAPレコードのフィールド名を入力してください。
- メールのLDAPフィールド: ユーザのメールアドレスを含むLDAPレコードのフィールド名を入力してください。
- 学生番号のLDAPフィールド: ユーザの学生番号を含むLDAPレコードのフィールド名を入力してください。
- 表示名のLDAPフィールド: ユーザの表示名を含むLDAPレコードのフィールド名を入力してください。
- ユーザ同期: あなたのユーザcronをジョブで同期して追加情報を更新するかどうか、:index:`決定 <single: LDAPユーザ同期>`してください。
- グループ同期: <single: LDAPグループ同期> あなたのLDAPグループに基づきMahara内にグループを自動的に作成するかどうか指定してください。
- この認証方法を有効にするには 送信 ボタンをクリックしてください。あなたの変更を中止するには キャンセル ボタンをクリックしてください。
9.5.3.2.1. LDAPユーザ同期
ユーザアカウントが自動的に作成されるようあなたのLDAP認証をセットアップすることができます。ユーザアカウントの削除に関して十分に配慮してください。
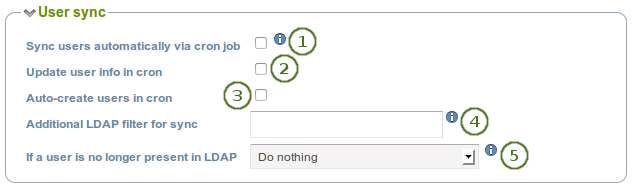
Sync users automatically via cron job: Enable this setting to activate a task in the cron which will automatically create and/or update user accounts based on records in the LDAP server.
注釈
By default, this cron task will execute once daily at midnight (server time). Edit the record in the 「auth_cron」 table or use the optional command-line script supplied at htdocs/auth/ldap/cli/sync_users.php if you wish to schedule it to run at other times or with other settings.
cronが動作していない場合、この設定は影響を及ぼしません。セットアップに関して`インストレーションガイド <http://wiki.mahara.org/System_Administrator%27s_Guide/Installing_Mahara>`をご覧ください。
cronでユーザ情報を更新する: LDAPレコードの変更時、あなたがcronでユーザ情報を更新したい場合、このチェックボックスをチェックしてください。
cronでユーザを自動作成する: あなたのLDAPディレクトリからアカウントを自動的に取得して新しいユーザを作成したい場合、この設定を有効にしてください。
Additional LDAP filter for sync: Provide an LDAP filter here, and the sync will only see users in LDAP who match that filter. Example: Example: uid=user*.
警告
Use this setting with caution if you have auto-suspend or auto-delete enabled, as doing so will cause all user accounts in your institution which do not match the filter to be suspended or deleted.
If a user is no longer present in LDAP: Choose from the drop-down menu what you want to do if users are no longer in your LDAP directory:
何もしない: ユーザはアカウントを保持します。これは推奨設定です。
Suspend user’s account: The user’s account will be suspended. The user will no longer be able to log in, and their content and pages will not be viewable. However, none of their data will be deleted, and the user can be un-suspended by the cron when their LDAP record reappears, or manually by an administrator.
ユーザアカウントおよびコンテンツすべてを削除する:ユーザアカウントがコンテンツおよびページと一緒に削除されます。
警告
ユーザアカウントが削除された場合、データはサーバから完全に削除されます。元に戻すため、この操作にはサーバのバックアップが必要です。
9.5.3.2.2. LDAPグループ同期
ユーザアカウントが自動的に作成されるようあなたのLDAP認証をセットアップすることができます。ユーザアカウントの削除に関して十分に配慮してください。
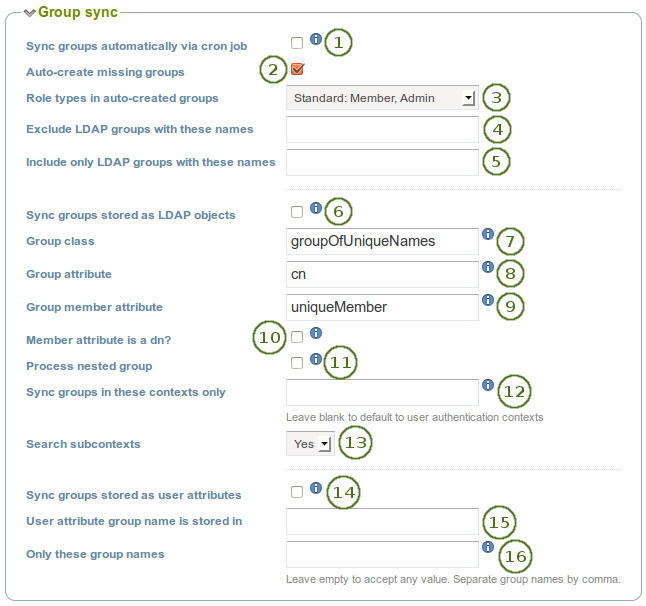
Sync groups automatically via cron job: Enable this setting to activate a task in the cron which will automatically create and/or update groups and their membership based on records in the LDAP server.
注釈
By default, this cron task will execute once daily at midnight (server time). Edit the record in the 「auth_cron」 table or use the optional command-line scripts supplied in htdocs/auth/ldap/cli/ if you wish to schedule it to run at other times or with other settings.
Note: You will also need to activate the 「Sync groups stored as LDAP objects」 and / or 「Sync groups stored as user attributes」 settings in order for groups to be synced.
Group members can be removed as well as added by this setting. If a group is no longer found in the LDAP records, all of its members will be removed from the group.
cronが動作していない場合、この設定は影響を及ぼしません。セットアップに関して`インストレーションガイド <http://wiki.mahara.org/System_Administrator%27s_Guide/Installing_Mahara>`をご覧ください。
Auto-create missing groups: Tick this checkbox if you want to have new groups in your LDAP directory created automatically in Mahara.
自動作成グループのロールタイプ: 自動作成グループにおいてユーザに割り当てられるロールを決定してください。
- コース: メンバー、チューターおよび管理者
- 標準: メンバーおよび管理者
**これらの名称のLDAPグループを除く*: あなたがグループを自動作成したい場合、しかし、すべてのグループを含みたいわけではない場合、いくつかのグループを除外することができます。ここにそのグループ名を入力してください。
Include only LDAP groups with these names: If you want to restrict the creation / synchronisation of your groups to a specified number, list them here.
Sync groups stored as LDAP objects: Tick this checkbox if your groups are stored as standalone records in LDAP. Example:
dn: cn=languagestudents,ou=groups,dc=mahara,dc=org
objectClass: groupOfUniqueNames
cn: languagestudents
uniqueMember: uid=user1,dc=mahara,dc=org
uniqueMember: uid=user2,dc=mahara,dc=org
uniqueMember: cn=frenchclass,ou=groups,dc=mahara,dc=org
グループクラス: ここでグループに割り当てられることを期待されるLDAPオブジェクトクラスを入力してください。
グループ属性*: グループ名にマップするLDAP属性を入力してください。通常、「cn」です。
グループメンバー属性: グループメンバーが保存されるLDAP属性を入力してください。ほとんどの場合、「uniqueMember」です。
Member attribute is a dn? Tick this checkbox if if each entry in the 「Group member attribute」 field is a 「distinguished name」. Disable this setting if each entry in 「Group member attribute」 field is a username only.
Process nested group: Tick this checkbox if your groups can contain other groups as members. If enabled, the sync process will recursively include the members of these nested groups into the parent group.
注釈
The process will safely cease recursing if it detects a circular reference.
Sync groups in these contexts only: List the contexts where groups are located. Separate different contexts with a semicolon ;. Example: ou=groups,o=org;ou=other,o=org.
注釈
If this field is left empty, the group sync cron will fall back to using the same list of contexts as the 「Contexts」 setting for where users are located.
サブコンテクストを検索する: 同期にサブコンテクストを含む場合、この設定を有効にしてください。
Sync groups stored as user attributes: Tick this checkbox if each LDAP user record has an attribute which indicates a group the user should be in. This setting will cause the LDAP sync cron to create a group for each unique value in the specified user attribute (or in those listed in the 「Acceptable group names」 field), and place each user in the appropriate group (or groups, if they have multiple values for the attribute).
User attribute group name is stored in: Provide the LDAP attribute in which the name is stored.
Only these group names: When creating groups based on user attributes, only create groups with these names. This will not affect groups created via the 「Sync groups stored as LDAP objects」 setting, if it is active.
9.5.3.3. ペルソナ認証
Persona is a project of the Mozilla Identity Team. It allows people to have one login across multiple sites without having to divulge the password to these sites. All they need to log in to a Persona-enabled site is their email address.
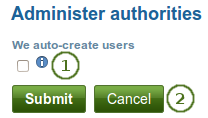
- We auto-create users: Place a check mark in this box if you wish to allow new users to register for your institution automatically using their Persona credentials.
- この認証方法を有効にするには 送信 ボタンをクリックしてください。あなたの変更を中止するには キャンセル ボタンをクリックしてください。
警告
The normal registration work flow and the potential confirmation of accounts does not come into play when you allow the auto-creation of accounts as this is an external authentication that is then considered to be trusted. We recommend you do not use the auto-creation of accounts unless you a sure that only trusted people can register. Otherwise, anybody with a Persona account could register on your site. This option could be used when your site is only available in an intranet or you want to allow anybody to register.
Users with a Persona account can go through the regular work flow of registering their accounts if the administrator allowed the registration for their institution (and requires the confirmation of accounts).
注釈
If users have internal accounts and later link the email addresses they use to a Persona account, they can also log in with their Persona credentials when the site administrator allowed the Persona authentication in their institution.
9.5.3.4. SAML認証
Choose this authentication method for your institution when you have a SAML 2.0 Identity Provider Service set up for your organisation that allows you to use the same login for multiple applications.
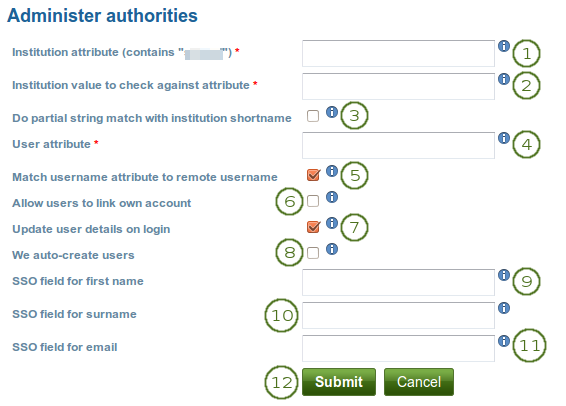
Institution attribute (contains 「…」): Enter the attribute that will be passed from the Identity Provider (IdP) that shows which institution the user belongs to. This usually directly correlates to the LDAP attribute (the signin service of the IdP), e.g. eduPersonOrgDN. This field is required.
Institution value to check against attribute: Enter the value that will be checked against the institution attribute value as passed from the IdP. If the institution regex checkbox 「Do partial string match with institution shortname」 is selected, this value can be a regular expression that will be used to check against the institution attribute value. This field is required.
Do partial string match with institution shortname: Check this checkbox to treat the value in 「Institution value to check against attribute」 like a regular expression.
ユーザ属性: ユーザ名が含まれるIdPから渡される属性名を入力してください。このフィールドは必須入力です。
Match username attribute to remote username: This box is selected by default and needs to stay selected. It matches the user attribute value to the remote username field assigned to a given user (not the internal Mahara username). Only if you have the experimental feature of 「usersuniquebyusername」 turned on can you deselect this checkbox. We do not recommend this unless you are very experienced and have control over all applications in question.
警告
By default, SAML authentication instances have the 「Match username attribute to remote username」 setting selected. If that setting were unchecked, someone with control over any SAML identity provider could gain control over any user account on that Mahara site by setting the username attribute accordingly. In other words, administrators of one institution could control users in other institutions. You would only be able to deselect this setting if you set the 「usersuniquebyusername」 variable to 「true」 in config.php. However, you should not do that on a Mahara instance to which multiple SAML providers connect and you are not in control of all usernames that are created.
Allow users to link own account: Check this box if you want to allow users to link their own internal Mahara account to the authenticated SAML account. This depends on the 「Match username attribute to remote username」 option being enabled. If this setting is turned on when users try to log in via SSO and their username as well as the email for example match an internal username, they can link their accounts. That would allow them to log in either via the SSO login or via the regular login box into the same account and avoid account duplication.
ログイン時、ユーザ情報を更新する: この設定を有効にした場合、それぞれのログイン時に渡された該当するIdP値により、姓名およびメールアドレスが更新されます。
We auto-create users: This is unselected by default and needs to stay unchecked if the option 「Match username attribute to remote username」 is enabled. Check this box to create user accounts on Mahara automatically when a user authenticates successfully but does not yet have an account. Only if you have the experimental feature of 「usersuniquebyusername」 turned on can you select this checkbox. We do not recommend this unless you are very experienced and have control over all applications in question.
SSOフィールド名: ユーザの名が含まれるIdPから渡される属性名を入力してください。
SSOフィールド姓: ユーザの姓*が含まれるIdPから渡される属性名を入力してください。
メールのSSOフィールド: ユーザのメールアドレスが含まれるIdPから渡される属性名を入力してください。
この認証方法を有効にするには 送信 ボタンをクリックしてください。あなたの変更を中止するには キャンセル ボタンをクリックしてください。
9.5.3.5. XML-RPC/MNet 認証
Use the XML-RPC authentication for connecting a Mahara instance to a Moodle or an other Mahara installation for sharing login information. With Moodle 2 that does not only mean that you can log in to Mahara via Moodle, but also that you can transfer certain activities into your Mahara portfolio from Moodle.
あなたが何件のインスティテューションをセットアップしているとしても、Moodleサイトは1回のみMaharaに接続することができます。MaharaのXML-RPC認証インスタンスすべては独自のリモートwwwrootを持つ必要があります。また、単一のインスティテューションに関連付けられる必要があります。
注釈
この認証方法を使用するにはあなたは ネットワーキング を有効にする必要があります。
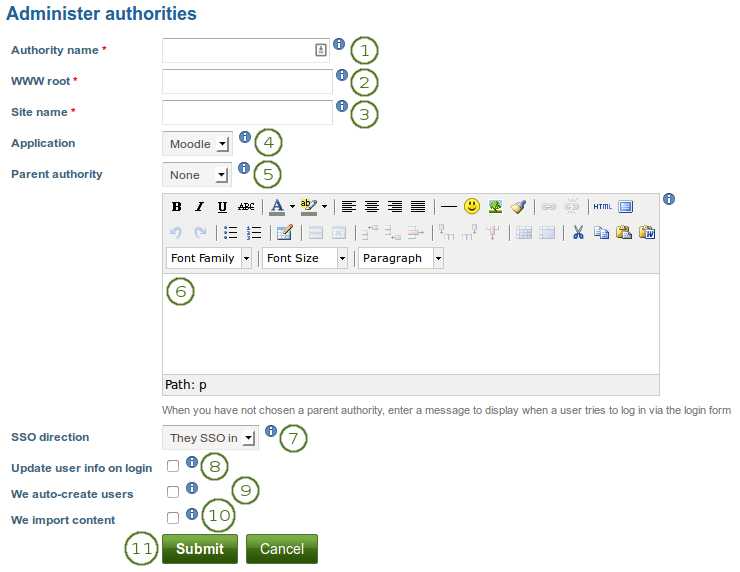
Authority name: Enter a descriptive name to help you identify this authority. Preferably, choose a short name. This field is required.
WWW root: Enter the web address of the root of the remote application, e.g. http://example.com. This field is required. If your WWW root requires a specific port, enter the port number that the remote application is listening at. You probably will not need to add a port unless you are connecting to a https service or your remote application is running on a non-standard port.
サイト名:あなたのユーザがリモートサイトを識別するためにサイト名を入力してください。あなたがSSOを有効にしている場合、リモートサイトとのセッションを開始するためにユーザはサイト名をクリックすることができます。このフィールドは必須入力です。
アプリケーション: もう一方のアプリケーションを選択してください。あなたは「Mahara」または「Moodle」を選択することができます。
Parent authority: If you set a parent authority from the already existing authentication methods, users will be able to log in using that authority as well as MNet. For example, you could set up SAML authentication and have that be the parent of this MNet authority. That means that users will be able to log in by clicking the SSO login button using their SSO credentials as well as via MNet from their Moodle. You do not have to set a parent authority. If you do not, users using MNet will only be able to access Mahara via MNet, i.e. log in to Moodle or the other Mahara first.
Wrong login box message: Enter a message to display when a user tries to log in via Mahara’s login form but is not allowed to if you have not set up a parent authority.
SSOの方向: あなたのSSOの方向をドロップダウンメニューから選択してください:
- They SSO in: Enable this option to allow users from the remote site to roam to your Mahara site without having to enter their username and password. This is the most commonly used setting.
- We SSO out: Enable this option to allow your users to roam from Mahara to the remote site without having to enter their username and password there.
Update user info on login: Enable this option to bring over user data from the remote site upon login and update your Mahara user record with any changes. The following fields, when filled in on Moodle, are filled in Mahara:
- 名 (常に継承)
- 姓 (常に継承)
- メールアドレス (常に継承)
- プロファイル写真
- 説明 (Maharaのイントロダクション)
- 都道府県
- 国
- 言語
- HTMLエディタ設定
こちらでユーザを自動作成する: ユーザが認証に成功したにも関わらずアカウントがまだ作成されていない場合、Maharaに自動的にアカウントを作成させるにはこのチェックボックスをチェックしてください。
We import content: Not all network-enabled applications support this, but if they do, e.g. Moodle 2.x, this will allow users of the remote site to import content to Mahara. It depends on the option 「They SSO in」 from 「SSO direction」 and it is sensible to also have 「We auto-create users」 set.
この認証方法を有効にするには 送信 ボタンをクリックしてください。あなたの変更を中止するには キャンセル ボタンをクリックしてください。
参考
Refer to the comprehensive guide about setting up Mahoodle, the combination of Mahara and Moodle, for step-by-step instructions on how to set everything up on the Moodle side and on Mahara. The guide explains the steps for both Moodle 1.9 and Moodle 2.x.
9.5.3.6. 認証方法順
1つのインスティテューションに複数の認証方法が設定されている場合、あなたはどの順番でチェックされるのか決定することができます。
- リスト内で特定の認証方法を上下に移動するには 上矢印 ボタンおよび 下矢印 ボタンを使用してください。
- *削除*ボタン|delete|をクリックすることにより特定の認証方法を削除します。
注釈
ログインに認証を必要とするユーザが存在する場合、あなたはその認証方法を削除することはできません。あなたは認証方法を削除する前にユーザを別の認証方法に移動する必要があります。
9.5.3.7. インスティテューションを利用停止する
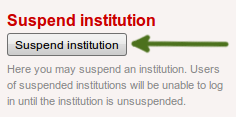
サイト管理者はいつでもインスティテューションを利用停止することができます。
インスティテューションを利用停止する ボタンをクリックすることにより、(一時的に) インスティテューションユーザがインスティテューションを利用できなくなります。
9.5.4. インスティテューション統計ページ
管理 → インスティテューション → 統計ページ
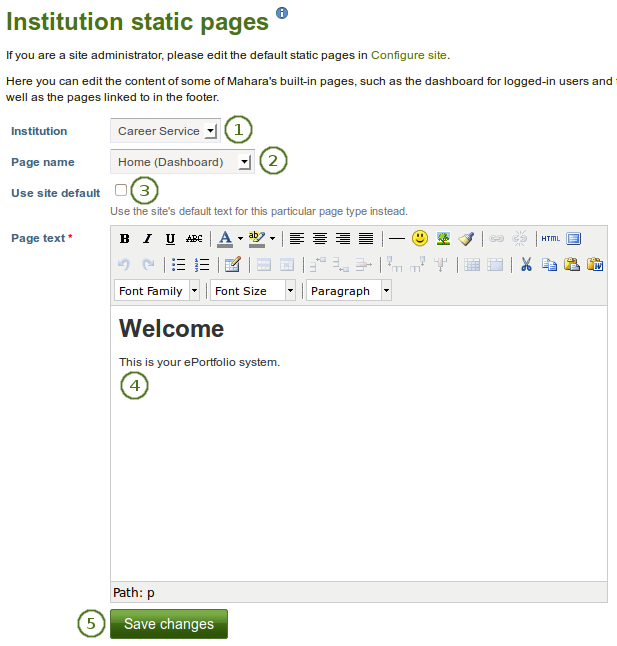
Institution administrators can overwrite the content of the static pages that the site administrator created. These pages are:
- About
- ホーム (ダッシュボード)
- ログアウトホーム
- プライバシー保護方針
- 使用条件
すべてのページにはあなたが完全に変更できるデフォルトのテキストが入力されています。すべてのページにはテキストを含む必要があります。あなたはビジュアルエディタを使用してページスタイルを変更することができます。
- Institution: If you are a site administrator or an institution administrator of more than one institution, choose the institution for which you want to change page content.
- ページ名: あなたが編集したいページをドロップダウンメニューから選択してください。
- サイトデフォルトに使用する: あなたがコンテンツをサイト全体のページに表示したい場合、このチェックボックスをチェックしてください。
- ページテキスト: エディタウィンドウのテキストを変更してください。あなたはこのフィールドを空白のままにすることはできません。
- *変更を保存する*ボタンをクリックしてください。
9.5.5. メンバー
管理 → インスティテューション → メンバー
あなたは1つのインスティテューションから一括でメンバーを追加および削除することができます。サイト管理者として、あなたは常にインスティテューションにメンバーを追加することができます。インスティテューションメンバーとして、あなたはユーザにメンバーになるための招待状を送ることのみできます。
ユーザを少なく表示するためフィルタして、あなたのインスティテューションに、さらに簡単にユーザを追加または削除することができます。
- インスティテューションのメンバーシップをリクエストしたユーザ
- インスティテューションメンバーシップをリクエストしていない人
- インスティテューションを離れたユーザ
- すでにインスティテューションのメンバーになっているユーザ
- 招待されたユーザ
注釈
あなたは名称をダブルクリックしてもう一方のサイドに移動することができます。この機能と似たような操作を他でも使用することができます。
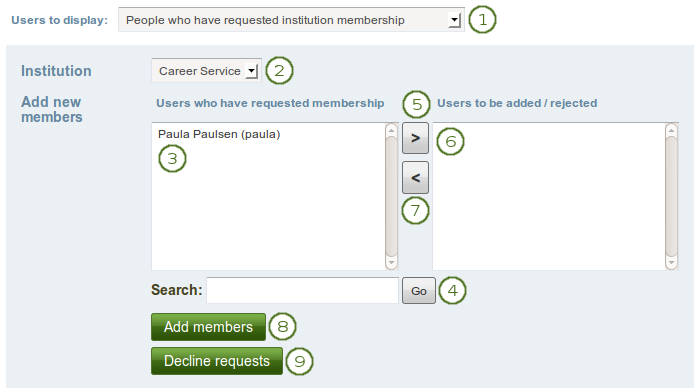
9.5.5.1. インスティテューションのメンバーシップをリクエストしたユーザ
あなたのインスティテューションが自己登録を許可している場合、あなたのインスティテューションのメンバーではないユーザは参加をリクエストすることができます。
インスティテューション管理者はメンバーシップリクエストに関して通知を受信します。サイト管理者は「インスティテューションなし」への参加希望に関する通知のみ受信します。
- 表示するユーザ: Choose **インスティテューションメンバーシップをリクエストしたユーザ**を選択してください。
- インスティテューション: あなたがユーザを追加したいインスティテューションをドロップダウンメニューから選択してください。1つのインスティテューションのみの場合、ドロップダウンメニューなしでインスティテューション名が表示されます。
- メンバーシップをリクエストしたユーザ: あなたがインスティテューションに追加したいユーザを選択してください。
- 検索: 多くの氏名が一覧表示されている場合、あなたは * 検索* ボックスにて、ユーザを検索することもできます。
- 右矢印 ボタンをクリックすることにより、ユーザを追加します。
- Users to be added / rejected: If you put users into the box for users to be added / rejected by accident, you can remove them from that list by clicking on them.
- 左矢印 ボタンをクリックすることにより、リストからユーザが削除されます。
- あなたがインスティテューションに追加したいユーザすべてを選択した場合、メンバーを追加する ボタンをクリックしてください。
- Alternatively, if you wish to decline users membership, you can select them and then send a general denial by clicking the Decline requests button.
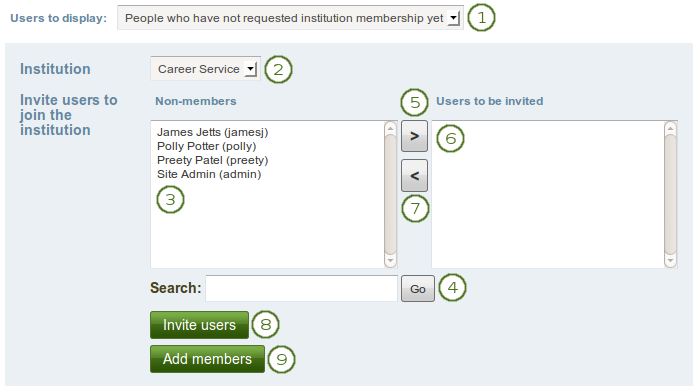
9.5.5.2. まだメンバーシップをリクエストしていないユーザ
管理者は率先してインスティテューションにユーザを招待または追加することができます。
- 表示するユーザ: **まだメンバーシップをリクエストしていないユーザ**を選択してください。
- インスティテューション: あなたがユーザを招待したいインスティテューションをドロップダウンメニューから選択してください。インスティテューションが1つのみの場合、ドロップダウンメニューなしにインスティテューション名が表示されます。
- 非メンバー: あなたがインスティテューションに招待したいユーザを選択してください。
- 検索: 多くの氏名が一覧表示されている場合、あなたは * 検索* ボックスにて、ユーザを検索することもできます。
- 右矢印 ボタンをクリックすることにより、ユーザを 招待するユーザ 一覧に追加します。
- あなたが間違ってユーザをボックスに入れて招待してしまった場合、クリックすることでリストから削除できます。
- 左矢印 ボタンをクリックすることにより、リストからユーザが削除されます。
- When you have all the members you wish to invite to the institution, click the Invite users button. The users receive a notification and can accept or decline the institution membership invitation.
- あなたは代わりにサイト管理者として メンバーを追加する ボタンをクリックして、最初に尋ねずに直接インスティテューションにユーザを追加することができます。
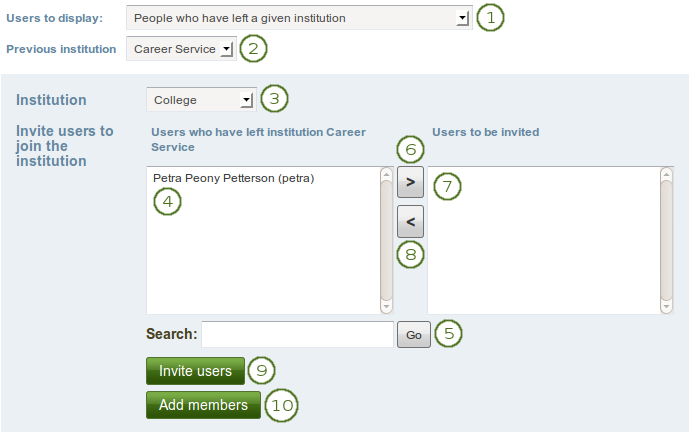
9.5.5.3. インスティテューションを離れたユーザ
ユーザを迅速に探すため管理者は前に参加していたインスティテューションでユーザをフィルタすることができます。
注釈
これは少なくとも2つのインスティテューションが登録された複数テナントのMaharaインスタンスのみに重要です。
- Users to display: Choose People who have left a given institution. 「Left」 is interpreted loosely, it also means when an administrator removed them from an institution.
- 前のインスティテューション: あなたがユーザを追加したいユーザのインスティテューションを選択してください。ここに一覧表示されるためにはユーザは最初にインスティテューションから離れる必要があります。
- インスティテューション: あなたがユーザを招待したいインスティテューションをドロップダウンメニューから選択してください。他のインスティテューションが1つのみの場合、ドロップダウンメニューなしにインスティテューション名が表示されます。
- インスティテューション [インスティテューション名] を離れたユーザ: あなたが他のインスティテューションに招待または追加したいユーザを選択してください。
- 検索: 多くの氏名が一覧表示されている場合、あなたは * 検索* ボックスにて、ユーザを検索することもできます。
- 右矢印 ボタンをクリックすることにより、ユーザを 招待するユーザ 一覧に追加します。
- あなたが間違ってユーザをボックスに入れて招待してしまった場合、クリックすることでリストから削除できます。
- 左矢印 ボタンをクリックすることにより、リストからユーザが削除されます。
- When you have all the members you wish to invite to this institution, click the Invite users button. The users receive a notification and can accept or decline the institution membership invitation.
- あなたは代わりにサイト管理者として メンバーを追加する ボタンをクリックして、最初に尋ねずに直接インスティテューションにユーザを追加することができます。
注釈
Maharaはユーザの最新インスティテューションの追跡を非表示タグで保持します。
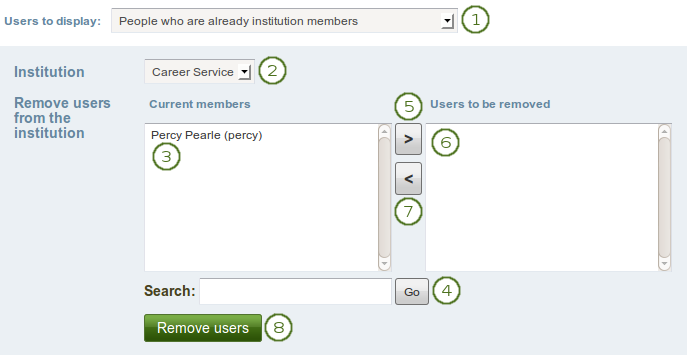
9.5.5.4. すでにインスティテューションのメンバーになっているユーザ
You can remove users from an institution, e.g. if they are no longer students at a school or university, but should still have an account on Mahara or when they are just switching institutions on the same Mahara instance.
- 表示するユーザ: **すでにインスティテューションのメンバーになっているユーザ**を選択してください。
- インスティテューション: あなたがメンバーを表示したいインスティテューションをドロップダウンメニューから選択してください。インスティテューションが1つのみの場合、ドロップダウンメニューなしにインスティテューション名が表示されます。
- 現在のメンバー: あなたがインスティテューションから削除したいユーザを選択してください。
- 検索: 多くの氏名が一覧表示されている場合、あなたは * 検索* ボックスにて、ユーザを検索することもできます。
- 右矢印 ボタンをクリックすることにより、ユーザを 削除されるユーザ リストに追加します。
- 間違ってユーザを削除するためのボックスに入れてしまった場合、あなたはリスト内のユーザをクリックして取り除くことができます。
- 左矢印 ボタンをクリックすることにより、リストからユーザが削除されます。
- あなたのインスティテューションから削除したいユーザすべてを選択した後、ユーザを削除する ボタンをクリックしてください。
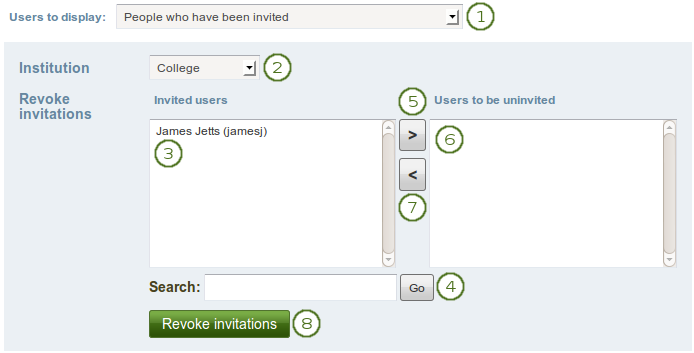
9.5.5.5. 招待されたユーザ
管理者はインスティテューションからのユーザの招待を取り消すことができます。
- 表示するユーザ: **招待されたユーザ**を選択してください。
- インスティテューション: あなたがメンバーを表示したいインスティテューションをドロップダウンメニューから選択してください。インスティテューションが1つのみの場合、ドロップダウンメニューなしにインスティテューション名が表示されます。
- 招待済みユーザ: あなたがインスティテューションへの参加の招待を取り消したいユーザを選択してください。
- 検索: 多くの氏名が一覧表示されている場合、あなたは * 検索* ボックスにて、ユーザを検索することもできます。
- 右矢印 ボタンをクリックしてユーザを 招待を取り消すユーザ リストに追加してください |右矢印|。
- 間違って招待取り消しのボックスにユーザを入れてしまった場合、あなたはユーザをクリックしてリストから削除することができます。
- 左矢印 ボタンをクリックすることにより、リストからユーザが削除されます。
- あなたがインスティテューションからのユーザすべてを招待したくない場合、招待を取り消す ボタンをクリックしてください。
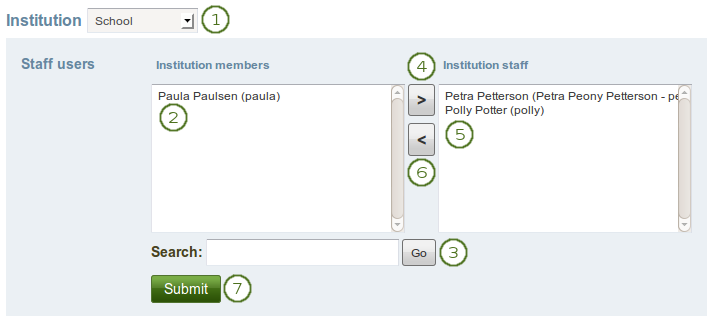
9.5.6. インスティテューションスタッフ
You can give users staff rights in an institution in which they are members. The staff role will allow them to create course groups for example. This page allows you to do that in bulk for many users at once.
参考
あなたは:ref:`ユーザアカウント設定ページ <site_account_settings>`でスタッフ権限を与えることもできます。
- インスティテューション: あなたがスタッフ権限を与えたいメンバーのインスティテューションをドロップダウンメニューから選択してください。
- インスティテューションメンバー: スタッフ権限を与えるインスティテューションメンバーを選択してください。
- 検索: 多くの氏名が一覧表示されている場合、あなたは * 検索* ボックスにて、ユーザを検索することもできます。
- 右矢印 ボタンをクリックすることにより、ユーザを インスティテューションスタッフ リストに追加します。
- あなたが間違ってユーザをインスティテューションスタッフにしてしまった場合、または既存のスタッフメンバーを削除して元の通常メンバーシップ状態に戻したい場合、ユーザを選択してください。
- 左矢印 ボタンをクリックすることにより、リストからユーザが削除されます。
- あなたがインスティテューションスタッフにしたいユーザすべてを選択した後、送信 ボタンをクリックしてください。
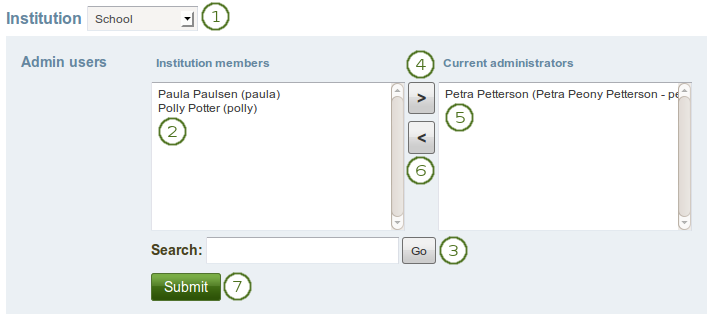
9.5.7. インスティテューション管理者
You can give users administrator rights in an institution in which they are members. The administrator role will allow them to manage users in their own institution. This page allows you to do that in bulk for many users at once.
参考
あなたは:ref:`ユーザアカウント設定ページ <user_institution_settings>`で管理者権限を付与することもできます。
- インスティテューション: あなたがユーザに管理者権限を与えたいインスティテューションをドロップダウンメニューから選択してください。
- インスティテューションメンバー: 管理者権限を取得するインスティテューションメンバーを選択してください。
- 検索: 多くの氏名が一覧表示されている場合、あなたは * 検索* ボックスにて、ユーザを検索することもできます。
- 右矢印 ボタンをクリックすることにより、ユーザを 現在の管理者 一覧に追加します。
- あなたがユーザを間違ってインスティテューション管理者リストに追加した場合、または既存の管理者メンバーを削除して元のメンバーシップステータスに戻したい場合、そのユーザを選択してください。
- そして 左矢印 ボタン
 をクリックしてください。リストから削除されます。
- あなたがインスティテューション管理者権限を与えたいユーザすべてを選択した場合、送信 ボタンをクリックしてください。
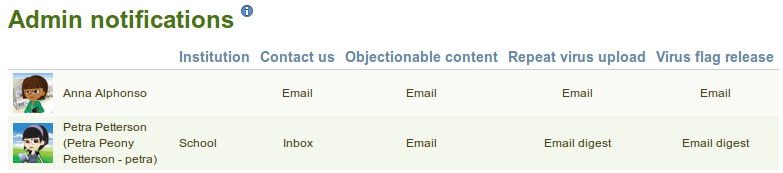
9.5.8. 管理者通知
管理 → インスティテューション → 管理通知
The Admin notifications page lists all users with institution and site administrator access on your site. It shows their selected notification preferences for all admin notifications. There should be at least one administrator receiving each type of message generated.
注釈
インスティテューション管理者のみが自分のインスティテューションの管理者通知を閲覧することができます。
管理通知:
- お問い合わせ
- 好ましくないコンテンツ
- ウイルスアップロードの繰り返し
- ウイルスフラグリリース
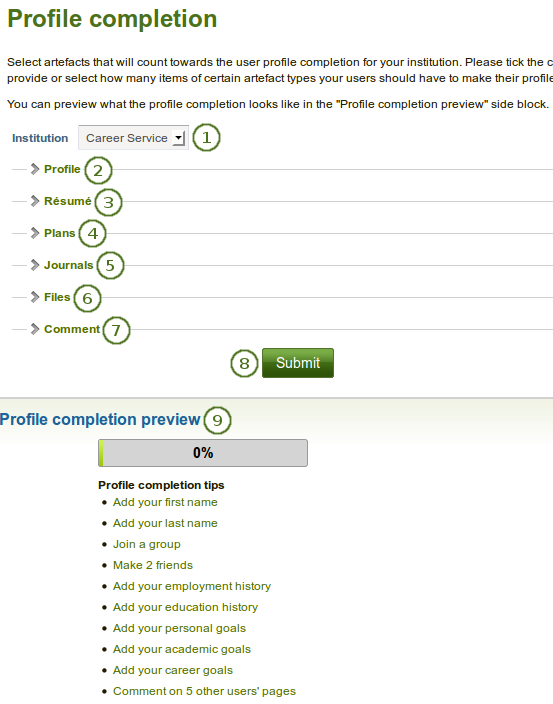
9.5.9. プロファイル完了
管理 → インスティテューション → プロファイル完了
Profile completion lets you select content that users of an institution need in order to have a 「completed」 profile. The parameters for a completed profile can differ from one institution to another. In some cases you can also decide how many content items a user needs of a specific artefact type to complete their profile.
参考
The site administrator needs to enable the profile completion feature in the user settings for institutions to be able to use it.
- インスティテューション: 1つ以上のインスティテューションを管理している場合、あなたがプロファイル完了を設定したいインスティテューションをドロップダウンメニューから選択してください。
- プロファイル: あなたのユーザにプロファイルで入力して欲しいアイテムの隣にあるチェックボックスをチェックしてください。これには姓名、ブログアドレス等を含みます。
- レジュメ: あなたのユーザがプロファイルを完了するために入力する必要のあるレジュメアイテムの隣にあるチェックボックスをチェックしてくだsだい。
- プラン: ユーザが作成すべきプランおよびタスク数をドロップダウンメニューから選択してください。
- Journals: Select whether a user needs to have a journal and / or a certain number of journal entries for a complete profile.
- Files: In this section you can decide whether users need to upload a certain number of files. You can also specify the file type and decide how many items of each file type users should upload for a complete profile.
- コメント: 完全なプロファイルを取得するためユーザが必要とするフィードバック数をドロップダウンメニューから選択してください。
- あなたの変更を保存するには 送信 ボタンをクリックしてください。
- Profile completion preview: Once you clicked the Submit button, you will see a preview of the progress bar that is displayed to your institution users in the sidebar.
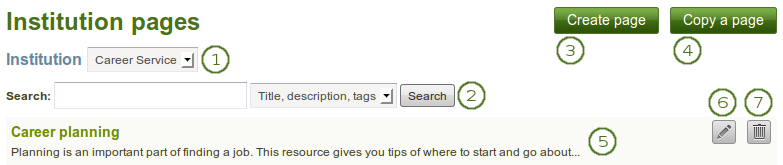
9.5.10. インスティテューションページ
管理 → インスティテューション → ページ
You can create pages for your entire institution. Although you could always create pages under a regular user account that other users could copy into their own portfolio, the advantage of institution pages is that new members in the institution can receive a copy upon joining the institution.
- インスティテューション: あなたがインスティテューションページを作成または編集したいインスティテューションをドロップダウンメニューから選択してください。
- 検索: 数多くのインスティテューションページがある場合、あなたはここで特定のページを検索することができます。あなたはタイトル、説明およびタグを検索すること、またはタグのみを検索することができます。
- 新しいインスティテューションページを作成するには ページを作成する ボタンをクリックしてください。
- 既存のページからのコピーで新しいページを始める場合、 ページをコピーする ボタンをクリックしてください。これは必ずしもインスティテューションページである必要はありませんが、あなたがコピーを許可されているページである必要があります。
- あなたがすでに作成しているインスティテューションページを表示します。
- 既存のインスティテューションページを編集するには*編集*ボタン|edit|をクリックしてください。
- インスティテューションページを削除するには*削除*ボタン|delete|をクリックしてください。
注釈
Creating and editing an institution page is very similar to creating and editing a portfolio page. However, not all blocks are available when editing an institution page in the page editor due to the different context. Please refer to the overview of blocks for a list of all the blocks that you can use in an institution page.
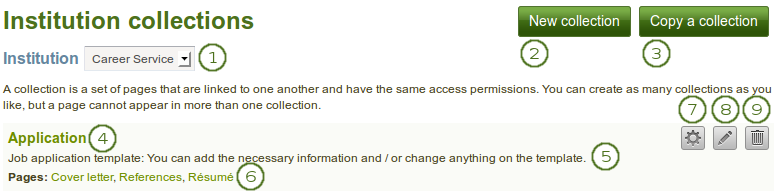
9.5.11. インスティテューションコレクション
管理 → インスティテューション → コレクション
You can create collections for your entire institution. Although you could always create collections under a regular user account that other users could copy into their own portfolio, the advantage of institution collections is that new members in the institution can receive a copy upon joining the institution.
- インスティテューション: あなたがインスティテューションコレクションを作成または編集したいインスティテューションをドロップダウンメニューから選択してください。
- 新しいインスティテューションコレクションを作成するには 新しいコレクション ボタンをクリックしてください。
- Click the Copy a collection button to start a new collection from a copy of an already existing one. This does not have to be an institution collection but can be any collection that you are allowed to copy.
- コレクションの最初のページに移動するにはコレクションタイトルをクリックしてください。
- このコレクションの説明を表示します。
- ページに直接ジャンプするにはコレクション内のページタイトルをクリックしてください。
- コレクション内ページの移動、コレクションへのページ追加またはコレクションからのページ削除するには*管理*|manage|ボタンをクリックしてください。
- コレクションのタイトルおよび説明を変更するには*編集*|edit|ボタンをクリックしてください。
- コレクションを削除するには*削除*ボタン|delete|をクリックしてください。ページは存在したままとなります。
注釈
インスティテューションコレクションの作成および編集は:ref:`ポートフォリオコレクションの作成および編集 <collections>`非常に似ています。
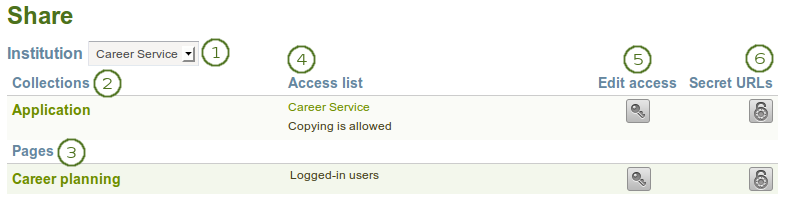
9.5.12. インスティテューションページおよびコレクションを共有する
管理 → インスティテューション → 共有
あなたはすべてのインスティテューションページおよび特定のインスティテューションのコレクションのリストを閲覧することができます。
- インスティテューション: あなたがインスティテューションページおよびコレクションを閲覧したいインスティテューションをドロップダウンメニューから選択してください。
- コレクション: ここにインスティテューションのインスティテューションコレクションすべてが一覧表示されます。
- ページ: ここにインスティテューションのインスティテューションページすべてが一覧表示されます。
- アクセスリスト: ページおよびコレクションのアクセスパーミッションを表示します。
- ページまたはコレクションを閲覧およびコピー可能なパーミッションに変更するには アクセスを編集する ボタン
 をクリックしてください。
- ページまたはコレクションのシークレットURLを設定するには シークレットURL|secret_url|を編集する ボタンをクリックしてください。
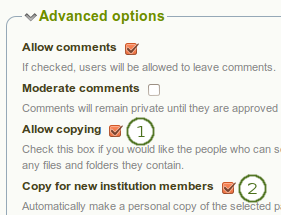
Sharing an institution page or collection is very similar to sharing a portfolio page or collection. The only difference is that you can allow new institution members to receive a copy of an institution page or collection immediately upon joining the institution.
- When you clicked the Edit access button on the Share page for institution pages and collections, place a tick in the checkbox Allow copying under Advanced options.
- Once you have put a check mark into that box, the line Copy for new institution members appears, and you can place a check mark into that box if you wish all new institution members to receive that page or collection automatically upon joining that institution.
- あなたの変更を保存するには 保存 ボタンをクリックしてください。
9.5.13. ファイル
管理 → インスティテューション → ファイル
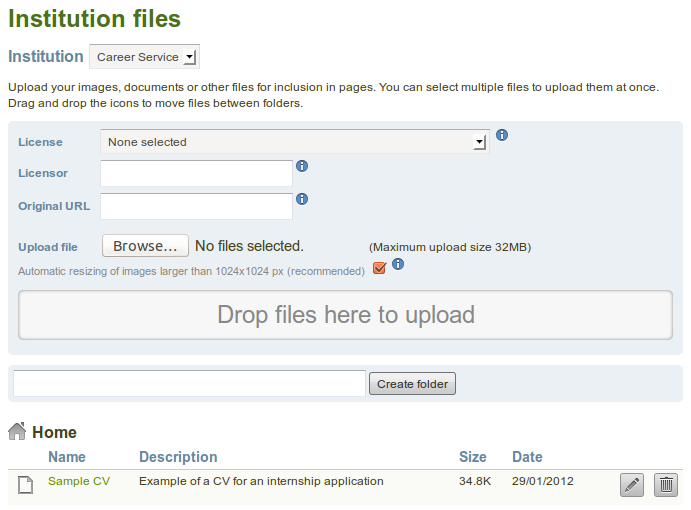
The files area in an institution holds all files that are uploaded by administrators as institution files. The uploading process works like the one in the personal files area.
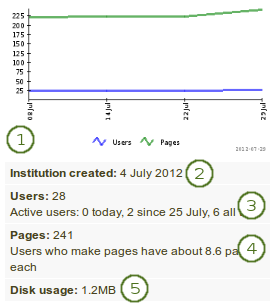
9.5.14. インスティテューション統計
管理 → インスティテューション → インスティテューション統計
The type of statistics you have available for institutions are very similar to the site statistics. You can view statistics for each institution individually and for example use the CSV download options to
- インスティテューション統計をサイト統計と比較する
- それぞれのインスティテューションを比較する
注釈
All institution administrators have access to their institution(s)』 statistics at any time. If the site administrator set the staff statistics access correctly, institution staff will also be able to see the statistics for their institution(s).
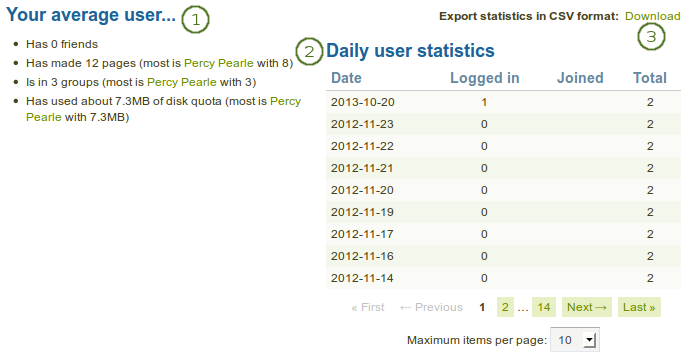
9.5.14.2. ユーザ
経過を確認するため、あなたはインスティテューションユーザの基本情報を閲覧することができます。
インスティテューション統計の ユーザ タブにおいてあなたは次の情報を閲覧することができます:
- このインスティテューションの平均ユーザ:
- average number of friends with the name of the person with most friends
- average number of pages with the author of the most pages
- average amount of file quota used with the user who has used most
- ユーザ数情報に関する日次ユーザ統計
- 日次ユーザ統計をCSVファイルでダウンロードするためのリンク
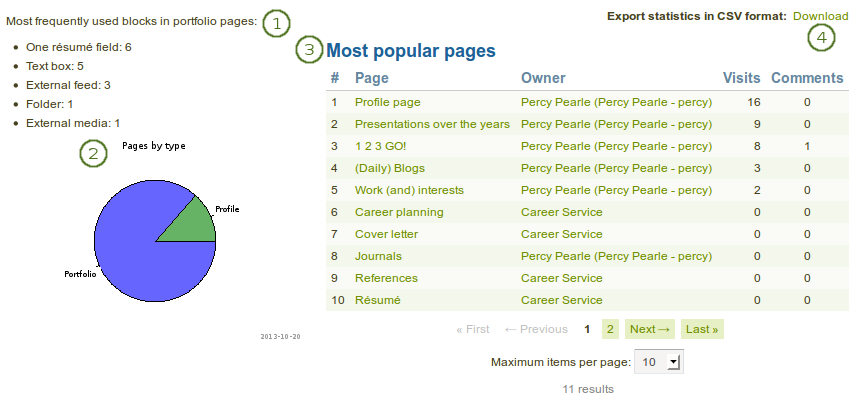
9.5.14.3. ページ
あなたは ページ タブ内でインスティテューションのページに関する統計を閲覧することができます。
あなたが閲覧できる情報:
- ポートフォリオページ内で最も頻繁に使用されているブロックです。
- グラフではプロファイル、グループおよびポートフォリオページに関する分布を表示します。
- 人気ページ: 人気ページは降順に並べ替えらた上でページおよびオーナーにリンクされます。
- 統計をCSVフォーマットでエクスポートする: ページ、閲覧数、コメント数の累積統計をCSVファイルとしてダウンロードします。
9.5.14.4. コンテンツ
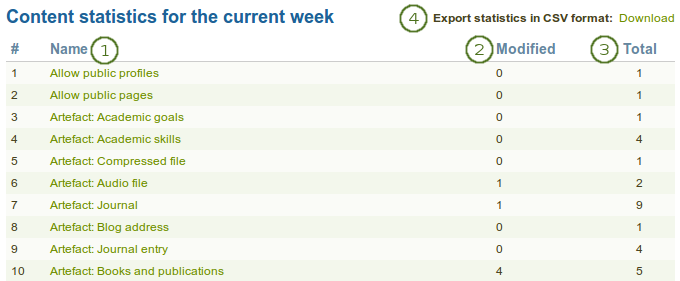
インスティテューション統計内の コンテンツ タブは次の情報を保持します:
- Name: The statistics item itself, e.g. artefact, block or other general item on institution level. It is linked to the Historial data statistics for an overview of the changes over time.
- 修正: このカラムでは今週更新されたアーティファクト等の更新数を表示します。
- 合計: このカラムでは統計アイテムのインスタンス数合計を表示します。
- 統計をCSVフォーマットでエクスポートする: 週に関して表示されるすべての統計の累積統計をCSVファイルでダウンロードします。
注釈
アーティファクトまたはブロックが使用された時点でそのタイプの統計が作成されるため、統計のコンテンツ合計数は変化します。
9.5.14.5. 歴史的データ
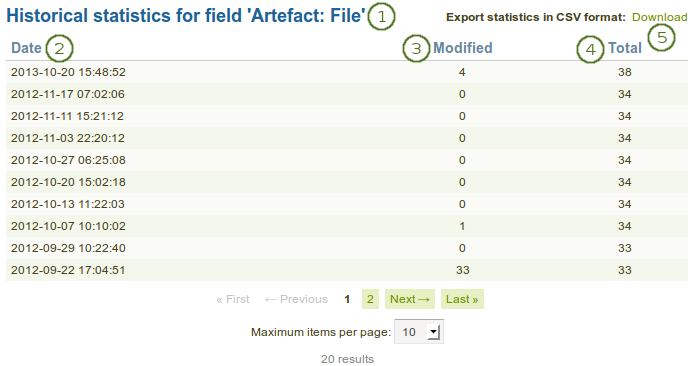
The Historical data tab in the institution statistics holds historical data over time about a particular content item that you have clicked on in the Content tab. Changes are saved per default on a weekly basis. However, whenever you run the cron manually, a new statistics will be created as well. You can also download the statistics as CSV file.
- フィールドの歴史的統計: あなたが調査しているアーティファクトまたは他のアイテムを表示します。
- 日付: 統計が作成された日付を表示します。
- 修正: 統計が作成された次の日からの修正数を表示します。
- 合計: 統計が実行された時点での統計アイテムの合計インスタンス数です。
- 統計をCSVフォーマットでエクスポートする: この特定アイテムに関する累積統計をCSVファイルでダウンロードします。
注釈
When you click on the Historical data tab without choosing an item to look at in particular beforehand, the number of users are displayed as that is a statistics that is available on all sites.
9.5.15. 登録保留
管理 → インスティテューション → 登録保留
When you turn on Confirm registration for an institution in the institution settings, no user account in this institution is created without the administrator knowing it. If a user is rejected, no account is created. If the option Confirm registration is not turned on, a user account is created in the 「No institution」 institution but not in the actual institution.
以下で「登録を確認する」を有効にして自己登録処理を続けてください。
9.5.15.1. 内部アカウントの自己登録
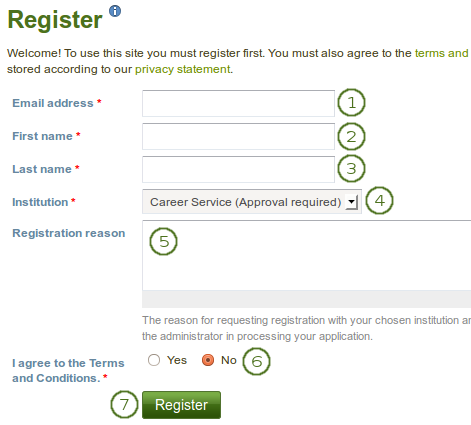
あなたのインスティテューションにユーザが自己登録する場合、詳細情報を提供する必要があります。
- 名: あなたの名を入力してください。
- 姓: あなたの姓を入力してください。
- Eメールアドレス: あなたのメールアドレスを提供してください。
- インスティテューション: あなたが登録したいインスティテューションを選択してください。あなたが登録したいインスティテューションに管理者の承認が必要かどうかされます。
- 登録理由: 管理者の承認が必要な場合、あなたは登録理由を提供することができます。
- If the site administrator requires users who self-register to agree to the terms and conditions, the 「Registration agreement」 of the site, you must read through them below and then make your choice.
- 登録 ボタンをクリックしてください。
- インスティテューションの管理者およびサイト管理者は登録保留に関して通知を受信します。そして、登録保留をレビューします。
- You will receive an email which includes a link to confirm your email address. You must click that link within 24 hours. If you do not, you will have to start the registration process again from the beginning.
9.5.15.2. Personaアカウントによる自己登録
The self-registration process with administrator approval also works for users who wish to use Persona. It needs to be set up as authentication method, and potential users go about in a very similar way.
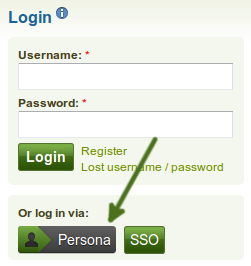
インスティテューションがPersona認証を許可している場合、Personaアカウントを持っているユーザは 登録 リンクをクリックする代わりにPersonaアカウントを使用することができます。
- Persona ボタンをクリックしてください
 。
。
- あなたのPersonaアカウントでログインします。
- :ref:`登録手順 <internal_registration>`に従ってください。
9.5.15.3. 保留中の登録をレビューする
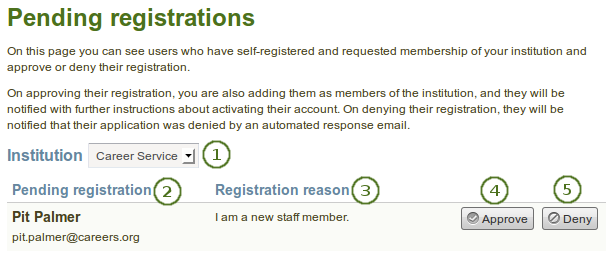
管理者として、あなたのインスティテューションの保留中の登録を 管理 → インスティテューション → 登録保留 の 登録保留 ページで確認することができます。
- インスティテューション: あなたが登録保留を閲覧したいインスティテューションを選択してください。
- 登録保留: あなたは登録をリクエストした人の名前およびメールアドレスを含む登録リクエストすべての一覧を閲覧することができます。
- 登録理由: 登録の理由が表示されます。
- Click the Approve button when you want to approve this registration request. You will have to confirm your approval on the next page. The person self-registering receives an email with a link to complete the registration process.
- この人に対して、あなたのインスティテューションに登録してアカウントを作成することを望まない場合、拒否 ボタンをクリックしてください。
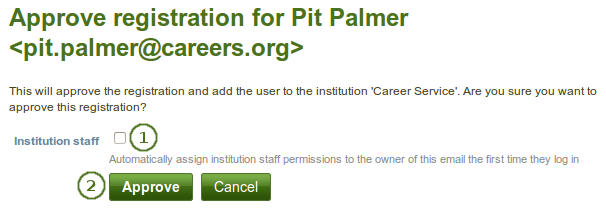
When you approve users, you can decide whether they should receive staff rights immediately. For example, this helps to give all teachers at a school staff access rights upon their self-registration.
- インスティテューションスタッフ: ユーザにスタッフアクセス権を与える場合、チェックボックスをチェックしてください。
- あなたがこの登録リクエストを承認したい場合、承認 ボタンをクリックしてください。承認処理を中止したい場合、キャンセル ボタンをクリックしてください。
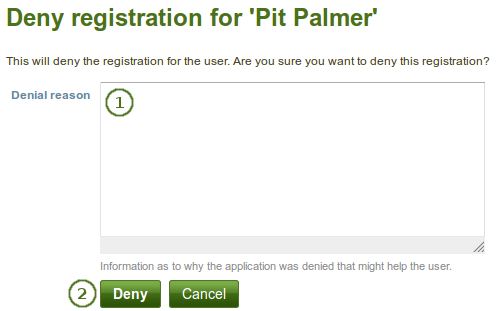
あなたのインスティテューションへのアクセスを拒否する場合、あなたは理由を提供することもできます。
- 拒否理由:あなたがインスティテューションメンバーシップを拒否した理由を記述してください。どのような理由であなたがアクセス権を与えたくないのか、拒否された人が理解する助けとなります。
- 拒否 ボタンをクリックすることによりユーザのメールアドレスに拒否理由を含む通知が送信されます。
- すべての登録保留のページに戻るには キャンセル ボタンをクリックしてください。
9.5.15.4. 自己登録を完了する
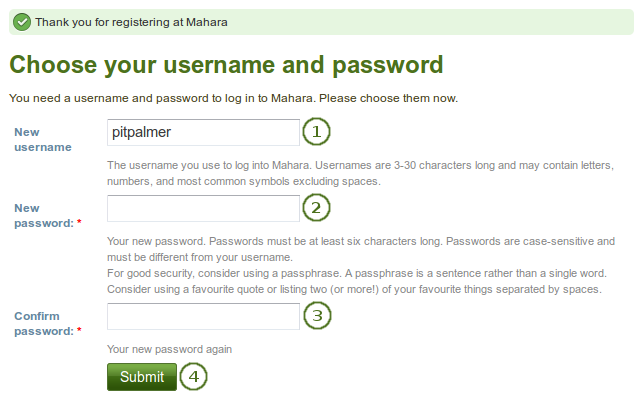
When users are accepted as members in an institution via this process, they must still complete the registration process. This is necessary to provide information in all required fields besides a password and a username.
- 新しいユーザ名: あなたの新しいユーザ名を選択してください。デフォルトユーザ名が推奨されますが、あなたは異なるユーザ名を使用することができます。あなたが入力したユーザ名がすでに取得されている場合、あなたの情報の送信後、システムによって知らされます。
- 新しいパスワード: あなたのアカウントのパスワードを入力してください。このフィールドは必須入力です。
- パスワードをもう一度: 新しいパスワードを再入力してください。このフィールドは必須入力です。
- あなたの登録を完了するには 送信 ボタンをクリックしてください。あなたは ダッシュボード に移動します。