4.4. Shared by me
 Portfolio → Shared by me
When you have created portfolio pages (and collections), you may wish to share them with others, e.g. to receive feedback. You can set the access permissions on the Edit access page. It is accessible via Portfolio → Shared by me or directly from the page editor when you edit a portfolio page.
Note
In Mahara 1.7, the menu item Share in the personal portfolio area was renamed to Shared by me. This step was taken to bring in the Shared pages menu item, previously located under Groups, to the Portfolio section as Shared with me. This distinction makes it easier for users to know on which page they can share their own portfolios and where they need to go to view portfolio pages and collections by others.
The Share overview page shows you the following.

Share overview page
- Collections: Your collections are sorted alphabetically.
- Pages: Pages that are not in a collection are listed alphabetically below the collections.
- Access list: The list of users, groups or institutions who have access to a particular collection or page.
- Edit access: The Edit access button
 next to each collection or page allows you to change the permission of who can view a page or collection.
 - Secret URLs: The Secret URL edit button
 next to each collection or page allows you to set up one or more secret URLs for a page or collection. The number of secret URLs that you have generated is displayed next to the button.
4.4.1. Edit access for users with an account
The Edit access page allows you to set the permissions for a single user or multiple users who should be able to view some of your portfolio pages or collections.
You can assign access to a single page or collection at a time or to multiple pages and / or collections at once.
Users and groups to whom you can give access to pages and / or collections
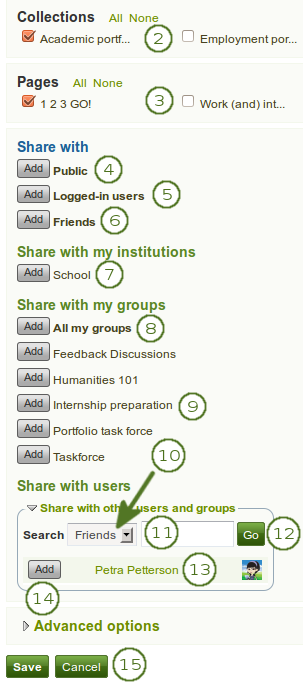
You have a number of choices for selecting who shall be able to see what. Always click the Add button if you want to add a group of people or an individual.
- Click the Edit access button next to the collection or page for which you want to give access permissions under Portfolio → Share. On the next screen…
- Choose the collection or collections for which you want to give access by placing a check mark in the check box next to it / them. If you made a mistake in your selection, either take the check mark off or select All or None to check or clear all respectively.
- Choose the page or pages for which you want to give access by placing a check mark in the check box next to it / them. If you made a mistake in your selection, either take the check mark off or select All or None to check or clear all respectively.
- Public: anybody online who knows the URL(s) can see your selection of pages / collections.
- Logged-in users: all users who have an account on the Mahara instance you are using can view your selection of pages / collections.
- Friends: all your friends on Mahara can view your selection of pages / collections.
- Share with my institutions: select your institution(s) with which you want to share your selection of pages / collections. This will allow all members in these institutions to have access to this selection.
- All my groups: every member in the groups to whom you belong can view your selection of pages / collections.
- A particular group: all members of that group can view your selection of pages / collections.
- If none of the above choices are what you are looking for, you can search for specific users or groups. Make your selection to search for:
- your friends
- any group
- any user
- Type the name of the user or the name of the group you search for. A partial name is often best.
- Click the Go button to search for that person or group.
- Click on the name of the user or group to verify that it is the correct one. When you clicked on the name of the user or group and want to get back to the access list, close the window.
- Click the Add button next to the user(s) or group(s) to whom you wish to give access.
- Click the Save button to keep your changes or click the Cancel button to abort the action.
Note
Your friends or individual users with whom you shared your pages / collections receive a notification. Group members also receive a notification that you shared a page with them if the group administrator allowed that. You do not receive a notification when users share their page with the public, all logged-in users, an entire institution or friends.
See also
If you use the web services plugin, you can also share pages with “favourite users”. For more information, please refer to the specifications for this feature.
4.4.2. Edit access to your profile page
You can restrict full access to your profile page to the members of your institution if the site administrator allowed that in Administration → Configure site → User settings → Logged-in profile access.
If you allow only members of your own institution(s) to see your profile page, other users who have an account can only see basic information, e.g. your name, your institution membership and messaging information.
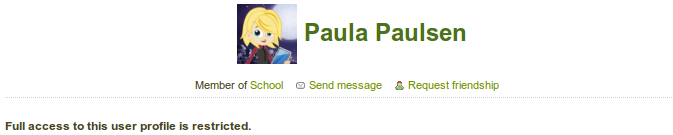
Restricted view of a profile
4.4.3. Restrict access based on time
In addition to controlling who shall have access to your pages / collections, you can further restrict that access for a specific period of time.
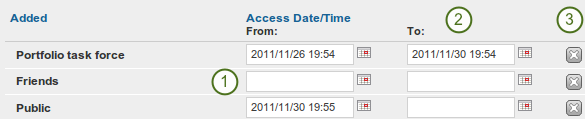
Restrict access to your pages / collections further
- Each user or group of people can receive their own time restrictions that are independent of other access groups. You can specify a start date. You can type the date and time in the format YYYY/MM/DD HH:MM or click on the Calendar icon
 to select the date.
 - You can specify an end date by typing it in manually or selecting it via the Calendar button .
- You can click the Remove button
 to completely take a user group off your access list.
4.4.4. Choose advanced options
You can choose a number of additional options which are applied to all pages and / or collections that are selected.
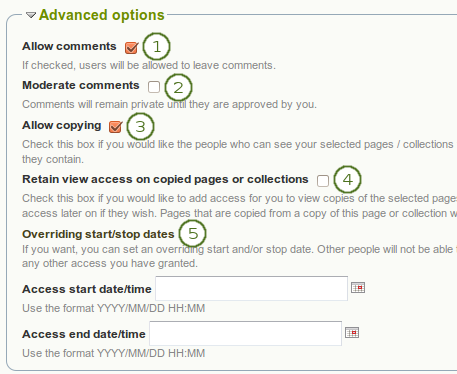
Advanced options for editing access to pages / collections
Allow comments: This check box is selected by default to encourage you to allow others to comment on your pages.
Moderate comments: If you wish to see any comment before it is made public, i.e. can be see by others who have access to the page on which the comment is made, place a check mark here.
Allow copying: Place a check mark in this box if you want to allow the users who can view your page to make a copy of it for themselves. Any text box content, files and folders will be transferred to their portfolio. For journals or journal entries you decide separately whether they can copy them or not via the Block copy permission. Profile information, plans and résumé information are not copied.
See also
Check the blocks which can be copied.
Retain view access on copied pages or collections: This option only becomes available when you put a check mark next to the option Allow copying. When you tick this check box, you as owner of the page / collection will have access to the copied page / collection automatically. However, the owner of the copied page / collection can take that access away at any time.
Overriding start / stop dates: You set the time frame for when all users who have access to your page / collection can view your page. The dates here override any individual dates you may have set.
If you have not allowed comments in general, you can still choose to allow them for a certain person or group of people who are in your access list. That way you can regulate very flexibly who shall be able to place comments on a page / collection and who cannot.

Allow comments on a user-by-user basis
Note
If you edit an institution page, you see the additional option Copy for new institution members when you allowed copying. With this option you can place a page directly into the portfolio of a new user. Existing users still have to copy the page themselves.
4.4.5. Edit access for users with no account
Besides giving users who have a login or the entire public access to your portfolio, you can also give users who do not have an account on Mahara access to your portfolio pages and / or collections without making your work publicly available and searchable by search engines. This can be interesting, e.g.
- when you create a portfolio for a job application and the prospective employer does not have a login and cannot get one.
- when you want to share your portfolio with your parents and also get feedback from them.
- when an external assessor shall evaluate your work.
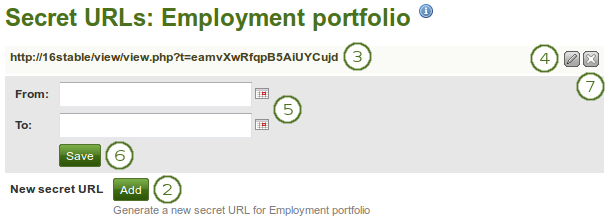
Add one or more secret URLs to a page or collection
You can create a secret URL the following way: when you are on the share overview page and click on the Edit button :
- Click the Edit secret URL access button next to the collection or page for which you want to give access permissions under Portfolio → Share. On the next screen…
- Click the Add button to generate a new secret URL. You can add as many secret URLs as you wish.
- You can now copy this URL and paste it into an email to send to somebody.
- You can click the Edit button to add a time restriction for access to your page / collection via this URL.
- Type a start and / or end date (and time) manually following the pattern of YYYY/MM/DD HH:MM or select the date via the Calendar icon .
- Click the Save button to save the date access changes.
- Click the Delete button if you do not want to use this secret URL anymore.
Note
Logged-out users or those who do not have an account can only leave comments on public pages or pages which they can access via a secret URL if the site administrator turned on the Anonymous comments function under Administration → Configure site → User settings.