6.3. 一般
このタブの記事は一般的性質を持つか他のカテゴリに合わないためサイト全体で使用することができます。
When you create a page in a group, you do not have the plans block available as you cannot create plans in groups. Additionally, you can choose the following blocks when you edit the group homepage:
6.3.1. Annotation
あなたのページにアノテーションを追加できるブロックを追加します。
注釈
This feature is an initial implementation of a feature for the SmartEvidence functionality. You can learn more about SmartEvidence from the presentation 「SmartEvidence: Why did it come about, and what is it?」.
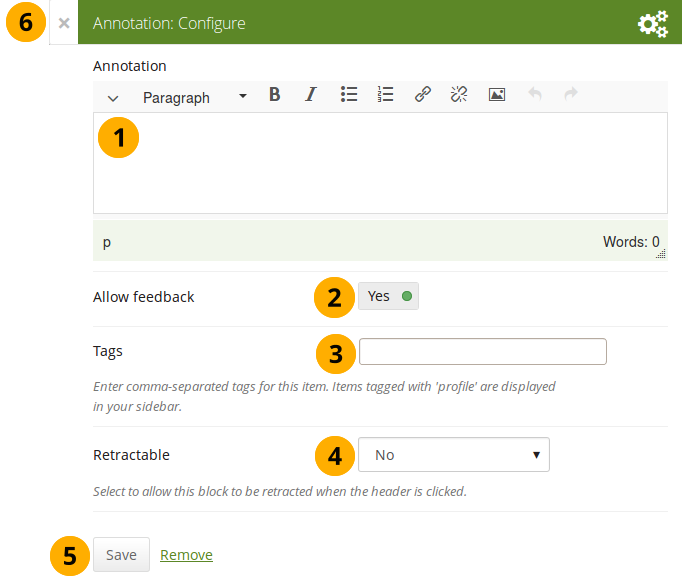
アノテーション ブロックを設定する
- Annotation: Write your annotation for your portfolio page. It will help to situate the evidence that you put together on the page, establish the context and tie things together.
- Allow feedback: When you allow feedback on your annotation, others can leave feedback as usual. However, as soon as the first feedback has been added, you will not be able to make changes to your annotation text anymore. That is to ensure that the feedback still relates back to the annotation.
- Tags: Enter tags to find your annotation more easily at a later stage. Separate your tags with commas. If you already have tags, you can click on the link Show my tags and select the ones that you think will fit for this collection as well. They will be entered into the text field for you.
- 格納: あなたがユーザにブロックのヘッディングのみに表示を減らすことができるようにするか自動的にヘッディングのみ表示するか選択してください。オプションは次のとおりです:
- No: 常にブロックおよびコンテンツが表示されます。
- Yes: ユーザが*格納*アイコン|retractable|をクリックしてブロックをヘッディングのみに減らすことができるようにします。
- 自動格納: ブロックのヘッダのみ表示されます。ユーザは*格納*アイコン|retracted|を使用してコンテンツを表示することができます。
- あなたの変更を受け入れるには*保存*ボタンをクリックしてください。ブロックコンテンツをそのままにするには*キャンセル*をクリックしてください。あなたがページにブロックを置く場合、最初に*削除*のみ表示されます。
- You can also click the Close button in the top left-hand corner of the modal window to either remove a newly created block before it is being saved or to cancel any changes and leave the block’s content as it is.
6.3.2. クリエイティブ・コモンズ・ライセンス
あなたのページがどのCreative Commons license <http://creativecommons.org/licenses/>`で作成されているのかユーザに示すためのブロックを追加します。
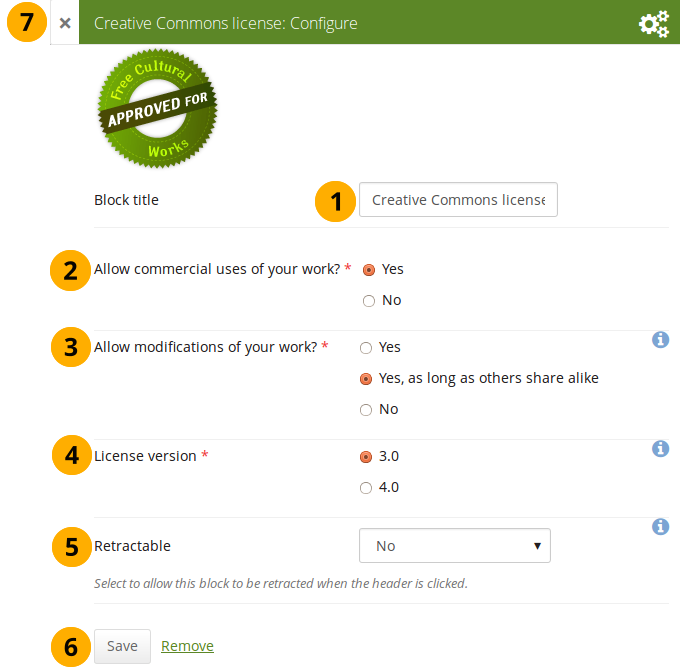
クリエイティブ・コモンズ・ライセンス ブロックを設定する
ブロックタイトル: あなたのブロックのタイトルを選択してください。
あなたの作品の商用利用を許可しますか? あなたの作品をユーザが商用のために再利用できるかどうか決定してください。
あなたの作品の修正を許可しますか? あなたの作品を他の人が改変することができるか、また改変できる場合、どのような条件の下で許可するか決定してください。
License version: Select under which Creative Commons license you wish to publish your work. You can choose between
- クリエイティブ・コモンズ 3.0
- クリエイティブ・コモンズ 4.0
参考
Check out what is new in Creative Commons 4.0, and why you may want to choose that license.
格納: あなたがユーザにブロックのヘッディングのみに表示を減らすことができるようにするか自動的にヘッディングのみ表示するか選択してください。オプションは次のとおりです:
- No: 常にブロックおよびコンテンツが表示されます。
- Yes: ユーザが*格納*アイコン|retractable|をクリックしてブロックをヘッディングのみに減らすことができるようにします。
- 自動格納: ブロックのヘッダのみ表示されます。ユーザは*格納*アイコン|retracted|を使用してコンテンツを表示することができます。
あなたの変更を受け入れるには*保存*ボタンをクリックしてください。ブロックコンテンツをそのままにするには*キャンセル*をクリックしてください。あなたがページにブロックを置く場合、最初に*削除*のみ表示されます。
You can also click the Close button in the top left-hand corner of the modal window to either remove a newly created block before it is being saved or to cancel any changes and leave the block’s content as it is.
6.3.3. Comments
注釈
 「Feedback」 was renamed to 「Comments」.
You can move the comments section from the bottom of a page elsewhere onto your page to integrate it better with your page content. Please note the following:
- このブロックに設定で設定できるものはありません。
- You only see comments when you display a page, but not in edit mode.
- You can only place 1 comment block onto a page.
- Comments for individual artefacts is still placed at the bottom of the artefact details pages because you cannot put a block onto these pages.
- You can move the block like any other block on your page. If you delete the block, the comments are displayed at the bottom of the page again.
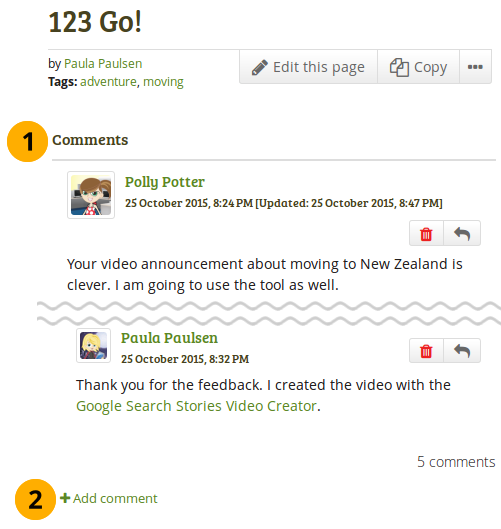
フィードバックブロックがページでどのように見えるのか
- The block has the heading 「Comments」 unless your Mahara installation uses a different word.
- When you click the Add comment link, a modal window is displayed in which you can enter your comments with all the usual functionality.
6.3.4. グループ情報
このブロックはグループホームページのデフォルトブロックです。利用できる設定はありません。
注釈
このブロックはグループホームページでのみ使用することができます。
グループ情報ブロック内のアイテム
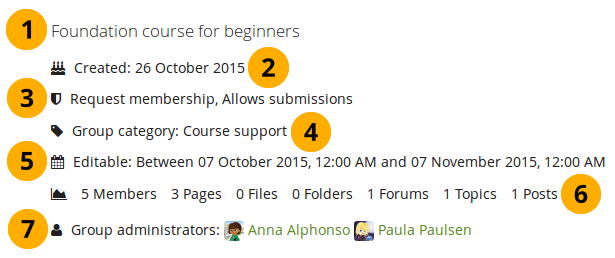
ブロックに含まれる情報:
- Description of the group
- Group creation date
- Type of group
- Group category if any was chosen
- Dates between which regular group members can participate in group activities. This information is only visible if any dates were entered in the group settings.
- Group statistics
- グループメンバー数
- グループ内に作成されたページ数
- グループにアップロードされたファイル数
- グループ内で作成されたフォルダ数
- グループ内で作成されたフォーラム数
- グループに作成されたフォーラムトピック数
- グループに投稿されたフォーラムトピック数
- Group administrators
6.3.5. グループメンバー
このブロックはグループホームページのデフォルトブロックです。あなたはメンバープロファイル画像および氏名を表示することができます。
注釈
このブロックはグループホームページでのみ使用することができます。
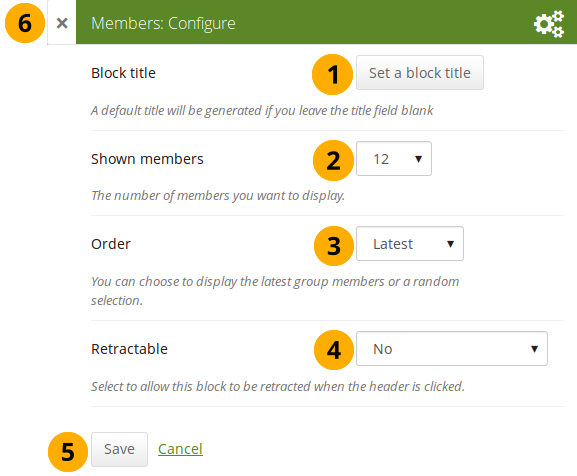
グループメンバー ブロックを設定する
- ブロックタイトル: このブロックに自動作成されるタイトルは 「メンバー」 です。あなたの希望する別のタイトルを設定することができます。
- Shown members: Choose how many members (between 1 and 100) are shown on the group homepage. All others are accessible via the Members tab in the group. The default number of members displayed is 12.
- 順番: メンバーの表示順を選択してください。オプションは次のとおりです:
- Latest: Display members according to their group joining date in reverse chronological order.
- Random: Let Mahara decide which members to display.
- 格納: あなたがユーザにブロックのヘッディングのみに表示を減らすことができるようにするか自動的にヘッディングのみ表示するか選択してください。オプションは次のとおりです:
- No: 常にブロックおよびコンテンツが表示されます。
- Yes: ユーザが*格納*アイコン|retractable|をクリックしてブロックをヘッディングのみに減らすことができるようにします。
- 自動格納: ブロックのヘッダのみ表示されます。ユーザは*格納*アイコン|retracted|を使用してコンテンツを表示することができます。
- あなたの変更を受け入れるには*保存*ボタンをクリックしてください。ブロックコンテンツをそのままにするには*キャンセル*をクリックしてください。あなたがページにブロックを置く場合、最初に*削除*のみ表示されます。
- You can also click the Close button in the top left-hand corner of the modal window to either remove a newly created block before it is being saved or to cancel any changes and leave the block’s content as it is.
6.3.6. グループページ
このブロックはグループホームページのデフォルトブロックです。あなたはグループで作成されたページをこのブロックで表示および共有することができます。
注釈
このブロックはグループホームページでのみ使用することができます。
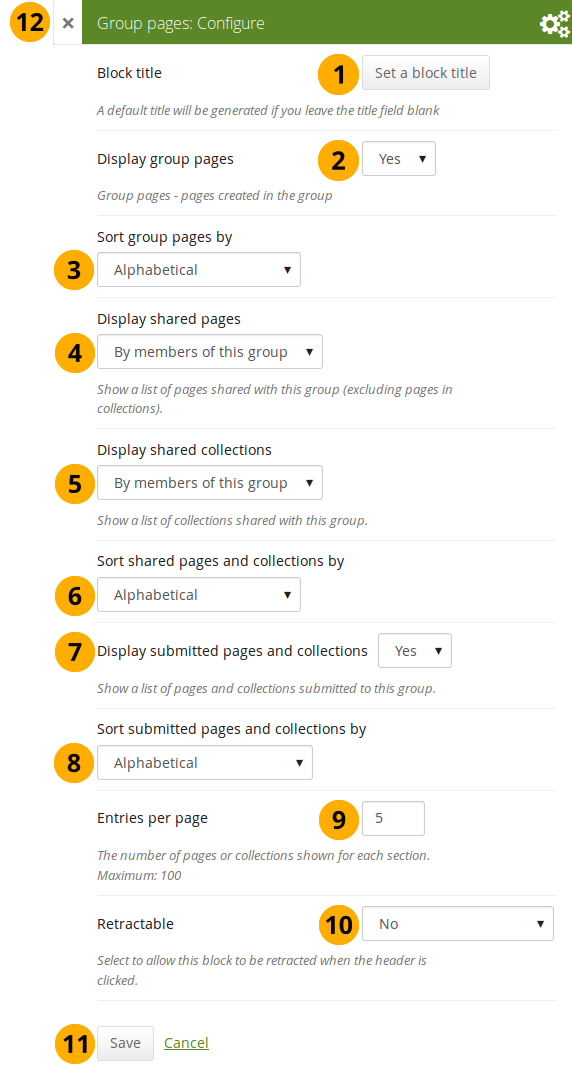
グループページ ブロックを設定する
ブロックタイトル: このブロックに自動作成されるタイトルは 「メンバー」 です。あなたの希望する別のタイトルを設定することができます。
グループページを表示する: グループ内に作成されるページを表示するかどうか指定してください。デフォルトオプションは「Yes」です。
Sort group pages by: Choose in which order to display pages created in the group. 「Alphabetical」 is the default option, but you can also display them based on when they were last updated.
共有ページを表示する: ユーザがグループと共有しているページを表示するかどうか決定します。オプションは次のとおりです:
なし: 共有ページは表示されません。
By members of this group: Display only pages that have been shared by members of the group.
注釈
This option is particularly well-suited for groups that are used for class purposes. That way, students can share their pages or collections with the group for a long time, but the administrator can choose to display only pages of group members but not those that are not members anymore. The pages of non-group members are still accessible via the Shared with me functionality.
誰でも: グループと共有されているページすべてを表示します。
共有コレクションを表示する: ユーザがグループと共有しているコレクションを表示するかどうか決定してください。オプションは次のとおりです:
- なし: 共有コレクションは表示されません。
- By members of this group: Display only collections that have been shared by members of the group.
- 誰でも: グループと共有されているコレクションすべてを表示します。
注釈
Submitted pages are not displayed in the section of 「Shared pages」 and 「Shared collections」 to avoid confusion whether they have been shared with the group or not.
Sort shared pages and collections by: Choose in which order to display pages and collections shared with the group. 「Alphabetical」 is the default option, but you can also display them based on when they were last updated.
Display submitted pages and collections: Decide whether to display pages and collections that group members submitted to the group. There is no distinction made between pages and collections. 「Yes」 is the default option.
Sort submitted pages and collections by: Choose in which order to display pages and collections submitted to the group. 「Alphabetical」 is the default option, but you can also display them based on when they were last updated.
Entries per page: Choose the maximum number of pages or collections you wish to see on the group homepage for the above before a paginator is displayed. You can display a maximum of 100 items per category.
格納: あなたがユーザにブロックのヘッディングのみに表示を減らすことができるようにするか自動的にヘッディングのみ表示するか選択してください。オプションは次のとおりです:
- No: 常にブロックおよびコンテンツが表示されます。
- Yes: ユーザが*格納*アイコン|retractable|をクリックしてブロックをヘッディングのみに減らすことができるようにします。
- 自動格納: ブロックのヘッダのみ表示されます。ユーザは*格納*アイコン|retracted|を使用してコンテンツを表示することができます。
あなたの変更を受け入れるには*保存*ボタンをクリックしてください。ブロックコンテンツをそのままにするには*キャンセル*をクリックしてください。あなたがページにブロックを置く場合、最初に*削除*のみ表示されます。
You can also click the Close button in the top left-hand corner of the modal window to either remove a newly created block before it is being saved or to cancel any changes and leave the block’s content as it is.
注釈
A page is considered as modified when the content of at least one block is updated, including the adding of a new Mahara journal entry into the journal block.
6.3.7. 受信箱
受信箱 ブロックではあなたが受信した最新メッセージを表示します。
注釈
このブロックはあなたのダッシュボードでのみ使用することができます。
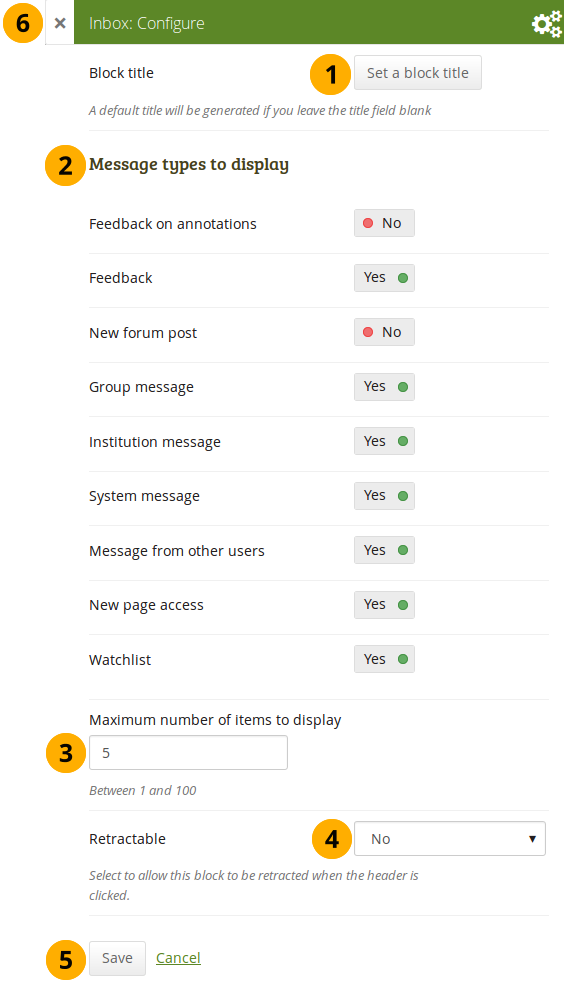
受信箱 ブロックを設定する
- ブロックタイトル: このブロックの自動タイトルは「受信箱」です。あなたは別の名称を設定することもできます。
- Message types to display: Change the switch to 「Yes」 for each message type that you want to display in this block.
- 最大表示アイテム数: あなたのダッシュボードに表示するメッセージ数を決定してください。あなたは1から100の範囲で選択することができます。
- 格納: あなたがユーザにブロックのヘッディングのみに表示を減らすことができるようにするか自動的にヘッディングのみ表示するか選択してください。オプションは次のとおりです:
- No: 常にブロックおよびコンテンツが表示されます。
- Yes: ユーザが*格納*アイコン|retractable|をクリックしてブロックをヘッディングのみに減らすことができるようにします。
- 自動格納: ブロックのヘッダのみ表示されます。ユーザは*格納*アイコン|retracted|を使用してコンテンツを表示することができます。
- あなたの変更を受け入れるには*保存*ボタンをクリックしてください。ブロックコンテンツをそのままにするには*キャンセル*をクリックしてください。あなたがページにブロックを置く場合、最初に*削除*のみ表示されます。
- You can also click the Close button in the top left-hand corner of the modal window to either remove a newly created block before it is being saved or to cancel any changes and leave the block’s content as it is.
6.3.8. Latest changes I can view
The Latest changes I can view block displays the latest portfolios to which you have access across Mahara. This includes pages and collections. Prior to Mahara 15.10 this block was called Latest pages.
注釈
このブロックはあなたのダッシュボードでのみ使用することができます。
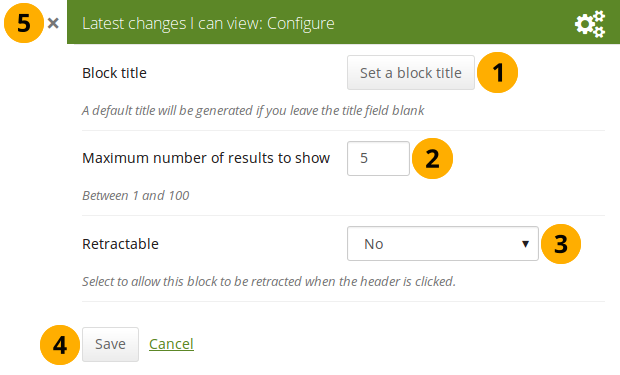
Configure the Latest changes I can view block
- Block title: The automatic title for this block is 「Latest changes I can view」. You can set another one if you wish.
- Maximum number of results to show: Decide how many pages and collections shall be shown on your dashboard. You can choose between 1 and 100.
- Retractable: Choose whether you want to allow users to reduce the block to its heading on a page or see just the heading without the block content automatically. The options are:
- No: 常にブロックおよびコンテンツが表示されます。
- Yes: Allow users to reduce the block to just the heading by clicking on the heading of a block where the Retractable icon is shown.
- Automatically retract: Only the heading of the block is visible, and the user can click on the heading of a block where the Retracted icon is shown to view its content.
- あなたの変更を受け入れるには*保存*ボタンをクリックしてください。または*キャンセル*ボタンをクリックしてブロックコンテンツをそのままにしてください。あなたが最初ページにブロックを置いた時のみ*削除*ボタンが表示されます。
- You can also click the Close icon in the top left-hand corner to either remove a newly created block before it is being saved or to cancel any changes and leave the block’s content as it is.
The block on your dashboard page looks like the following.
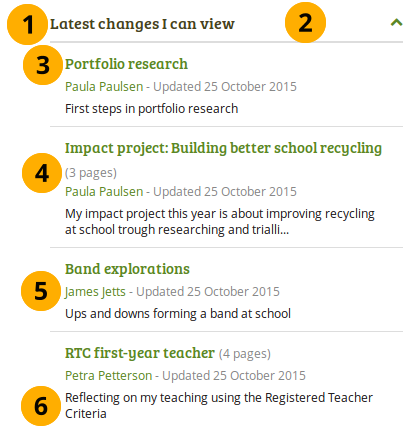
Example of the Latest changes I can view block
- ブロックのタイトルです。
- If you chose a retractable option, you can click on the title or anywhere in the title space to change the block’s behaviour.
- Title of the page or collection to which you have access.
- If it is a collection, you see the number of pages contained within.
- Name of the portfolio author, and when the portfolio was last updated.
- Page or collection description.
6.3.9. ナビゲーション
コレクション内ページへのリンクを表示するため、ナビゲーションブロックを追加します。
注釈
このブロックを使用するにはあなたは少なくとも1つの コレクション を作成する必要があります。
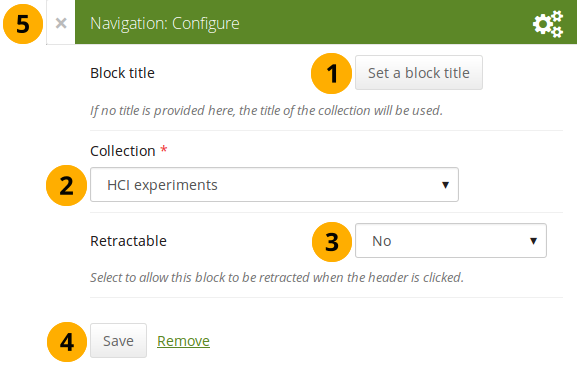
ナビゲーション ブロックを設定する
- ブロックタイトル: あなたが異なるタイトルを選択しない場合、コレクションタイトルは自動的に選択されます。
- コレクション: あなたがブロックにリンクを表示したいコレクションをドロップダウンメニューから選択してください。
- 格納: あなたがユーザにブロックのヘッディングのみに表示を減らすことができるようにするか自動的にヘッディングのみ表示するか選択してください。オプションは次のとおりです:
- No: 常にブロックおよびコンテンツが表示されます。
- Yes: ユーザが*格納*アイコン|retractable|をクリックしてブロックをヘッディングのみに減らすことができるようにします。
- 自動格納: ブロックのヘッダのみ表示されます。ユーザは*格納*アイコン|retracted|を使用してコンテンツを表示することができます。
- あなたの変更を受け入れるには*保存*ボタンをクリックしてください。ブロックコンテンツをそのままにするには*キャンセル*をクリックしてください。あなたがページにブロックを置く場合、最初に*削除*のみ表示されます。
- You can also click the Close button in the top left-hand corner of the modal window to either remove a newly created block before it is being saved or to cancel any changes and leave the block’s content as it is.
6.3.10. ノート
あなたのページにノートを追加します。この機能はあなたが日誌内にテキストを保存したくない場合、しかしテキストを他のページで再利用したい場合に使用することができます。
6.3.10.1. 新しいノートを追加する
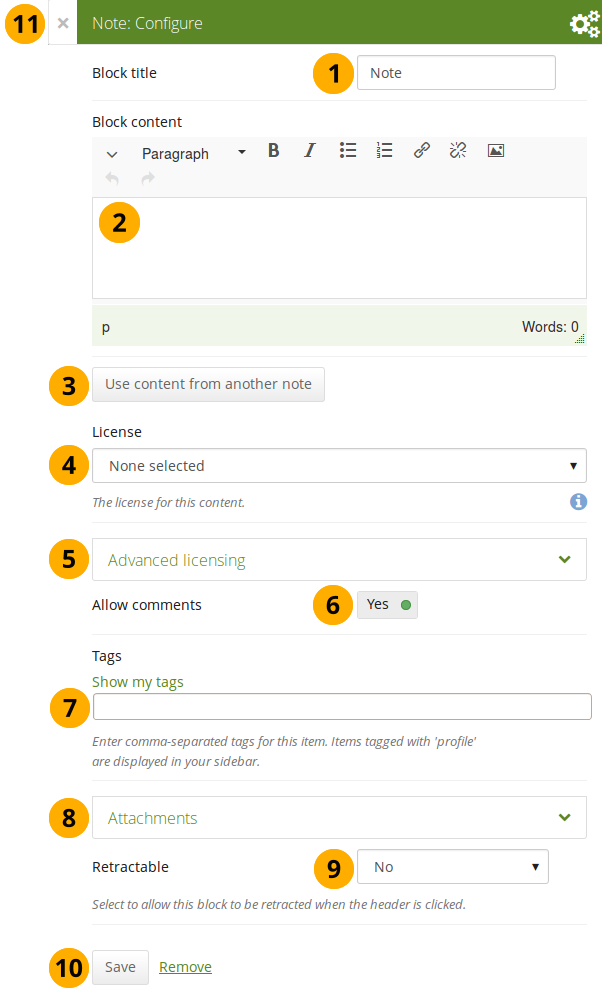
ノート ブロックを設定する
- ブロックタイトル: あなたのノートのタイトルを提供してください。
- ブロックコンテンツ: あなたのテキストを記述します。あなたは書式設定、外部イメージ等を含むことができます。
- Alternatively, you can also use text from another note that you have already written. Click the Use content from another note button to do so.
- License: You see this drop-down menu if the site administrator turned on license metadata. Additionally, if you are in an institution, your institution administrator may require you to provide a license. Your default license is displayed. You can set your default license in your account settings. You may choose a different license for each individual artefact.
- 高度なライセンス: あなたがライセンス情報を入力できる場合、オリジナルのライセンサおよびオリジナルを取得できるURLを提供することもできます。
- Allow comments: Switch this setting to 「No」 if you do not want others to comment on your note. This option is set to 「Yes」 by default.
- Tags: Enter tags to find your note more easily at a later stage. Separate your tags with commas. If you already have tags, you can click on the link Show my tags and select the ones that you think will fit for this collection as well. They will be entered into the text field for you.
- Attachments: Attach a file to a note as additional evidence for the text you are writing.
- 格納: あなたがユーザにブロックのヘッディングのみに表示を減らすことができるようにするか自動的にヘッディングのみ表示するか選択してください。オプションは次のとおりです:
- No: 常にブロックおよびコンテンツが表示されます。
- Yes: ユーザが*格納*アイコン|retractable|をクリックしてブロックをヘッディングのみに減らすことができるようにします。
- 自動格納: ブロックのヘッダのみ表示されます。ユーザは*格納*アイコン|retracted|を使用してコンテンツを表示することができます。
- あなたの変更を受け入れるには*保存*ボタンをクリックしてください。ブロックコンテンツをそのままにするには*キャンセル*をクリックしてください。あなたがページにブロックを置く場合、最初に*削除*のみ表示されます。
- You can also click the Close button in the top left-hand corner of the modal window to either remove a newly created block before it is being saved or to cancel any changes and leave the block’s content as it is.
6.3.10.2. ノートにイメージを追加する
注釈
Please refer to the section 「Insert an image into text」 for more information.
6.3.10.3. ファイルをノートに追加する
ノート ブロックにファイルを添付する
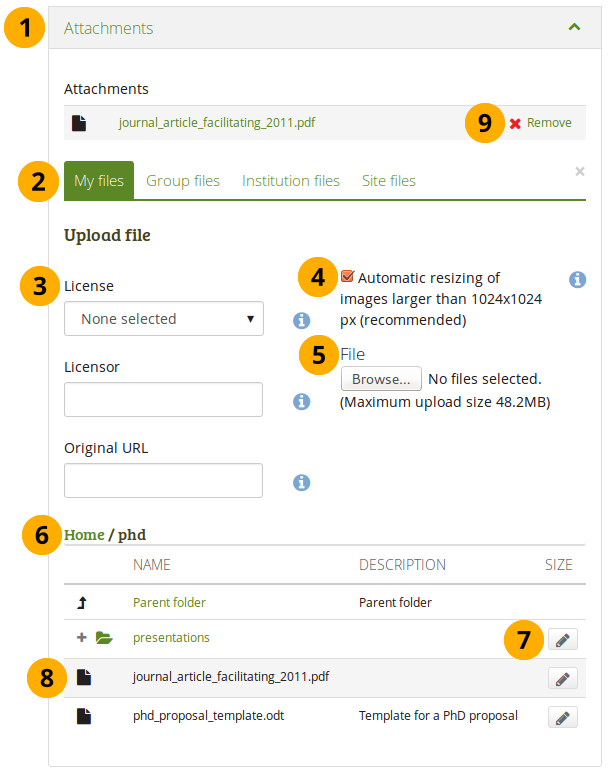
Click the Attachments panel if you wish to add one or more files to a note.
ファイルエリア: あなたが選択したいファイルをファイルエリアから選択してください:
- マイファイル: あなたが作成したフォルダおよびファイルすべてが表示されます。
- グループファイル: :ref:`あなたが公開できるフォルダおよびファイル <group_files>`すべてが表示されます。
- インスティテューションファイル: あなたがインスティテューション管理者の場合、インスティテューションフォルダおよびファイルが表示されます。
- サイトファイル: あなたがサイト管理者の場合、すべてのサイトフォルダおよびファイルが表示されます。そうでない場合、あなたには*サイトファイル*内の*パブリック*フォルダのみ表示されます。
License information: You see these fields if the site administrator turned on license metadata. Additionally, if you are in an institution, your institution administrator may require you to provide a license.
- ライセンス: あなたのデフォルトライセンスが表示されます。あなたのデフォルトライセンスを:ref:`アカウント設定<general_account_options>`で設定することができます。あなたはアーティファクトに関して個別に異なるライセンスを選択することができます。
- ライセンサ: 誰かが作成したファイルをアップロードする場合、あなたはここで作品に対して例えば氏名等の謝辞を提供することができます。
- オリジナルURL: あなたが他の人のファイルをアップロードする場合、他のユーザがアクセスしてオリジナルファイルを閲覧できるようオリジナルのインターネットアドレスを提供してください。
サイト管理者が イメージリサイズオプション を有効にした場合、イメージが指定されたサイズより大きい場合にリサイズするかどうか指定することができます。あなたのポートフォリオのスペースを節約するためにこのオプションをお勧めします。
ファイル: あなたのファイルをアップロードするために コンテンツ の ファイル エリアに戻る必要はありません。あなたはこの画面より直接アップロードすることができます。
フォルダパス:ブレッドクラムでは、あなたの現在のフォルダを表示します。
Click the Edit button to change any component of a folder or file, i.e. its name, description and tags. If you have a folder or file included in a page that you submitted for feedback, you will not be able to edit them.
注釈
あなたは別のポートフォリオページに送信されたファイルを選択することもできます。
あなたが表示したいブロックを選択するにはファイルを含む行をクリックしてください。
警告
あなたがグループ、インスティテューションまたはサイトファイルをページに配置した場合、これらのファイルは所有者が削除した時点で利用できなくなることに留意してください。
あなたの選択を元に戻したい場合、*削除*をクリックしてください。
Continue editing your note and save it.
6.3.10.4. 既存のノートからテキストを再利用する
あなたは最初にページをコピーせずに別のノート1ページからテキストを再利用することができます。
警告
あなたがブロック設定内のノートコンテンツをコピーしない場合、テキストが変更された時点でこのノートが使用されている他のインスタンスすべてのテキストが変更されます。
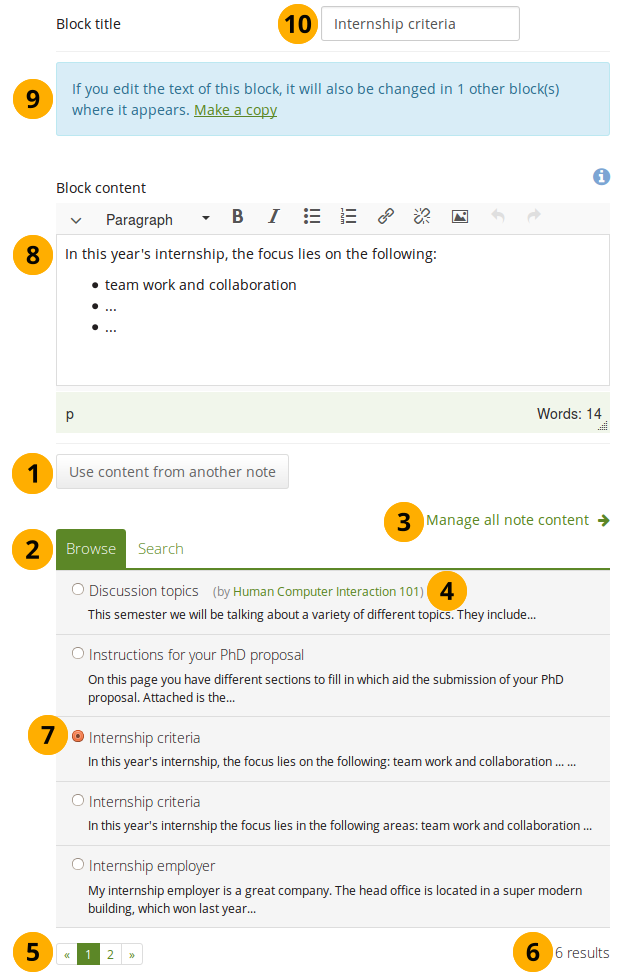
テキストをコピーして ノート ブロックを設定する
Click the button Use content from another note to view all notes to which you have access. These can be:
- あなたのノート
- あなたがコピーできるグループページのノート
- インスティテューションのノートまたはあなたがアクセスできるサイトページ
あなたが再利用できるノートを探すには 閲覧 または 検索 をクリックしてください。
Click the Manage all note content link to be taken to your personal Notes if you can’t find what you are looking for.
All notes are listed with their title and the first line. If a note does not belong to you but for example to a group, you see the author next to the note’s title.
あなたのノートが5ページ以上ある場合、ノート間の移動にページネータを使用してください。
You see the number of notes that you have access to.
Click the radio button in front of a note that you want to use in this page.
あなたが選択したノートのコンテンツは ブロックコンテンツ ボックスに表示されます。あなたはコンテンツを変更することができます。
警告
このノートが表示される他のすべてのインスタンスでテキストが変更されます。
If you wish to make changes to the note, but do not want to change it everywhere else, click the Make a copy link above the Block content. The text is then retained, but it is treated like a new note and the original note is not changed.
Block title: Review the block title and make changes if necessary. Once you copied a note, the original block title is entered here.
注釈
You can change the block title no matter whether you change the content of the note or not.
All other functionality that you see on the screen is the same as for adding a new note.
6.3.11. プラン
あなたのプランの1つをブロック内に表示します。
注釈
このブロックを使用するため、あなたは少なくとも1つのプランを作成する必要があります。
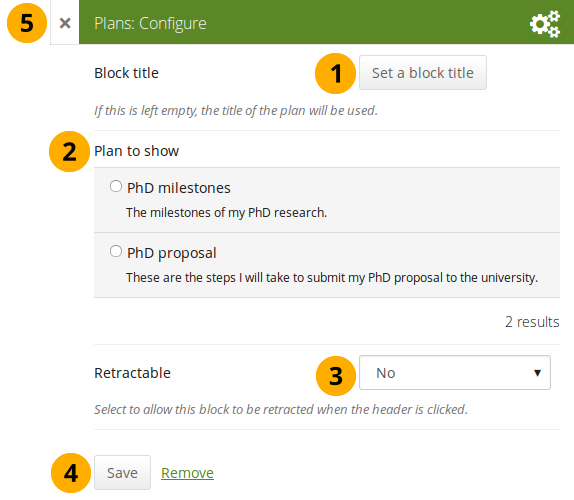
プラン ブロックを設定する
- ブロックタイトル: あなたが異なるタイトルを提供しない場合、プランのタイトルは自動的に選択されます。
- 表示するプラン: あなたのページに表示したいプランを選択してください。
- 格納: あなたがユーザにブロックのヘッディングのみに表示を減らすことができるようにするか自動的にヘッディングのみ表示するか選択してください。オプションは次のとおりです:
- No: 常にブロックおよびコンテンツが表示されます。
- Yes: ユーザが*格納*アイコン|retractable|をクリックしてブロックをヘッディングのみに減らすことができるようにします。
- 自動格納: ブロックのヘッダのみ表示されます。ユーザは*格納*アイコン|retracted|を使用してコンテンツを表示することができます。
- あなたの変更を受け入れるには*保存*ボタンをクリックしてください。ブロックコンテンツをそのままにするには*キャンセル*をクリックしてください。あなたがページにブロックを置く場合、最初に*削除*のみ表示されます。
- You can also click the Close button in the top left-hand corner of the modal window to either remove a newly created block before it is being saved or to cancel any changes and leave the block’s content as it is.
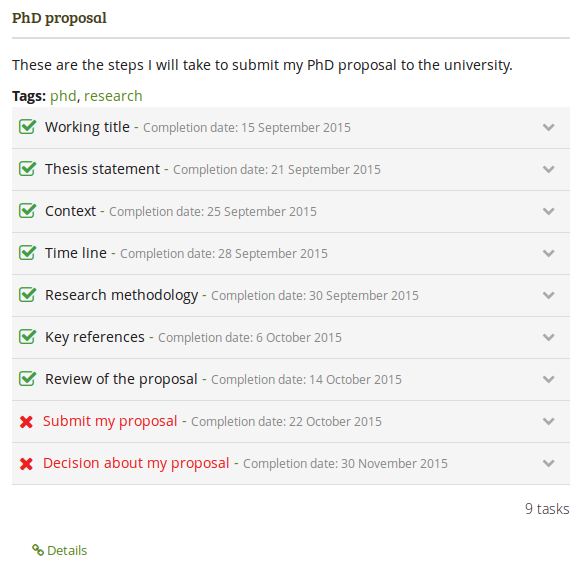
ポートフォリオページの埋め込みプランの結果です。リンクタイトルをクリックすることにより、あなたには個々のタスクの説明が表示されます。
6.3.12. 最近のフォーラム投稿
指定された数の最近の投稿を1つのグループから1ページ内に表示します。
注釈
このブロックを使用するにはあなたは少なくとも1つの:ref:`グループ <groups>`のメンバーである必要があります。
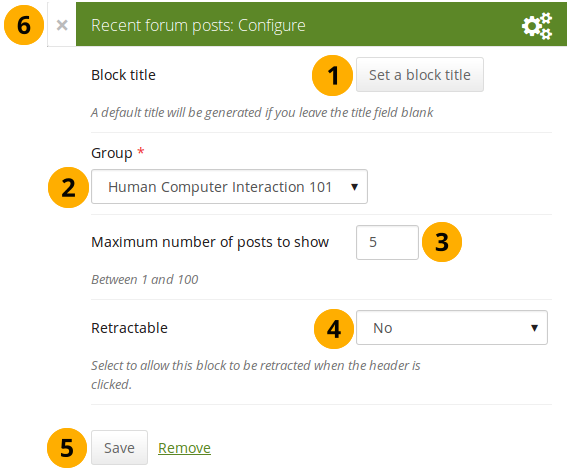
最近のフォーラム投稿 ブロックを設定する
- ブロックタイトル: あなたが異なるタイトルを提供しない限り、自動的にブロックタイトルが生成されます。デフォルトタイトルは「最近のフォーラム投稿」です。
- グループ: あなたが表示したいフォーラム投稿のグループを選択してください。
- 最大表示投稿数: あなたが表示したい最新投稿数を決定してください。デフォルト値は5です。あなたは最大100件表示することができます。
- 格納: あなたがユーザにブロックのヘッディングのみに表示を減らすことができるようにするか自動的にヘッディングのみ表示するか選択してください。オプションは次のとおりです:
- No: 常にブロックおよびコンテンツが表示されます。
- Yes: ユーザが*格納*アイコン|retractable|をクリックしてブロックをヘッディングのみに減らすことができるようにします。
- 自動格納: ブロックのヘッダのみ表示されます。ユーザは*格納*アイコン|retracted|を使用してコンテンツを表示することができます。
- あなたの変更を受け入れるには*保存*ボタンをクリックしてください。ブロックコンテンツをそのままにするには*キャンセル*をクリックしてください。あなたがページにブロックを置く場合、最初に*削除*のみ表示されます。
- You can also click the Close button in the top left-hand corner of the modal window to either remove a newly created block before it is being saved or to cancel any changes and leave the block’s content as it is.
6.3.13. Text
あなたのページにテキストを追加します。この機能はあなたが再利用する必要のないページにテキストのスニペットを追加する時に使用することができます。
注釈
In a default Mahara instance, this block is available in the content chooser at the top together with the Image block. It does not appear in the section General as well.
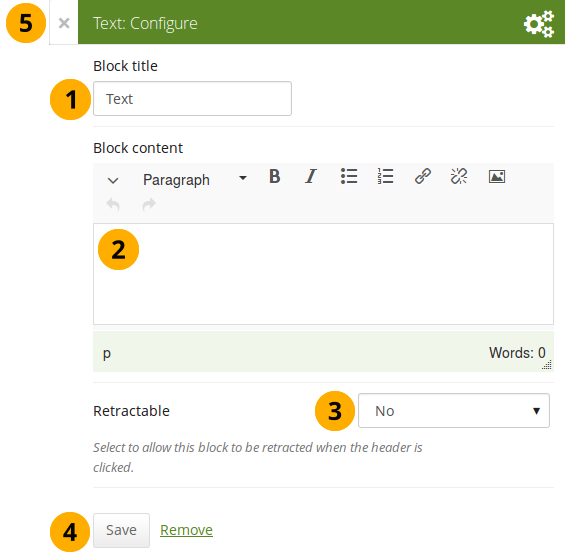
テキスト ブロックを設定する
- ブロックタイトル: あなたのテキストのタイトルを入力してください。
- ブロックコンテンツ: あなたのテキストを記述します。あなたは書式設定、外部イメージ等を含むことができます。
- 格納: あなたがユーザにブロックのヘッディングのみに表示を減らすことができるようにするか自動的にヘッディングのみ表示するか選択してください。オプションは次のとおりです:
- No: 常にブロックおよびコンテンツが表示されます。
- Yes: ユーザが*格納*アイコン|retractable|をクリックしてブロックをヘッディングのみに減らすことができるようにします。
- 自動格納: ブロックのヘッダのみ表示されます。ユーザは*格納*アイコン|retracted|を使用してコンテンツを表示することができます。
- あなたの変更を受け入れるには*保存*ボタンをクリックしてください。ブロックコンテンツをそのままにするには*キャンセル*をクリックしてください。あなたがページにブロックを置く場合、最初に*削除*のみ表示されます。
- You can also click the Close button in the top left-hand corner of the modal window to either remove a newly created block before it is being saved or to cancel any changes and leave the block’s content as it is.
注釈
Please refer to the section 「Insert an image into text」 for more information on adding an image to the text block.
6.3.14. ウォッチページ
ウォッチページ ブロックはあなたのウォッチリストのページを表示します。
注釈
このブロックはあなたのダッシュボードでのみ使用することができます。
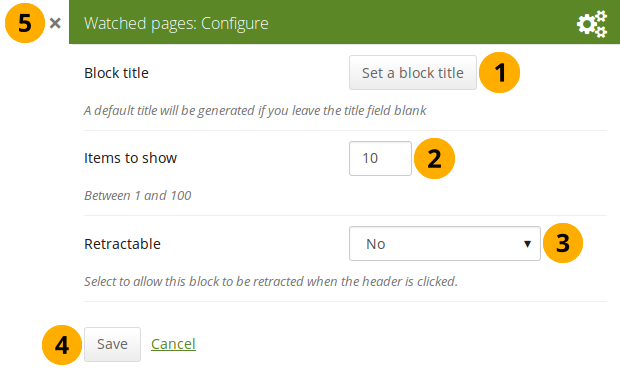
ウォッチページ ブロックを設定する
- ブロックタイトル: このブロックの自動タイトルは「ウォッチページ」です。あなたは別のタイトルを設定することができます。
- 表示するアイテム: あなたのダッシュボードに何ページ表示するか決定してください。あなたは1から100の範囲で選択することができます。
- Retractable: Choose whether you want to allow users to reduce the block to its heading on a page or see just the heading without the block content automatically. The options are:
- No: 常にブロックおよびコンテンツが表示されます。
- Yes: ユーザが*格納*アイコン|retractable|をクリックしてブロックをヘッディングのみに減らすことができるようにします。
- 自動格納: ブロックのヘッダのみ表示されます。ユーザは*格納*アイコン|retracted|を使用してコンテンツを表示することができます。
- あなたの変更を受け入れるには*保存*ボタンをクリックしてください。または*キャンセル*ボタンをクリックしてブロックコンテンツをそのままにしてください。あなたが最初ページにブロックを置いた時のみ*削除*ボタンが表示されます。
- You can also click the Close button in the top right-hand corner to either remove a newly created block before it is being saved or to cancel any changes and leave the block’s content as it is.
View your watchlist on your dashboard.
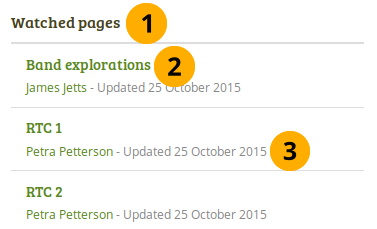
View the Watched pages block
ブロックのタイトルです。
注釈
If you chose a retractable option, you can click on the title or anywhere in the title space to change the block’s behaviour.
Title of the watched page. You can click the link to be taken to her.
- View the page owner and the date when the page was last updated. This is in particular important information when all your watched pages have the same or a similar title.