8.3. ユーザ
ユーザ メニューにおいて、サイト管理者は次のことができます:
- ユーザを検索する
- 個々のユーザの設定を変更する
- ユーザを利用停止および削除する
- ユーザをサイトスタッフまたは管理者にする
- 管理通知設定を確認する
- add users manually or by CSV
8.3.1. ユーザ検索
Site administrators can search for any user on the entire site. You can search for their
- 名
- 姓
- 表示名
- ユーザー名
- メールアドレス
注釈
The display name is not shown in the user list. That will be a feature of Mahara 1.5.
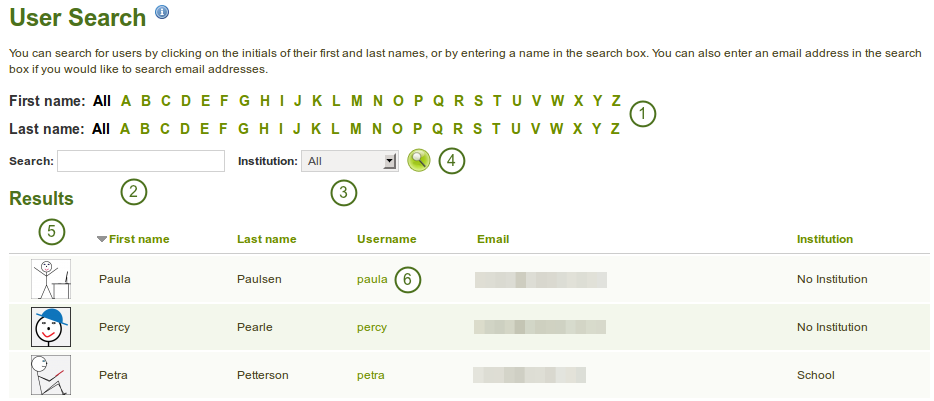
ユーザ検索
あなたは検索およびフィルタオプションも組み合わせることができます。あまりにも多くを組み合わせた場合、あなたは結果を取得できない場合があります。
- あなたが表示したいユーザの姓または名のイニシャルをフィルタします。
- Type the name, display name, username or email address or any partial thereof you wish to search for in the search field.
- あなたがユーザを探したいインスティテューションをドロップダウンメニューより選択してください。
- Click the Search button
 to start searching.
 - View your results. The default order is alphabetically according the the first name. However, you can change the order of the results by clicking on a heading and sort that column in ascending or descending order.
- あなたが さらに操作したい ユーザのユーザ名をクリックしてください。
8.3.2. ユーザアカウント設定
On the Account settings page of a user in the administration area, you can perform a number of actions to manage the user’s account. However, you cannot change personal information about this user, e.g. name, email, from this page. This can only be done in the Content area of the user’s account.
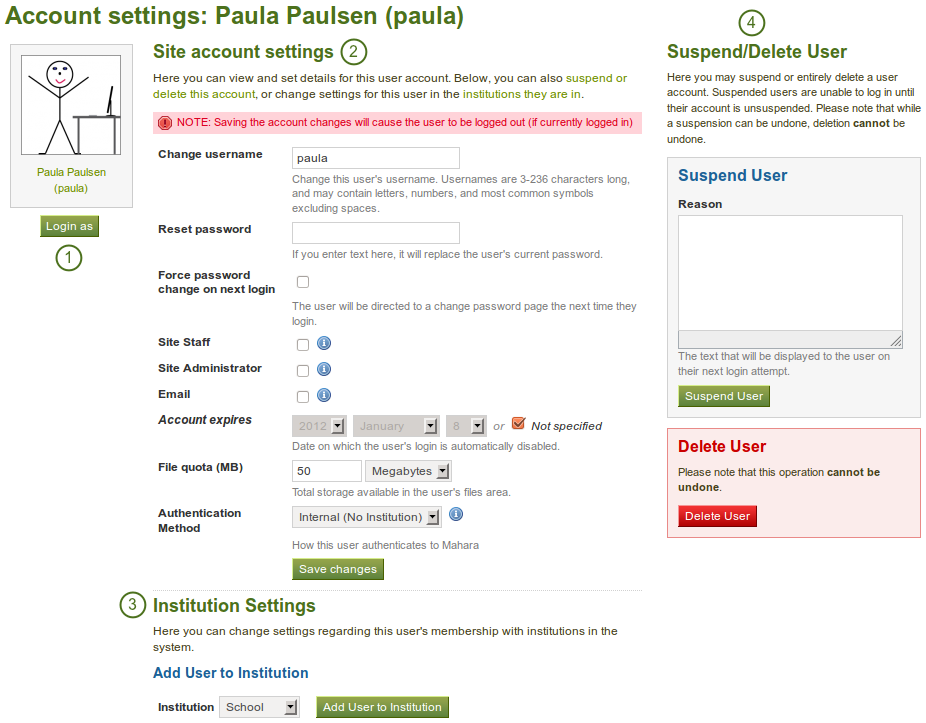
Overview of the user account settings page
- 代理ログイン
- サイトアカウント設定を変更する
- インスティテューション設定を変更する
- Suspend and / or delete this user
8.3.2.1. 代理ログイン
As administrator you have the power to log in as any user that you manage ans masquerade as them. If you are a site administrator, you can log in as any user while institution administrators can only perform this action for any user who is in their user management.
It is a great function for troubleshooting a user account because you see everything as the user would without having to know his password.
警告
This function can easily be misused by an administrator because he can make changes to the user’s portfolio and artefacts as well as participate in groups while logged in as that user. Users should be aware of this function and that an administrator can enter their account.
Sites should have clear policies around the use of this function so that the privacy of users and their portfolios and collaborative work is protected. Therefore, there should also not be many users within an institution who have administrator rights.
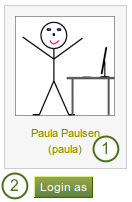
Login as another user
- Click on the user’s name to go to his profile page.
- そのユーザになる場合、xxxxx としてログインする ボタンをクリックしてください。あなたが別のユーザとしてログインしていることを示す赤いバーがブラウザウィンドウ上部に表示されます。
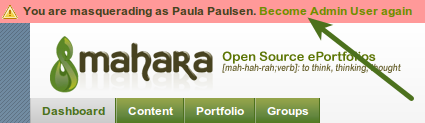
Stop masquerading as another user
When you want to return to your own account again, click the Become [your user name] again link at the top of the browser window.
8.3.2.2. サイトアカウント設定を変更する
あなたはユーザアカウントの多くの設定を表示および変更することができます。
注釈
このユーザに関連付けられている認証方法により、あなたはすべての設定を編集できない場合もあります。
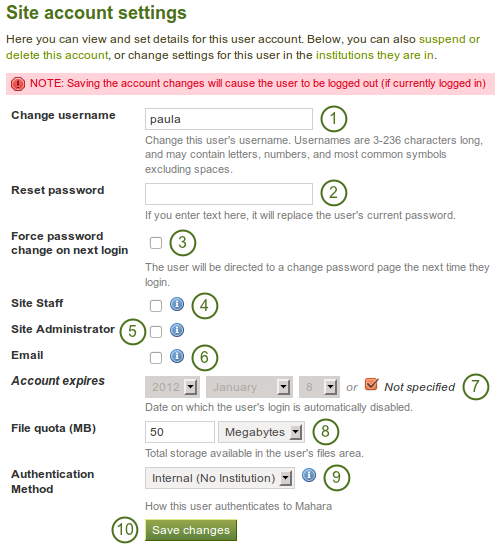
Site account settings of a user
- ユーザ名を変更する: 異なるユーザ名を入力してください。アカウントが外部認証方法で管理されている場合、このフィールドは利用できません。
- パスワードをリセットする: このユーザアカウントのパスワードを変更します。アカウントが外部認証方法で管理されている場合、このフィールドは利用できません。
- Force password change on next login: Check this box if the user shall change his password when he next logs in. This field is not available when the account is managed by an external authentication method.
- Site staff: Check this box if the user shall be able to create controlled groups.
- Site administrator: Check this box if the user shall have full administrative rights.
- Email: Check this box to disable the sending of emails for this user. If email is disabled notifications and messages can only be viewed in the internal inbox. Depending on your setup, if emails are bounced back to the sender, then email may be automatically disabled.
- Account expires: Choose the date on which the user’s login is automatically disabled. The default setting is that the date is not specified. You always see the current date in the greyed out date fields. You can set an automatic account expiry date for all users in the account settings of the site configuration.
- File quota (MB): Change the storage allowance for a user’s personal files area. The default value as set in the files configuration in the plugin administration.
- Authentication method: Choose the authentication method that the user uses to log in to Mahara. The authentication methods can be set up in the institution administration. Depending on the authentication method that you have chosen, you may have to provide a remote username to allow the user to log in.
- あなたが設定編集を完了した場合、変更を保存する ボタンをクリックしてください。
警告
メールアドレスが無効にされた場合、メールが送信されないため、ユーザはパスワードをリセットすることができません。
8.3.2.3. インスティテューション設定を変更する
You can view and change settings regarding a user’s membership in institutions. Depending on the site settings for institutions, a user may be added to more than one institution.

Institution settings for a user
- Choose the institution from the drop-down menu to which you want to add this user.
- Click the Add User to Institution button to make him a member of this institution.
- Membership expires: If you wish, specify the date when the user will be removed from this institution automatically. If you click the 「Not specified」 check box, no end date will be set.
- IDナンバー: インスティテューションにおけるユーザの任意のIDを入力してください。ユーザはこのフィールドを編集することはできません。
- Institution staff: Check this box if you want to give this user staff rights in this institution. This will allow him to create controlled groups.
- Institution admin: Check this box if you want to make this user an administrator of this institution. This will allow him to manage all users in this institution.
- あなたの変更を保存するには、更新 ボタンをクリックしてください。
- Click the Remove user from this institution button to disassociate this user from this institution. The user will stay in any other institution that he may be in, and he will also keep his account no matter whether he is in an institution or not.
8.3.2.4. ユーザを利用停止する
Suspend a user if he does not follow the terms and conditions of the site and behaves inappropriately. Suspended users cannot log in, but all their content is still available.
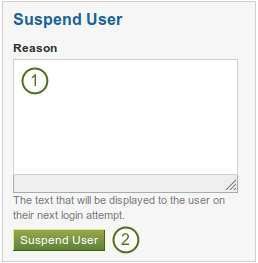
Suspend a user
- Provide a reason for your suspension. This is particularly useful when you are not the only administrator and / or need to remember after some time why you suspended this user.
- Click the Suspend User button to disallow the user from logging in.
When a user has been suspended, the following suspension message appears on his account settings stating the reason for the suspension and giving the administrators the possibility to unsuspend the user by clicking on the Unsuspend User button.
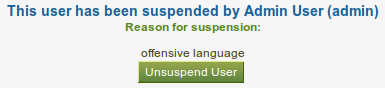
Suspension notice on the account settings page
When the user tries to log in, he will see the suspension message and the reason. He can then contact an administrator via the 「Contact Us」 form for further action.

Suspended user tries to log in and gets suspension message
8.3.2.5. ユーザを削除する
A user can delete his own account from Mahara on his account settings if he is allowed to by his institution. Site administrators can also delete user accounts at any time.
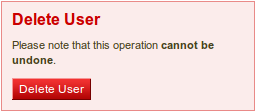
Delete a user account
Click the Delete User button to delete this user account permanently. This action cannot be undone. As this is a permanent action, you see a confirmation pop-up window that you will have to acknowledge.
警告
When you delete a user account, all personal data is wiped from the system. This applies to everything that is in a user’s Content and Portfolio area. This action cannot be undone. His contributions in groups, e.g. forum messages, uploaded files and pages created in a group, are still available, but are made anonymous by changing the name the 「Deleted user」 as author where an author is shown.
注釈
If an account was deleted by accident - either by a user or by an administrator - swift action may result in recovery of (most of) the data from a backup file. This requires access to the server’s backups and the backend of Mahara. More information is available on the wiki.
8.3.3. Suspended users
A list of all suspended users is available in the sub-menu Suspended users. Here you can unsuspend or delete them.

List of all suspended users
- 同じ処理を実行したユーザを選択してください。
- Click the Unsuspend Users button to reinstate the accounts for all selected users.
- Click the Delete Users button to delete all selected users in bulk. This account cannot be undone and all personal information of these users will be deleted (see delete user).
8.3.4. Staff users
On this page you can choose which users receive site staff rights. Potential staff members - any user on the site - are listed on the left while existing site staff members are listed on the right.
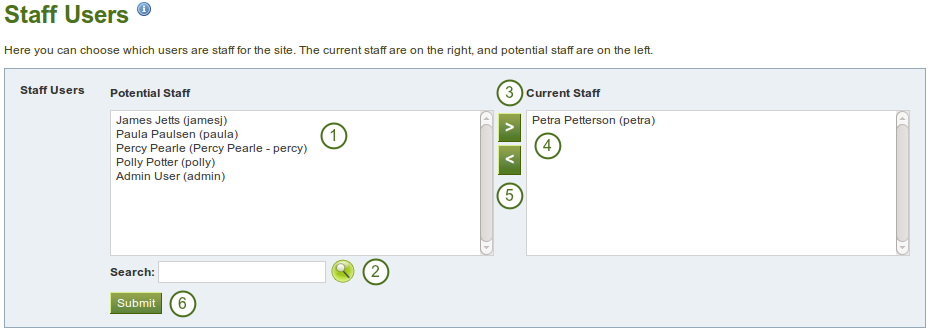
Give site staff rights
- From the list under Potential Staff, select the users you wish to make site staff. You can also select multiple users at once using Ctrl and Shift click.
- If you have too many users on your site and you cannot see / find the user you want, you can search for him in the Search box.
- Add the potential staff members to the right-hand side - Current Staff - by clicking on the right-arrow button
 .
. - If you want to remove an existing or accidentally added site staff member, you can remove him from the list on the right-hand side by clicking on him.
- Then click on the left-arrow button
 , and he is removed from the list.
 - あなたがサイトスタッフにしたいメンバーすべてを選択した後、送信 ボタンをクリックしてください。
8.3.5. サイト管理者
Site administrators have powerful rights on Mahara. They can make far-reaching changes and also log in as other users. Be careful whom you give these rights. One site administrator is needed for each site. The total number of site administrators should be kept small.
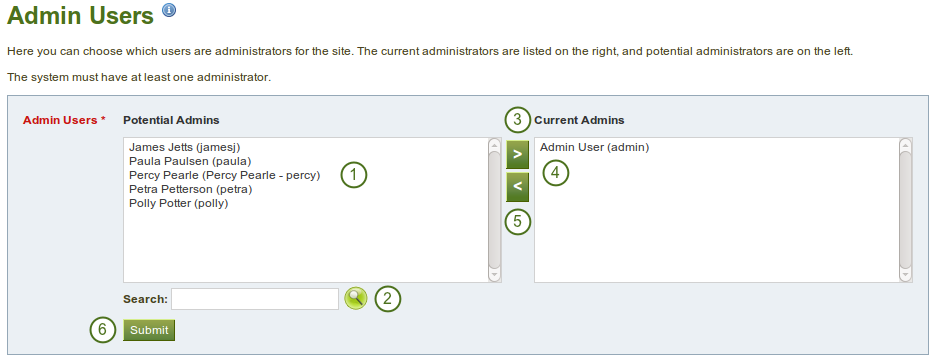
Give site admin rights
- From the list under Potential Admins, select the users you wish to make site administrators. You can also select multiple users at once using Ctrl and Shift click.
- If you have too many users on your site and you cannot see / find the user you want, you can search for him in the Search box.
- Add the potential site admin to the right-hand side - Current Admins - by clicking on the right-arrow button .
- If you want to remove an existing or accidentally added site admin, you can remove him from the list on the right-hand side by clicking on him.
- Then click on the left-arrow button , and he is removed from the list.
- あなたがサイト管理者にしたいユーザを選択した後、送信 ボタンをクリックしてください。
8.3.6. 管理者通知
The Admin Notifications page lists all users with institution and site admin access on your site. It shows their selected notification preferences for all admin notifications. There should be at least one administrator receiving each type of message generated. Admin notifications are:
- お問い合わせ
- 好ましくないコンテンツ
- ウイルスアップロードの繰り返し
- ウイルスフラグリリース

Overview of the admin notification types
8.3.7. ユーザを追加する
手動で1つずつ作成することで、あなたのサイトにユーザを追加することができます。
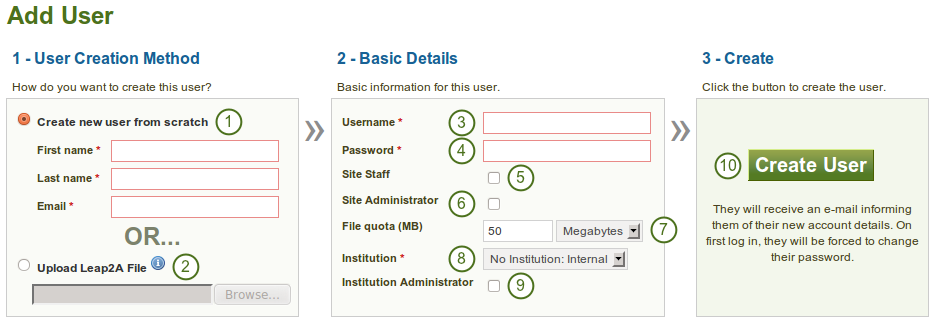
Add a user manually
- あなたが空のアカウントを作成したい場合、ユーザをスクラッチから作成する ラジオボタンをクリックしてください。このユーザに対して、姓名およびメールアドレスを入力してください。
- Click the Upload Leap2A File radio button if you want to import a user from another Mahara instance or a system that supports the Leap2A standard. Such a user could have exported his portfolio from another Mahara instance.
- Give the new user a username. The username may contain letters, numbers and most common symbols. It must be from 3 to 236 characters in length. Spaces are not allowed.
- Choose a password for the account. The password must be at least six characters long and contain at least one digit and two letters.
- Check this box if the new user should have site staff rights.
- Check this box if the new user should have site administrator rights.
- Review the allocated file quota. You may change it here for this user.
- Choose the institution of which the user should be a member.
- Check this box if the new user should have institution administrator rights in the chosen institution.
- Click the Create User account button.
- The user will receive an email with his account details.
注釈
You can change the settings under Basic Details on the account settings page.
8.3.8. Add users by CSV
You can use this function to upload new users in bulk via a csv file (comma-separated file). The first row of your csv file should specify the format of your data. For example, it should look like this:
username,password,email,firstname,lastname,studentid
This row must include:
- ユーザー名
- パスワード
- Eメール
- 名
- 姓
It must also include fields that are mandatory for all users to fill out and any fields locked for the institution you are uploading the users for.
All other fields are optional. This is the full list of fields that you can add in addition to your csv file upload
- studentid - プロファイルに表示される学生ID
- preferredname - 表示名
- イントロダクション - プロファイルに表示されるイントロダクション
- officialwebsite - 公式ウェブサイト
- personalwebsite - パーソナルウェブサイト
- blogaddress - ブログURI
- 住所 - 所在地住所
- 市町村 - 市町村
- city - 市町村
- country - 国
- homenumber - 自宅電話
- businessnumber - 勤務先電話
- mobilenumber - 携帯電話
- faxnumber - FAX番号
- icqnumber - ICQニックネーム
- msnnumber - MSNニックネーム
- aimscreenname - AIMスクリーンネーム
- yahoochat - ヤフーチャットユーザ名
- skypeusername - Skype ID
- jabberusername - Jabber ID
- 職業 - プロファイルに表示される職業
- 職種 - 職種はプロファイルに表示されます。
- maildisabled - Eメールアドレスを無効するには選択してください。
- remoteuser - 外部認証のリモートユーザ名
When you have created your csv file, you are ready to upload it.
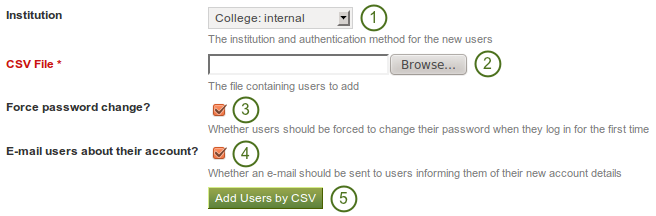
Add users by csv file
- Institution: Choose the institution and the authentication method for the user accounts that you upload. You cannot change the authentication method later on in bulk, but only for each user individually.
- CVS file: You must upload a csv file by clicking on the Browse button and then selecting it from the files on your computer.
- Force password change? If you select this option, users need to change their password before they can log in for the first time.
- Email users about their account? If you select this option, users will receive an email with their account information. This is in particular good for internal accounts. For user accounts that are managed for example by SSO with Moodle or through LDAP, you do not have to select this option because the users should already know their login information.
- Click the Add Users by CSV button to upload the users.
注釈
Depending on your server settings and / or the size of your installation, you may not be able to upload all user accounts at once. You may wish to upload them in bunches of 100 instead.